
This article provides both written and visual instructions for creating a Reveal processing project.
Reveal collects and organizes data for legal matters into containers called Projects. Reveal projects are created for both Review and Processing. Processing and Review projects are linked together so that data can flow seamlessly between the processing and review environments. This article will provide instructions for creating projects in Reveal's processing environment. For instructions on how to create a project in Reveal's review environment, see How to Create a Project.
The Projects Module in Reveal's processing environment gives you the ability to create, manage, and delete projects and clients. After a project is created, the client is represented with the ![]() icon in the Projects Module Navigation as the topmost level icon in the Module Group’s tree view. An active project is represented underneath the client in the group’s tree view with the
icon in the Projects Module Navigation as the topmost level icon in the Module Group’s tree view. An active project is represented underneath the client in the group’s tree view with the ![]() icon. An active project linked to Reveal's review environment in an AWS instance is represented underneath the client in the tree view with a green
icon. An active project linked to Reveal's review environment in an AWS instance is represented underneath the client in the tree view with a green ![]() icon.
icon.
These processing clients, along with their projects, are linked with clients and projects in Reveal's review environment. For instructions on how to create a client in Reveal's processing environment, see How to Create a Processing Client. For instructions on creating clients in Reveal's review environment, see How to Create a Client.
Creating a Project
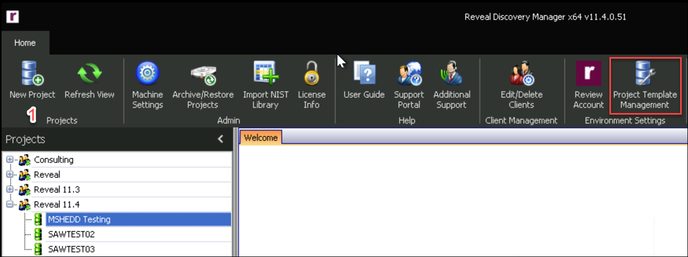
- New Project – Click the New Project button on the Home tab to launch the New Project Creation wizard.
- Project Location – The Project Location screen contains the following setting options:
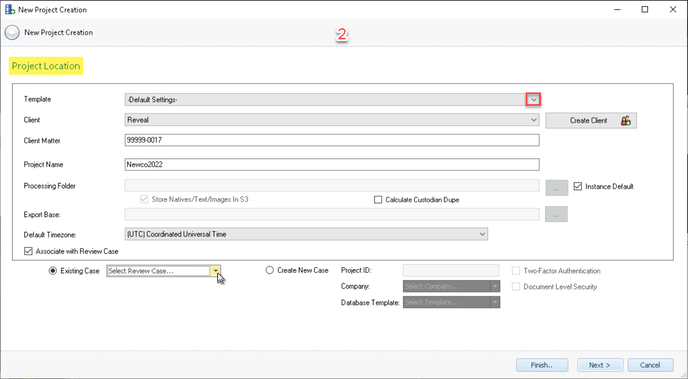
- Template – A collection of saved project settings stored as a Template may be retrieved here.
- If a template is selected from the drop-down, all settings that were saved during a previous New Project configuration will be repopulated in the wizard pages. The selection may be returned to -Default Settings- to clear the template from this project.
- If no template is selected here, the option to save a template is the last step in the project creation process; if a template is saved during this last step, all settings that have been selected in the previous project creation wizard pages will be saved to the template, and the template will be available in the drop-down for creating future projects.
- Templates are managed from the Project Template Management button on the Home ribbon.
- Client – Every project must be associated with a client. If the Client does not exist in the drop-down menu, click the Create Client button. Here you can create the Client Name and enter optional physical address information, or link by checking Associate with Review Client and selecting whether to link to an Existing Client, and selecting that client from the drop down list that is activated, or Create New Client, which will post the new client information entered here to Reveal 11. For details on creating and linking Clients, see How to Create a Processing Client.
- Client Matter – This is the billing number of the client’s project.
- Project Name – This Project Name will be displayed in the Projects Module Navigation.
- Processing Folder – The Processing Folder is the location where Reveal stores all work product for the project.
- The default selection of checking Instance Default will replace the opportunity to set a value here; it will also default to checking Store Natives/Text/Images in S3. It is important that the processing folder’s location contains enough space to process all the data for the project.
- If not using the Instance Default, click the [...] button to create the processing folder by navigating to the appropriate location and clicking Make New Folder.
- To properly maintain the project, never manipulate or delete this folder.
- There is an option to Calculate Custodian Dupe to evaluate hashes on a Custodian (not just the overall project) level. This involves additional processing time and is not selected by default. If enabling Calculate Custodian Dedupe after processing has completed, you will need to:
- Enable the project setting and Save.
- Go to the Custodian module and unassign data from all custodians.
- Reassign data to Custodians.
- Process will kick off to calculate custodian level dedupe.
- Export Base – At this path, a folder named Exports will be created when the first Export is initiated. Underneath this Export folder, a folder will be created for each export using the Export Name. By default, Export Base will default to the project’s Processing Folder set in Instance Settings in the Environment Module and selected by checking Instance Default. To change this, uncheck Instance Default and click the [...] button and browse to another path.
- Default Timezone – This will automatically choose the selected timezone within the Import Module. The timezone can be changed at processing time by selecting a new timezone.
- Instance Default - This checkbox applies Instance Settings configured in the Environment Module to the project, for example, assigning Exports for this project to be written under a defined default Export folder for the current instance of the Reveal processing environment.
- Associate with Review Case – Checking this option allows users in the SaaS environment to push Reveal processing environment jobs directly to a defined Reveal review environment project, and for overlays to be performed as needed.
- Existing Case – Select an existing Reveal review environment project from the drop-down menu enabled with this selection.
- Create New Case – Configure the project for the Reveal review environment by specifying:
- Project ID (which should match the Reveal processing environment ID);
- Company selected from a list available in the Reveal review environment instance;
- Database template selected from a list of available Reveal review environment project templates to set the framework for the review;
- Two-Factor Authentication checked for more secure standard Reveal access; and
- Document Level Security to administer access to individual documents on a granular level.
- Please contact your Reveal Success Coordinator to discuss this option in greater detail. Any change to the project name in Review will be picked up and applied to the related Processing project upon notification and approval of the user.
- Finish – The Finish button expedites the project creation process by jumping to the last page of the Project Wizard. This is typically used when a Template is selected and no settings need to be adjusted past the first wizard page.
- Template – A collection of saved project settings stored as a Template may be retrieved here.
For additional details on further items that may be specified using the New Project Creation wizard, see Reveal Processing - Projects Module.
Linking Processing & Review Projects
Project Settings is where you may modify the specifications entered or derived from an existing template when the project was created. Among the choices available under the General Settings tab is to specify or change the Reveal review environment project (or case) link.

Related Articles
- How to Create Processing Project
- How to Create Processing Client
- How to Link Processing & Review
- How to Create Processing Custodians
- How to Create a Processing Job
- How to Monitor a Processing Job
- How to Manage Exceptions
- How to Generate Processing Reports
- Processing Reports
- How to Search & Filter Data in Processing Environment
- How to Create Selective Sets
Last Updated 11/14/2023