
This article provides both visual and written instructions for combining searches and filters for processed data
Defining a selective set collects documents for actions such as imaging, reports or export. The Selective Set module combines multiple sets of information using Boolean operators (AND, OR, NOT) to define a subset of the entire data population.
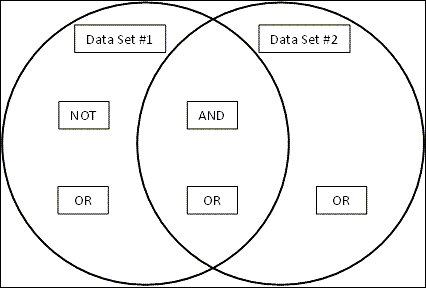
- The AND operator is the overlap of the two data universes.
- The OR operator is both the non-overlap and overlap of the two data universes.
- The NOT operator is the non-overlap of the first data universe.
The following figure illustrates the AND, OR, and NOT operators:
After a Selective Set has been created, the inactive Selective Set is represented in the Selective Set Module Navigation with the ![]() icon. When a Selective Set is active the Selective Set is highlighted in the Selective Set Module Navigation.
icon. When a Selective Set is active the Selective Set is highlighted in the Selective Set Module Navigation.
Creating a Selective Set
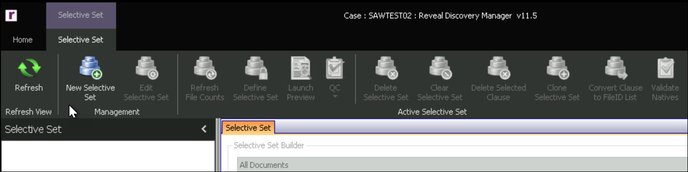
- New Selective Set – Click the New Selective Set button to make the Selective Set Builder form active. When creating a Selective Set there are five settings:
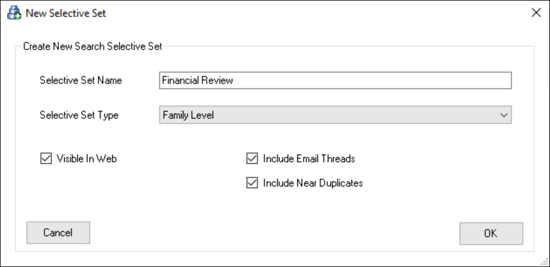
- Selective Set Name – Provide a descriptive name for the selective set.
- Selective Set Type – There are two types of Selective Sets:
- Family Level – This is the default setting. This will keep families together when adding items to the Selective Set Table. For example, if a Keyword Term is added to the Selective Set Table and has a Doc Count of 20 and a Family Count of 40, the File Count in the Family Level Selective Set Table would equal 40.
NOTE: Since family members are never broken up during export, leaving all Selective Sets as Type Family Level is advised. Document Level Selective Sets are typically used for reporting purposes only or to look for very specific items. For example, if the goal is to find all Excel attachments within the project and to not see the non-responsive family members, a Document Level Selective Set should be used. - Document Level – This will add items on a Document Level when adding items to the Selective Set Table. For example, if a Keyword Term is added to the Selective Set Table and has a Doc Count of 20 and a Family Count of 40, the File Count in the Document Level Selective Set Table would equal 20.
NOTE: If there is a defined set of Privileged Keyword Terms and they are to be excluded in a query with the NOT Boolean, it is extremely important to do this in a Family Level Selective Set.
- Family Level – This is the default setting. This will keep families together when adding items to the Selective Set Table. For example, if a Keyword Term is added to the Selective Set Table and has a Doc Count of 20 and a Family Count of 40, the File Count in the Family Level Selective Set Table would equal 40.
- Visible in Web – Will make the Selective Set available to other processing users.
- Include Email Threads – This option is only available when Reveal Email Threading is enabled on a project. To include all email thread members when building and creating a Selective Set, select the Include Email Threads checkbox.
- Include Near Duplicates – This option is only available when Reveal Near Duplicate Identification is enabled on a project. To include all email thread members when building and creating a Selective Set, select the Include Near Duplicates checkbox.
NOTE: When Selective Sets are created with the settings Include Email Threads and/or Include Near Duplicates, the counts in the line items within the Selective Set table will not reflect the counts for the email threads or near duplicates. These counts will be included when the Selective Set is launched to Preview, or if the Selective Set is used as the scope in other modules such as Reports or Exports.
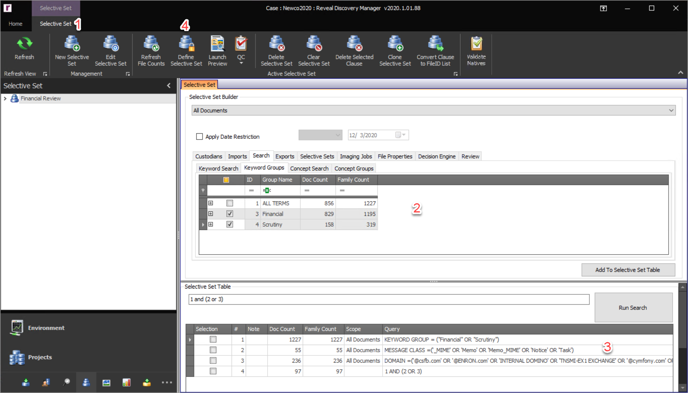
- Selective Set Builder – Line items are added to the Selective Set Table from the Selective Set Builder.
- Scope – The scope of the Selective Set Builder will limit searches to either All Documents or one of four file types: Efiles, Email, Attachments or Short Message. By default, the scope will be All Documents. To change the scope, click the All Documents drop-down menu and select one of the other choices.
NOTE: The selected scope will not change after adding files to the Selective Set Table. If Email is selected and it is not changed back to All Documents, anything added to the Selective Set Table below will be limited to Email only. - Apply Date Restrictions – To add a date restriction check the Date Restrict Data checkbox, choose either
- After (any files after the date will be kept),
- Before (any files before the date will be kept), or
- Between (any files between the two dates will be kept) from the drop-down box, and click the
 date button to choose the applicable date(s).
NOTE: The selected scope will not change after adding files to the Selective Set Table. So if Date Restrictions are selected and not removed or updated, anything added to the Selective Set Table below will be limited to the Date Restrictions previously set here.
- Module Builder Tabs – These tabs contain data subsets created within the different modules. Each tab contains project module items such as Custodians, Imports, Search sets to set out in the table for selection and inclusion in the Selective Set Table. Select one or more items within the tab by clicking the item’s checkbox. Multiple items selected within one tab will be automatically combined with the OR operator when added to the Selective Set Table. If the desired Boolean operator is not the OR operator the items will have to be selected one at a time and combined with the desired Boolean operator in the Selective Set Table. While most of the Module Builder Tabs reference items generated within the Reveal processing environment, File Properties are derived from imported content and merit additional discussion in contributing to building Selective Sets.
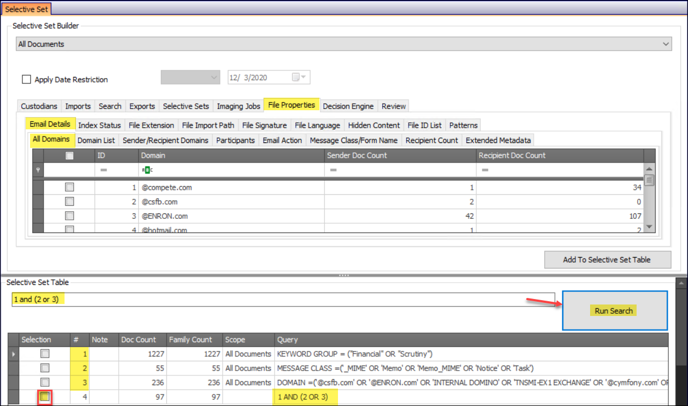
- File Properties – The File Properties tab within the Module Builder tab set contains information that is captured during import that is not work product created by users but is useful to isolate different data sets within the project.
- Email Details – The Email Details tab contains email information that is captured during import that is useful to isolate different data sets within the project.
- All Domains – To add emails via their extracted domain value(s) to the Selective Set Table using the All Domains tab table, select the checkbox of one or more domain values and click the Add To Selective Set Table button. Multiple values will be combined with the OR operator.
- Domain List – To add a group of files via their domain, click the Domain List tab, and click the […] button to browse to a text file containing the domains (one per line). Each domain should be on a separate line.
NOTE: If any domain(s) in the list does not exist within the project, a popup will be shown to the user containing the domain(s). The domain(s) will still be added to the Selective Set Table so that if the domain(s) is extracted in a subsequent import it will be added to the Selective Set. - Sender/Recipient Domains – To add emails via their extracted domain value(s) to the Selective Set Table from either a list of specific Sender Domains or a list of specific Recipient Domains, select the checkbox of one or more domain values from either table or both tables and click the Add To Selective Set Table button. Multiple values will be combined with the OR operator.
- Participants – To add emails via their extracted participant value(s) to the Selective Set Table from a list of senders, recipients and those mentioned in emails, select the checkbox of one or more participant values and click the Add To Selective Set Table button. Multiple values will be combined with the OR operator.
- Email Action - To add emails Selective Set Table according to the message's position in a thread or whether it was sent at all, select the checkbox for one or more of the values New, Reply, Reply All, Forward or Draft and click the Add To Selective Set Table button. Multiple values will be combined with the OR operator.
- Message Class/Form Name – To add emails via their extracted message class (Outlook MIME, Appointment, Note or Task) or Form Name (Lotus Notes) value(s) to the Selective Set Table, select the checkbox of one or more message class/form names values and click the Add To Selective Set Table button. Multiple values will be combined with the OR operator.
- Recipient Count – To add emails via their recipient size range(s) to the Selective Set Table (i.e., Direct, Small, Medium, Large, Extra Large as defined in the Recipient Count table), select the checkbox of one or more recipient size value(s) and click the Add To Selective Set Table button. Multiple values will be combined with the OR operator.
- Extended Metadata – To add emails via their extended metadata field(s), select the checkbox of one or more recipient size value(s) and click the Add To Selective Set Table button. Multiple values will be combined with the OR operator.
- Index Status – To add files via their Index status(es) to the Selective Set Table, select the checkbox of one or more Index status(es) (e.g., Indexed, Index Error, Non-Indexable, Encrypted) and click the Add To Selective Set Table button. OCR Status and Text Extraction Status states may also be selected here. Multiple values will be combined with the OR operator.
- File Extension – To add files via their file extension to the Selective Set Table, add one extension per line in the File Extension tab text box and click the Add To Selective Set Table button. Multiple extensions will be combined with the OR operator. All extensions added will be normalized, meaning if the extension is added without a leading '.' the Reveal processing environment will add it automatically.
- For example, if finding all attachments with the extension .xls OR .xlsx within the Project is desired, choose Attachments as the scope (rather than All Documents), choose the File Extension tab, type .xls[enter key].xlsx in the File Extension tab text box, and click the Add To Selective Set Table button.
- File Import Path – To Search for files that fall underneath a certain file path of files, adding a leading and trailing wildcard (*) and '\' to the path is advised. One or multiple paths can be searched at one time. To search for multiple paths, add one path per line and click the Add To Selective Set Table button. Multiple file import paths will be combined with the OR operator.
- For example, to find all files within the inbox OR Sent Items folder of all email within the project, choose Email as the Scope, choose the File Signature tab, type *\Inbox\* [enter key] *\Sent Items\* in the File Import Path tab text box, and click the Add To Selective Set Table button.
- File Signature – To add files via their application file signatures to the Selective Set Table, select the checkbox of one or more signatures and click the Add To Selective Set Table button. Multiple signatures will be combined with the OR operator.
- For example, if finding all efiles with an Excel signature within the project is desired, choose Efiles as the Scope, choose the File Signature tab, select the checkbox of all signatures that have Excel in the name, and click the Add To Selective Set Table button. Multiple signatures will be combined with the OR operator.
- File Language – To add files via their identified original language to the Selective Set Table, select the checkbox of one or more languages and click the Add To Selective Set Table button. Multiple languages will be combined with the OR operator.
- Hidden Content – To add files via their identified Hidden Content value(s) to the Selective Set Table, select the checkbox of one or more hidden content values and click the Add To Selective Set Table button. Multiple values will be combined with the OR operator. Please see Appendix E for a complete listing of all Hidden Content values and their meaning.
- File ID List – There are three list types that may be used to create a Selective Set based upon the processing environment: FileID, Export FileID or Export BegBates. For example, a client who is reviewing data may ask for images for certain files. The client tags those files in review and then provides those FileIDs to initiate the imaging process for those files.
- List Name – Provide a reference name for this list of documents.
- Import Type – There are two methods that may be used to list File IDs:
- Text – This import type allows a user to paste one or more File IDs into a text field to create a line item in the Selective Set Table.
- Click the File ID List tab,
- enter a List Name,
- choose Text as the Import Type,
- type the File ID(s) into the List text box, or
- paste a list of File IDs into the List text box, and
- click the Add To Selective Set Table button.
- Each FileID should be on a separate line.
- List File – This import type allows a user to upload a list of one or more File IDs to create a line item in the Selective Set Table.
- Click the File ID List tab,
- enter a List Name,
- choose List File,
- click the […] button,
- browse to a text file containing the list of File IDs, and
- click the Add To Selective Set Table button.
- Each FileID should be on a separate line within the text file.
- Text – This import type allows a user to paste one or more File IDs into a text field to create a line item in the Selective Set Table.
- Patterns – To add files via their matched regular expression Pattern value(s) (such as Social Security Number, Credit Card Number, Email Address or Phone Number) to the Selective Set Table, select the checkbox of one or more Pattern values and click the Add To Selective Set Table button. Multiple values will be combined with the OR operator. Please see Analytics Module for more information about Patterns.
- Imaging/PDF Status – selections may be filtered here by choices in two categories:
- Imaging Status – if document imaging is done in processing:
- Success
- Errored
- Pending
- Not Required
- PDF Generation Status – if PDFs are created in processing:
- Success
- Errored
- Pending
- Not Required
- Imaging Status – if document imaging is done in processing:
- Email Details – The Email Details tab contains email information that is captured during import that is useful to isolate different data sets within the project.
- Add To Selective Set Table – Once the scope is set, the items are selected within the builder tab, and the operator is chosen, click the Add To Selective Set Table button. The query will be added to the Selective Set Table as the next available numbered line item.
- File Properties – The File Properties tab within the Module Builder tab set contains information that is captured during import that is not work product created by users but is useful to isolate different data sets within the project.
- Scope – The scope of the Selective Set Builder will limit searches to either All Documents or one of four file types: Efiles, Email, Attachments or Short Message. By default, the scope will be All Documents. To change the scope, click the All Documents drop-down menu and select one of the other choices.
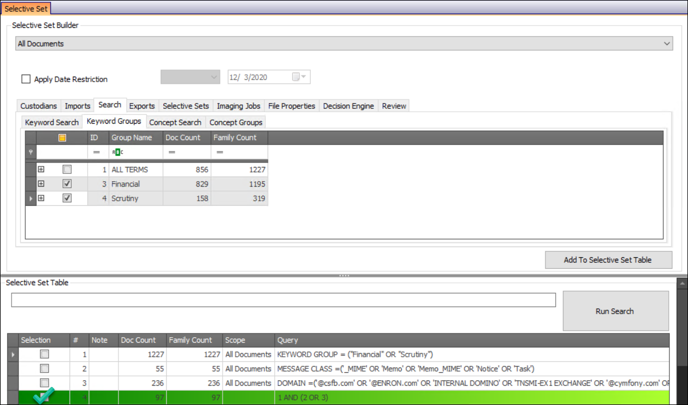
- Selective Set Table – The table shows the line items added to the table by giving the line item a number, the actual query, the scope of the query, the document count and the family count of the query. Line items can be combined with the AND, OR, NOT operators. The last step is to select one of the line items to define the Selective Set.
- Run Search – Combine line items within the table by typing the line item numbers and operators in the Run Search textbox and click the Run Search button or use the ENTER key. The next available line item will be comprised of this new query.
- Simple Search – A simple search comprises line items and operators with no grouping of line items together. For example, 3 not 1; 1 and 2; 2 or 3; etc.
- Advanced Search – An advanced search comprises line items and operators grouped together. To group line items together to define the logic of the combination use parentheses. For example, (2 or 3) and 1; 1 and 2 or (3 and 4); etc.
- Table Definitions – The below describes the Selective Set Table values:
- # – This is the line designation of the item added to the Selective Set Table to be used for running the Selective Set search.
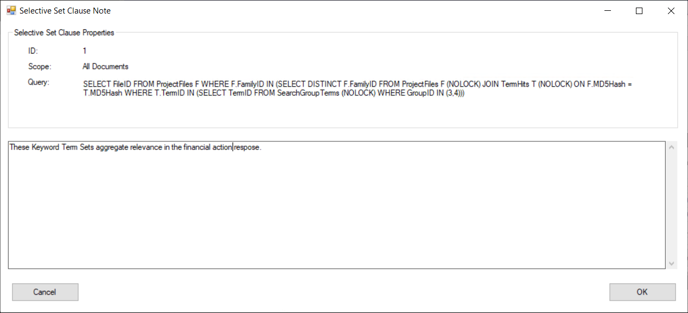
- Note -- To add a note to the individual line item added to the Selective Set Table, click in this field and click the […] button to launch the form below, add the note, and click OK.
- Doc Count – The individual files responsive to the line item query.
NOTE: This will only have a different value from the Family Count in a Document Level Selective Set. - Family Count – The family items responsive to the line item query.
- Scope – The scope selection used for the line item, selected from All Documents, Efiles, Email, Attachments or Short Message.
- Query – The textual representation of the SQL query.
- Run Search – Combine line items within the table by typing the line item numbers and operators in the Run Search textbox and click the Run Search button or use the ENTER key. The next available line item will be comprised of this new query.
- Define Selective Set – To define a Selective Set, select the checkbox of one of the line items and click the Define Selective Set button. The selected line item will be highlighted in green.
After Creating a Selective Set
- Selective Set Module Navigation – The Selective Set Module Navigation displays the various Selective Sets in the project. Each Selective Set has an icon and has a tree view which displays the following values:
- Type – This displays the Selective Set’s type which can either be Family Level or Document Level.
- Doc Count – The Selective Set’s file count.
- Include Threads – This option is only available when Reveal Email Threading is enabled on a project. To include all email thread members when building and creating a Selective Set, select the Include Email Threads checkbox.
- Include Near Dupe – This option is only available when Reveal Near Duplicate Identification is enabled on a project. To include all email thread members when building and creating a Selective Set, select the Include Near Duplicates checkbox.
- Edit Selective Set – To edit the name of the Selective Set, click the Edit Selective Set button and make the applicable changes.
- Launch Preview – A Preview allows a user to see the files that are responsive to the chosen Selective Set. To preview the results of a Selective Set, define the Selective Set, click on the Selective Set in the Module Navigation, and click the Launch Preview button. To see more information about using Previews, please see Appendix G.
- Delete Selective Set – To delete first click on the Selective Set in the Selective Set Module Navigation and then click the Delete Selective Set button in the Selective Set Ribbon.
- Clear Selective Set – Click the Clear Selective Set button to clear all line items from the Selective Set Table.
- Delete Selected Clause – To delete a clause from the Selective Set Table, select the checkbox of one of its line items and click the Delete Selected Clause.
NOTE: If the clause being deleted is referenced in another Selective Set, the line item will not be deleted. - Clone Selective Set – To make a duplicate of a Selective Set, click the Clone Selective Set button, give the new Selective Set a name, and click OK.
- Convert Clause to FileID List – Every line item in the Selective Set Table is a SQL query. These line items can be combined in a search using the Boolean operators AND, OR, NOT. Each time a line item is combined in a search, it is added as a nested SQL query. The more complicated the search the longer it can take for the Selective Set to run when used in reports, exports, etc. To speed up the Selective Set, click the Convert Clause to FileID List. This converts the SQL query to a FileID list that when executed will run much more efficiently.
NOTE: If the Convert Clause to FileID List is used, the Selective Set will be static and will no longer be dynamic. - Refresh – Click the Refresh button to refresh the Selective Set Module to show new Selective Sets created or removed as well as to update the Selective Set group’s statistics.
- Refresh File Counts – A Selective Set’s file count can change by actions taken in other modules. For example, a Custodian that was part of the Selective Set may have been deleted or had additional data added to the Custodian. Both examples would change the file count of the Selective Set. To see the effects of these changes a user should right click on the Selective Set and select Refresh File Counts.
NOTE: It is important to Refresh File Counts on any Selective Set before using it in a report or an export as the file counts may have changed. Refresh File Counts cannot be undone. If you want to keep a Selective Set ‘preserved’ but want to Refresh File Counts to see the changes to the various line items, Cloning the Selective Set or creating a new Selective Set using the same steps taken in the preserved Selective Set is suggested. - QC – To launch the Selective Set into Import or Image QC, click the QC button, and choose Import QC or Image QC.
Related Articles
- How to Create Processing Project
- How to Create Processing Client
- How to Link Processing & Review
- How to Create Processing Custodians
- How to Create a Processing Job
- How to Monitor a Processing Job
- How to Manage Exceptions
- How to Generate Processing Reports
- Processing Reports
- How to Search & Filter Data in Processing Environment
- How to Create Selective Sets
Last Updated 4/05/2023