
This article provides both visual and written instructions for keyword searches in the Reveal processing environment
The Search & Indexing module in the Reveal processing environment has two ribbon-level tabs that separate functionality within the module for Search and Indexing. The Search tab creates, manages, and deletes search terms, whereas the Indexing tab creates, manages, and deletes indexes within the project.
The value of searching in the Reveal processing environment is realized in finding or filtering export data using searches individually or as components of Selective Sets.
- Search – To create, manage, and delete searches, click the Search tab.
%20Toolbar.png?quality=high&width=500&height=241&name=163%20-%2001%20-%20Search%20(and%20Indexing)%20Toolbar.png)
- Indexing – To create, manage, and delete Indexes, click the Indexing tab. Indexing can be automated or it can be a manual build. Depending on the project setting for indexing, that process may need to be run before search is available.
%20Indexing%20Toolbar.png?quality=high&width=500&height=272&name=163%20-%2002%20-%20(Search%20and)%20Indexing%20Toolbar.png)
Running Keyword Terms
There are nominally two types of searches that can be executed in the Search Module: Keyword and Concept searches.
Keyword Terms use dtSearch to return files via search types like Boolean, proximity, wildcard, stemming, etc. Concept searching has been superseded by advancements in Reveal analytics, and is in the process of being deprecated in the Reveal processing environment.
All counts displayed within the Search tab are total counts meaning they have both original and duplicate files included in the counts. There are two different types of counts within the Search Module: Doc Count and Family Count.
- Doc Count is the result of a term on a file level.
- Family Count is the result of a term on an entire family.
For example, the Search term ‘document’ may be responsive to the attachment of an email or an embedded object of an efile, but not the parent email or efile itself. In this example, the Doc Count will be 1 and the Family Count will be 2.
Only original or unique files are added to an Index. All counts displayed within the Indexing tab are unique counts meaning they have only original files included in the counts.
Keyword Terms automatically update at the end of the Import process, which updates the counts in the Search Module. Run the Keyword Term Hits Report on the new imports to see the effect on the Keyword Terms. Note the collapsed Search & Index Module ribbon to increase work space in the illustration below. - New Search Group – In the Search tab choose New Search Group to collect Keyword Search Terms into a Keyword Search Group. Terms entered using Add Keyword Terms (Item 5 below) are added to the selected group if Add to Group is checked.
- Keyword – Choose the Keyword tab to add and run Keyword Terms.
- Add Keyword Terms – Search allows for literal, wildcard, proximity and fuzzy searches. All Keyword Terms must be written using the appropriate syntax, and each term must be entered on a separate line in the Add Keyword Search box. To view the Search Syntax guide, see dtSearch Syntax Guide. There are two ways to add a Keyword Term to the project:
- Typing a Keyword – Type a freeform Keyword term and click the Add Keyword Terms button. To add multiple Keyword terms, type a term, hit the Enter key, type in a term, hit the Enter key, etc. (repeat as many times as necessary) and click the Add Keyword Terms button.
- Dragging and Dropping a List of Terms – Create a list of Keyword term(s) by typing the term(s) into a text file using the same method as above of one term per line, and drag and drop the text file into the Keyword tab, then click the Add Keyword Terms button.
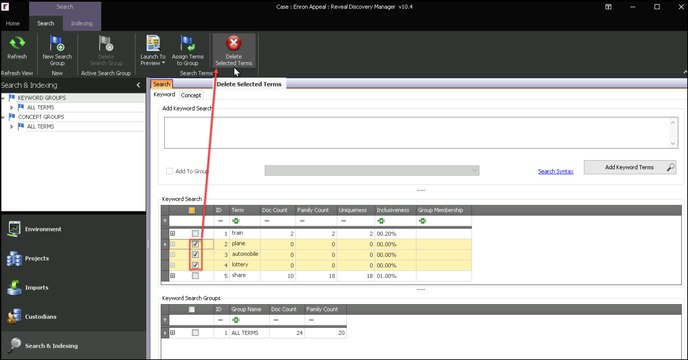
NOTE: This text file must be directly accessible from your processing environment load machine (e.g., in its Documents folder or an available network location) to drag and drop. An alternative for a list in a file on a user's desktop would be to copy from the original file and paste into the Add Keyword Search box. - As the terms are added a search is run. If a term yields no results, you may check to select the term(s) and click Delete Selected Terms on the toolbar. The term will be removed after you confirm.
- Add Term To Group – Search terms can be organized within a Search Group after a Search Group is created. The Search Group is represented in the Search Module Navigation with the
 icon. To add the Keyword Term(s) to a Keyword Group, check and choose the Keyword Group and the terms will be automatically added to the target Keyword Group as well as the ALL TERMS Keyword Group.
- If a Search Term Group has not yet been created, click New Search Group from the toolbar and enter a name for the group, ideally indicating the focus of the search group.
- You will then be able to add selected keyword search terms to this or any other available search group.
NOTE: By default, the Reveal processing environment indexes and searches the fields FULLTEXT, SENDER, RECIPIENTS, TO, FROM, CC, BCC. The sender and recipient email address fields contain both the display name and the fully qualified email address. Because of this it is possible that a Keyword Search Term will hit on one of the email address fields and the fully qualified email address will not visible in the extracted text (FULLTEXT). To only search the extracted text, use the syntax //text contains (<Term>). This is the only fielded search that requires the // syntax in the fielded search. Alternatively, within the Project Settings, the sender and recipient fields can be excluded from the dtSearch Index leaving only the FULLTEXT.
Search syntax guidance in this module applies only to dtSearch. Different indexing engines may require different specification syntax for field searches.
- Keyword Search Terms Table – After the Add Keyword Terms button is clicked, the Keyword Term(s) are displayed in the Keyword Search Terms table. The Keyword Search Terms table has six columns in addition to sequentially-assigned ID:
- Term – This is the Keyword search term that was added to the Keyword Terms table.
- Term Derivatives – All Keyword Terms are displayed with a tree view. Once expanded, the tree view shows all derivatives for the parent term, for example, counts for individual connected terms or expansions of a wildcard term. The Doc Count for the parent term is the combination of the derivative’s Doc Hits combined with the given operation. It is likely the parent term’s Doc Count will not equal the sum of the derivatives' Doc Hits counts, as several derivatives may exist within one file.
- Doc Count – This is the number of files responsive to the Keyword Term.
- Family Count – This is the total number of files within a family one or more of whose members are responsive to a Keyword Term. For email, Doc Count and Family Count may be different depending on the situation. For example, the Keyword Term ‘document’ may be responsive to the attachment of an email but not the email itself. In this example, the Doc Count will be 1 and the Family Count will be 2.
- Uniqueness – This is the number of files that uniquely and only hit on the particular Keyword Term with no other overlapping Keyword Terms responsive to the file. This means that if this Keyword Term were deleted from the case, these unique files would be removed from the responsive set. This is calculated on the document level.
- Inclusiveness – This is percentage of Doc Hits/Indexed Files. If the percentage is high for a particular Keyword Term, that term may be over inclusive and need to be revised. This is calculated on the document level.
- Group Membership – This is the Keyword Group(s) to which the term has been assigned.
- Term – This is the Keyword search term that was added to the Keyword Terms table.
- Keyword Search Groups – This table lists the totals for all terms within all defined Keyword Search Groups. The table displays three columns:
- Group Name -- The name given the Keyword Search Group before Keyword Search terms were added.
- Group Terms -- All Keyword Search Groups are displayed with a tree view. Once expanded, the Keyword Search Terms for the Group are displayed in this sub-table with Doc Count and Family Count.
- Doc Count – This is the total number of files responsive to the Keyword Terms in the Keyword Search Group.
- Family Count – This is the total number of files within a family one or more of whose members are responsive to a Keyword Term in the Keyword Search Group. As noted above, Doc Count and Family Count may be different depending on members of a family having or not having one or more of the terms in the group.

- Group Name -- The name given the Keyword Search Group before Keyword Search terms were added.
Creating Indexes
Every time an Indexing Job is created with a scope, the processing environment will only pull back the original files that are within the scope that have not been indexed in any prior Indexing Jobs. When creating Indexing Jobs, the user will choose the scope of files to create the Index, click the Launch Indexing Job button, and an Indexing Job will be created and sent out to the Discovery Agents. The Indexing Job can be monitored in the Search & Indexing Module and the Environment Module.
NOTE: Indexing can be automated or it can be a manual build. Depending upon the project setting for indexing, that process may need to be run before search is available.
IMPORTANT: When building or rebuilding an Index, the old Indexes must be first deleted.
- Indexing – Choose the Indexing tab to create an Index.
- Index Scope – There are three scopes that can be used to create an Index for the project:
- Project – If no checkbox is selected in Imports or Selective Sets and the Launch Indexing Job button is selected, the system will look across the entire project to see if there are any files available for indexing.
- Imports – To create an Index from one or more Imports, select the checkbox next to the applicable Import(s), and click the Launch Indexing Job button.
- Selective Sets – To create an Index from one or more Selective Sets, select the checkbox next to the applicable Selective Set(s), and click the Launch Indexing Job button.
- Launch Indexing Job – To launch an Indexing Job to the Discovery Agents, select the Index Scope, and click the Launch Indexing Job button.
NOTE: The Reveal processing environment uses only accent-insensitive indexes. This is done so that the same keyword term does not need to be added with and without accents to be a search hit. For example, the Keyword Search of ‘uber’ would return ‘uber’ and ‘über’. - Monitoring Indexing Jobs – Indexing Jobs can be monitored in the Indexing tab by clicking the Refresh button, or within the Environment Module.
After Creating an Index
- Refresh – Click the Refresh button to refresh the Indexing tab to show the current counts.
- Project Indexes – To delete or update an Index, select the checkbox next to the Index(s) and choose the applicable button in the Indexing Ribbon. The Project Indexes table contains the following values:
- Index ID – The ID of the Index within the project.
- Index Status – The status of the Index. If the Index Status is ERRORED, the Index should be deleted and a new Index should be built for the applicable scope(s).
- Index Scope -- The content selected in generating the Index, either PROJECT, IMPORTS or SELECTIVE SETS.
- Index Type – There are two different Index Types of EXTRACTED TEXT and OCR. While both extracted text and OCR text can be added to the dtSearch Index and be made searchable, this is done through different process, thus they are separated as different Index Types.
- Actual Count – This is the actual number of items added to the dtSearch Index. If Actual Count does not equal Expected Count, the Index should be deleted, and a new Index should be built for the applicable scope(s).
- Expected Count – This is the expected number of items that should be added to the dtSearch Index. If Actual Count does not equal Expected Count, the Index should be deleted, and a new Index should be built for the applicable scope(s).
- Fragmentation – Fragmentation of an Index increases the size of the Index and slows searching, but the effect is generally not noticeable unless the fragmentation is severe. If the fragmentation of an Index is high and search results are taking a long time to complete, the Index should be deleted and a new Index should be built for the applicable scope(s).
- Job ID – The Distributed Job ID of the Index.
- Delete Index – To delete an Index from the project select the checkbox next to the Index, and click the Delete Index button. Any file(s) deleted from the Index may be part of a future Index Scope and will be available for indexing. Note that null indexes from the prior illustration (having 0 documents to index) have been deleted here.
- Update Index Properties – To update Actual Count and Fragmentation to the most current states for one or more Indexes, select the Index(es) and click the Update Index Properties button.
Related Articles
- How to Create Processing Project
- How to Create Processing Client
- How to Link Processing & Review
- How to Create Processing Custodians
- How to Create a Processing Job
- How to Monitor a Processing Job
- How to Manage Exceptions
- How to Generate Processing Reports
- Processing Reports
- How to Search & Filter Data in Processing Environment
- How to Create Selective Sets
Last Updated 4/05/2023