
This article provides both written and visual instructions for how to create a processing job.
Processing Jobs are created to process specific sets of data for a given project. A processing job is typically assigned to specific custodians within a project. Please see instructions below for how to create a new processing job within Reveal's processing environment. Once the job is created and started, please see the article How to Monitor a Processing Job for instructions on how to monitor it's progress. Once the job completes, you can attempt to resolve any file-level exceptions that may have occurred during processing. See the How to Manage Exceptions. article for instructions on how to manage file-level exceptions.
Create Processing Job
Start by selecting the project, then click Imports.
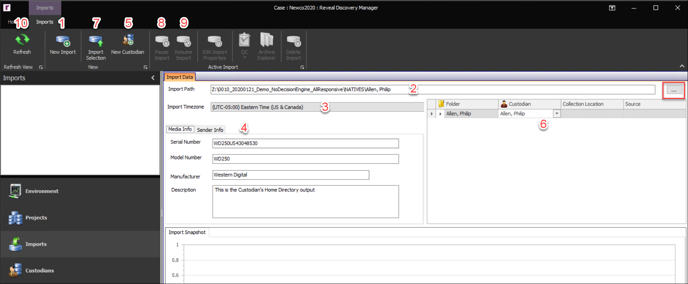
- New Import – Click the New Import button in the Import Ribbon to launch the Import Data form.
- Import Path – The Import Path is set to default to the S3 data store bucket for your account. This location and the access keys required are configured with your Reveal instance.

- Clicking the green button to the right of this field opens the Staging Bucket Browser.
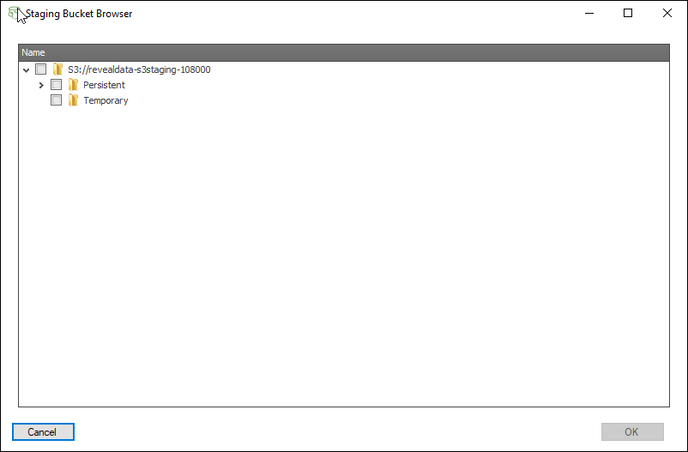
- There are two main stores within the S3 bucket:
- Persistent - Data in this store is retained even after ingestion and processing. Unless removed within 30 days these data are charged as inactive storage.
- Temporary - Data in this store is automatically deleted after 30 days so no reminder to remove is required after import and QC are complete.
NOTE: Only one folder and all its sub-folders under either store may be selected for import at one time. In the below example, everything under the PilotData selection will be imported.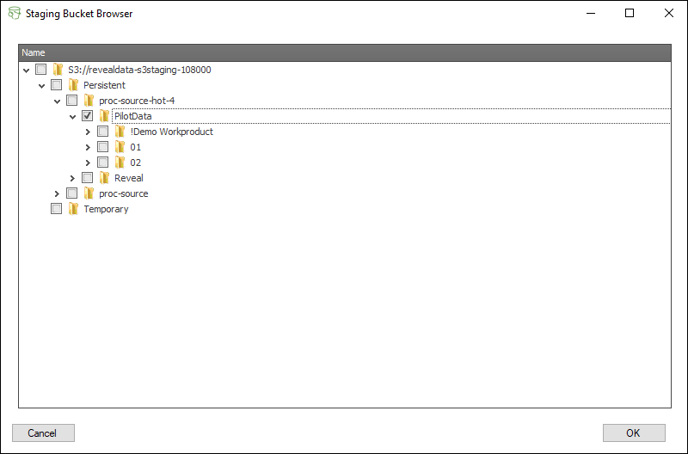
- On-premise users may browse to the top level folder of the source data by clicking the […]button and choose the source folder.
- Clicking the green button to the right of this field opens the Staging Bucket Browser.
- Import Timezone – By default, the timezone is set to the local timezone of the machine. If the data was collected in a different timezone, click the drop-down menu and choose the timezone according to the location of the collection.
NOTE: At this point the data can be imported without any other settings by clicking the Import Selection button in the Imports Ribbon. - Import Details – There are two types of additional details that can be added to an import:
- Media Info – If the import is located on a hard drive, enter the hard drive’s serial number, model number, and the manufacturer of the hard drive to track the hard drive. A description of the data can also be added to help better track the data. This information can be recalled later in the Reports Module.
- Sender Information – To track the sender of the data, enter the contact’s information. Click the […] button to upload the Chain of Custody. This information can be recalled later in the Reports Module.
NOTE: This information can be edited or added after an import completes by clicking the Edit Import Properties button in the Imports Ribbon.
- New Custodian – To create a new Custodian click the New Custodian button in the Imports Ribbon and the form below will appear. There are two types of Custodians that can be created. Each Custodian requires the input of a Custodian Prefix. One of the settings in Export is Custodian Prefix Incremental when it comes to numbering the files. This will add the Export Prefix onto the number for files pertaining to the Custodian within any scope.
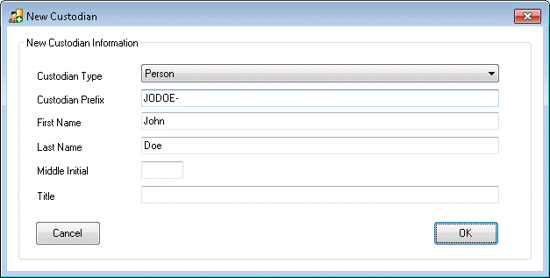
- Person – This is the default Custodian Type. The minimum information for a Person Custodian is the First Name and Last Name. After filling out the New Custodian form, click OK, and the
 icon will appear in the Module Navigation and the Custodian Management section within the module form.
 - Entity – The other Custodian Type is Entity. This Custodian Type allows for only one name if necessary. To create an Entity Custodian, click the Custodian Type drop-down, change it to Entity, and enter the Entity Name. After filling out the New Custodian form, click OK, and the icon will appear in the Module Navigation and the Custodian Management section within the module form.
- Person – This is the default Custodian Type. The minimum information for a Person Custodian is the First Name and Last Name. After filling out the New Custodian form, click OK, and the
- Import Custodian Assignment – If the import belongs to one or more Custodian(s), the data can be assigned to the Custodian(s) automatically by clicking the drop-down menu and choosing the applicable Custodian(s). To expand the import pathing structure, click the > If it is preferred to assign the data to the Custodian(s) after the data is imported, the default Unassigned Custodian and assigned within the Custodian Management Module after the import completes.
- Import Selection – Click the Import Selection button in the Import Ribbon to import all of the data under the source folder.
- Pause Import – This will pause the import, so that the import can be resumed later. There are several reasons to pause an import, but the two most common reasons are to start importing data that has priority over the suspended data.
- Resume Import – This will resume any import that was suspended or interrupted abruptly.
- Refresh – Click the Refresh button in the Import Ribbon to refresh the Imports Module to show new imports as well as to update the import group’s statistics.
Related Articles
- How to Create Processing Project
- How to Create Processing Client
- How to Link Processing & Review
- How to Create Processing Custodians
- How to Create a Processing Job
- How to Monitor a Processing Job
- How to Manage Exceptions
- How to Generate Processing Reports
- Processing Reports
- How to Search & Filter Data in Processing Environment
- How to Create Selective Sets
Last Updated 4/05/2023