
This article provides both written and visual instructions for how to manage and resolve file-level exceptions that occur during data processing.
Import QC allows a user to identify, track, resolve, and report on all archive and file level exceptions encountered during processing. The purpose of Import QC is to fix exceptions or clear them to move all exceptions to QC Cleared. There is nothing to prevent a user from exporting file exceptions even if they are not in QC Cleared, but what follows is the recommended workflow. Any files that are moved to QC Cleared can have a comment associated with them which can be analyzed in Previews and/or exported as a field in the Export Load File.
Import QC can be launched directly from the Projects, Imports, or Selective Set Modules within the Reveal processing environment by clicking the Launch Import QC button.
All tables, tabs, etc. within QC are undockable/dockable. To move any tab around within the user interface, click on a tab and drag it to the desired location. For example, in Import QC it may be desired to have the QC Document table take up the entire screen, or to have it on a different screen altogether. To do this, click on the QC Documents tab and move it out of Import QC.
NOTE: Import QC removes duplicates to streamline the exception handling process. This is important to understand as the Import Project Snapshot might show a higher number of archive errors than presented in the user interface.
IMPORT QC WORKFLOW
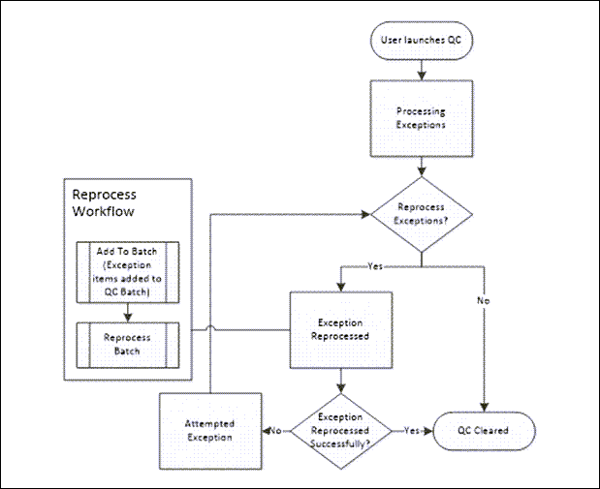
Within the Import QC Module, the QC Flags provide both the workflow and the navigation for scoping or filtering the QC Documents Table. The top-level QC Flags or Categories are:
- Processing Exceptions,
- Attempted Exceptions,
- Reprocessing, and
- QC Cleared.
Beneath each Category are the Subcategories File Exceptions and Archive Exceptions. When each of these items is selected, the QC Documents Table will display these exception items, as more fully explained below.
By default, archives are not exported out of the system, but can be given a new file type so that they can be exported out if desired. File exceptions on the other hand will be exported out of the system.
QUALITY CHECKING A PROCESSING JOB
- Category – The QC workflow has 4 top level categories. Each top-level category also contains subcategories of File Exceptions and Archive Exceptions. When a user clicks on one of these subcategories, the QC table will be restricted to the view of just those files. As files are worked on in QC, they will be moved from one category to another depending on the action taken on the file.
NOTE: Archive exceptions will not be displayed in an Import QC session launched via a Selective Set.
The following gives a breakdown of the categories:- Processing Exceptions – All original exceptions within the QC session that have not been reprocessed once. When File Exceptions or Archive Exceptions are selected, the QC Documents Table will display these items grouped by the QCFlagCategory field followed by the Super Type field. The QCFlagCategory field represents an exception reason, whereas the Super Type groups the files underneath them by their general file type (i.e. SYSTEM FILE, WORD PROCESSING, etc.).
- File Exceptions QCFlagCategory Definitions – The following lists the QCFlagCategory definitions for File Level Exceptions. The QCFlagCategory field is a multivalue field that will display more than one value if applicable except for PASSWORD PROTECTED, UNRECOGNIZED, or ZERO KB.
- ATTACHMENTS – These are files where the attachments failed to properly extract for the file. NOTE: When analyzing Archive or File Level Exceptions with the QCFlagCategory ATTACHMENTS, it is recommended to use the ChildCount (the actual number of files/attachments extracted) and ExpectedChildCount (the expected number of files/attachments extracted) fields in the QC Documents Table.
- METADATA – These are files where the metadata failed to properly extract for the file.
- OCR – These are files that errored during OCR. Files will only have this QC Flag Category after OCR has been attempted on the file.
- PASSWORD PROTECTED – These are files that are password protected. NOTE: If a file is PASSWORD PROTECTED, this is the only QCFlagCategory that will be displayed.
- TEXT – These are files where the text failed to properly extract for the file.
- UNRECOGNIZED – These are files that were unrecognized thus they are either junk or corrupt files. NOTE: If a file is UNRECOGNIZED, this is the only QCFlagCategory that will be displayed.
- ZERO KB – These are 0 KB files. NOTE: If a file is ZERO KB, this is the only QCFlagCategory that will be displayed.
- Archive Exceptions QCFlagCategory Definitions – The following lists the QCFlagCategory definitions for Archive Exceptions. The QCFlagCategory field is a multivalue field that will display more than one value if applicable except for PASSWORD PROTECTED or ZERO ITEMS EXTRACTED.
- ACTUAL/EXPECTED MISMATCH – Archives that failed to extract the exact number of parent items.
- CHILD RELATED ERRORS – Archives that failed to extract attachments from parent items. This will only show for NSF files on the archive level. This reflects a scenario where the User ID file is necessary to extract the attachments from the parent items. In this scenario, the parent items will still show up under ATTACHMENTS.
- PASSWORD PROTECTED – Archives that are password protected.
- ZERO ITEMS EXTRACTED – Archives where 0 items were extracted from the archive.
- ARCHIVE ERRORS – Archives with generic errors. When this QCFlagCategory is encountered, if the archive is sent to support@revealdata.com it can be investigated to see if a new QCFlagCategory is necessary for the archive, or if it can fall underneath one of the predefined QCFlagCategory values.
NOTE: If an archive is PASSWORD PROTECTED or ZERO ITEMS EXTRACTED, this is the only QCFlagCategory that will be displayed.
- File Exceptions QCFlagCategory Definitions – The following lists the QCFlagCategory definitions for File Level Exceptions. The QCFlagCategory field is a multivalue field that will display more than one value if applicable except for PASSWORD PROTECTED, UNRECOGNIZED, or ZERO KB.
- Attempted Exceptions – All original exceptions that have been unsuccessfully reprocessed at least once will automatically move to Attempted Exceptions -> File or Archive exceptions. When File Exceptions or Archive Exceptions are selected, the QC Documents Table will display these items, and is grouped by QCCount followed by QCFlagCategory, followed by QCFlagCategory. The QCCount field is incremented by 1 for a file or archive every time it is reprocessed. This field allows users to track the number of reprocess attempts on the archive or file.
- Reprocessing – All original exceptions that are currently being reprocessed.
- QC Cleared – When exceptions are reprocessed successfully, they will automatically be moved to QC Cleared -> System. If a user moves an exception to QC Cleared, the item(s) will be moved to QC Cleared -> User. When moving files to QC Cleared -> User, a custom comment can be added to the file(s) and can be analyzed in Preview or used as a field in the Export Load File. These comments can be edited after the files are moved to QC Cleared as well. Files moved to QC Cleared are organized into the following two categories:
- System – Exceptions that were successfully reprocessed by the system.
- User – Exceptions that were moved to QC Cleared by the user.
- Processing Exceptions – All original exceptions within the QC session that have not been reprocessed once. When File Exceptions or Archive Exceptions are selected, the QC Documents Table will display these items grouped by the QCFlagCategory field followed by the Super Type field. The QCFlagCategory field represents an exception reason, whereas the Super Type groups the files underneath them by their general file type (i.e. SYSTEM FILE, WORD PROCESSING, etc.).
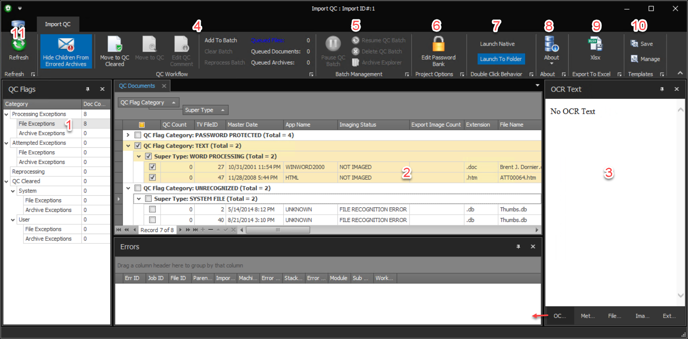
- QC Documents Table – The QC Documents table is used to navigate file by file within QC. To view a file within the viewer, click on the row in the table and the file’s Errors, Extracted Text, Images, Metadata and File Properties will be displayed in the viewer. The up and down keys can be used to go to the previous/next file.
- Hide Children From Errored Archives - When engaged, this option suppresses children extracted from errored archives from showing in the File Exceptions.
NOTE: If errored archives are remediated and reprocessed, their children will show in the File Exceptions. - To see the available settings, right click on the table column headers and the following form will appear:
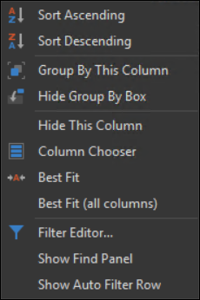
- Sort – To sort the table by a particular column, click the column header or right click on the column headers and choose Sort Ascending or Sort Descending.
- Group By – To group the table by a particular column, drag and drop that column above the column headers or right click on the column headers and choose Group By This Column. To clear a grouping right click next to the field the table is grouped by and choose UnGroup.
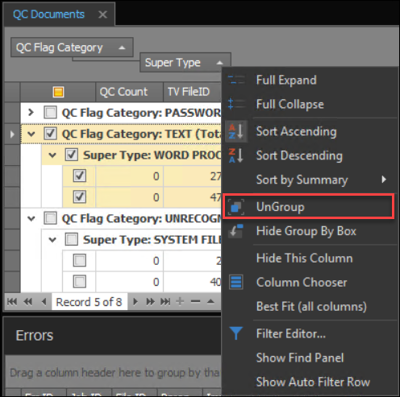
NOTE: As described above, the QC Documents table will be automatically grouped by certain fields, depending on the Category/Subcategory the user selects. - Column Management – To add or remove columns within the table, click Column Chooser and a listing of all available fields will be displayed. To add the field as the last field in the table, double click on the field. To add the field to a certain location in the table, drag and drop the field to the desired position.
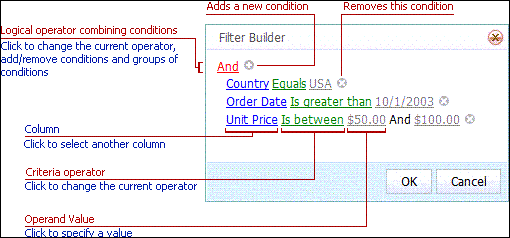
- Filter Preview Table – To filter the QC Documents table, click on the Filter Editor and the following form will appear:
- Hide Children From Errored Archives - When engaged, this option suppresses children extracted from errored archives from showing in the File Exceptions.
- QC Viewer – The QC Viewer has separate views of the file that is selected in the QC Documents table:
- Errors – This is the error message(s) associated with the file.
- Extracted Text – This is the electronic text associated with the file.
- OCR Text – This is the OCR text associated with the file.
- Images – This is the image(s) associated with the file.
- Metadata – This is the metadata associated with the file.
- File Properties – These are the file properties associated with the file.
NOTE: The button for any of the above views may be clicked and dragged out of the QC Viewer to a separate window which may be pinned to the QC workspace.
- QC Workflow – To move a file(s) in the QC workflow click the checkbox next to the file(s) in the QC table and click the applicable QC Workflow button.
- Move to QC Cleared – The purpose of moving files to QC Cleared is to add the custom comment to the files. For example, if a file is within the System Files ZERO KB, no text will be extracted from the file as it is 0 kilobytes, so this file could be moved to QC Cleared with the comment ‘0 KB Files’. This comment field can be used to group or analyze files in Preview as well as a field within the DAT file at export time. To move files to QC Cleared, select the files(s), and click the Move to QC Cleared button.
- Move to QC – If a file needs to go through QC again (i.e. from QC Cleared to Processing Exceptions), select the file(s), and click the Move to QC button.
- Edit QC Comment – To edit the comments applied to files moved to QC Cleared, select the file(s), and click the Edit QC Comment button.
- Add To Batch – The typical workflow to add exception items to a QC Batch is to select one or more items in the QC Documents table, click the Add To Batch button, and click OK. This form has other settings that can be used during this process as well. These settings have different implications when archive exceptions are added to a batch versus a file exception for some of the sections. The differences and settings are described below.
.png?quality=high&width=688&height=436&name=160%20-%2006%20-%20Add%20Archives%20to%20Batch%20(QC).png)
- Selected Documents Table – This table provides a listing of the files that will be reprocessed in the batch. This table has the same functionality as the QC Documents table.
- New File Type – The New File Type/Incorrect Recognition provides the user the ability to apply a new file type to a file. There are typically two different scenarios for doing this based on file/archive exceptions:
- File Exceptions – For file exceptions, this section is typically used to provide UNKNOWN files with a new file type for common extensions where the file identification failed. For example, there may be a file exception under UNKNOWN with the extension .docx.
- Select this item,
- click Add To Batch,
- find an applicable file type like WINWORD2013, and
- Reprocess the QC Batch, which will change the file type for this file.
- Archive Exceptions – Archives are not exported out of the system. Exporting archives out as standalone files may be desired when nothing is extracted from them. To do this, select the archive(s) in the QC Documents table, click Add To Batch, select a new file type (use UNKNOWN or a more applicable file type), and Reprocess the QC Batch which will change the file type so that the file can be exported out of the system as a standalone file.
- File Exceptions – For file exceptions, this section is typically used to provide UNKNOWN files with a new file type for common extensions where the file identification failed. For example, there may be a file exception under UNKNOWN with the extension .docx.
- Source Replacement Files – This allows users different settings to replace the exception file or archive with a new file. There are 4 replacement settings:
- Reprocess Original – By default, this defaults to Reprocess Original. This will reprocess the original archive or file.
- File Exceptions – The typical workflow will be to Reprocess Original. If there is a reason to replace a particular file with a replacement file, please see below. Otherwise this should be left on Original File for file exceptions.
- Archive Exceptions – When this setting is used for an archive, the system will go back into the archive and only try to re-extract the errored parent items. This is the recommended setting when trying to reprocess an errored archive for the first time.
- File – This setting allows a user to upload a replacement file or archive.
- File Exceptions – A file exception can be replaced by another file, but this must be done on a file-by-file level. To replace a file exception, choose the single file in the QC Documents table, click Add To Batch, click the drop-down, change it to File, and browse to the replacement file.
- Archive Exceptions – When replacing an archive with a replacement file (e.g., a PST file that has been repaired by ScanPST.exe), if the archive had any children extracted from it those items will be deleted from the project and the replacement archive will be processed in its entirety in place of the errored archive. So if data has been exported from the errored archive prior to replacing the file, the FileIDs that were in the project will no longer exist.
- Folder – This setting is only available for archives, and is not an option for hosted S3 storage. This follows the same behavior as File, meaning it will delete any children for the errored archive if it existed, but this will iterate through the entire folder to replace the errored archive. For example, if there is an errored non-email archive like a zip file, launching that archive to folder, unzipping it, and pointing to the unzipped folder as the replacement folder is recommended. Without this ability, it would be necessary to rezip the folder to use the new zip file as the replacement.
- Reprocess Original – By default, this defaults to Reprocess Original. This will reprocess the original archive or file.
- NSF User ID File – This will only be available for password protected NSF files. Type in the password for the file and upload the NSF file’s UserID by browsing to the UserID file.
- Clear Batch – To clear the batch, click the Clear Batch button. This can be necessary if the need for different settings on the exception files becomes apparent prior to reprocessing them.
- Reprocess Batch – To reprocess a QC Batch, click the Reprocess Batch button, give the QC Batch a name, choose whether or not to OCR, and click Launch. This will launch the QC Batch to start processing it. The QC Batch will move into the Reprocessing Category. Click the Refresh button to see the status update in the Reprocessing Category as well as the Doc Count in the other categories.
NOTE: If items are selected for OCR they must also be selected in the Project Settings, otherwise they will not OCR. For example, if JPEG is selected as an item to OCR in Import QC but is not selected in the Project Settings as an image type to OCR, this item will not OCR.
- Batch Management – A QC Batch can be paused, resumed, or deleted, or Archive Explorer opened.
- Edit Password Bank – Click the Edit Password Bank button to copy and paste a list of passwords (one per line) into the Password Bank. These passwords will be used to decrypt the files identified as encrypted during reprocessing.
- Double Click Behavior – The double click behavior defines what will happen when a user double clicks on a row within the QC Documents table. There are two settings, only one of which can be used at a time:
- Launch To Folder – To launch the native file to a folder to get a working copy of the native file, click the Launch To Folder button and double click on the row within the QC Documents table.
- Launch Native – This is the default setting. When a user double clicks on a row within the QC Documents table, it will launch that file in the Windows native application with which that file is associated.
- About – The About section provides the ProjectID as well as the Current Scope. When Current Scope is clicked it will put the SQL Query being used to filter the table on the clipboard so that it can be pasted into SQL to return the same file population.
- Export To Excel – To export the QC Documents table to an Excel file holding its groupings, counts, and columns, click the Export To Excel button.
NOTE: There is a grouping expand/collapse navigation within the Excel file. To use this navigation, open the Excel file and notice the numbers in the upper left hand corner next to the column A. Each of these numbers will correlate to its number of grouping within the QC Documents table. For example, when exporting the Processing Exceptions -> File Exceptions this navigation will look like when it is opened. If 1 is selected, all groupings will be collapsed to the top level, and so forth. Alternatively, the
 buttons can be used to expand/collapse individual groupings within the Excel file.
 - Templates – Templates provide the user the ability to save the current Preview settings, including selected fields, field groupings, etc., on the project and global level. This feature coupled with the Export To Excel feature allows users to create customizable reports. There are two buttons associated with Templates that manage these features:
- Save – To save the current Preview’s settings:
- click the Save button,
- give the template a name,
- choose the Project Scope (Project to save the template only within the project, and Global to save the template across projects), and
- click Save.
- Manage – To load a previously saved template:
- click the Manage button,
- choose the template, and
- click the Load Template button.
- Save – To save the current Preview’s settings:
- Refresh – To check the status of a QC Batch when reprocessing, click the Refresh button and pay attention to the Status field.
Related Articles
- How to Create Processing Project
- How to Create Processing Client
- How to Link Processing & Review
- How to Create Processing Custodians
- How to Create a Processing Job
- How to Monitor a Processing Job
- How to Manage Exceptions
- How to Generate Processing Reports
- Processing Reports
- How to Search & Filter Data in Processing Environment
- How to Create Selective Sets
Last Updated 4/05/2023