
How to build a custom AI Model in Reveal.
You can build custom AI models to help prioritize documents for review. AI models produce predictive scores between 0 and 100 which can be used to sort documents for attorney review regardless of the type of legal matter.
The process begins with creating an AI Tag in Reveal. AI Tags are used by subject matter experts to code documents. These coding decisions are then used to train or teach the system how to recognize documents that are responsive vs. non-responsive, privileged vs. not privileged, etc. When you create an AI Tag, the system automatically creates a corresponding Classifier. A Classifier is a representation of the AI Model during the training process. As you code documents with your AI Tag, those coding decisions are used to train the Classifier. After each training round, the AI Model will generate predictive scores for each document.

This article will step through the workflow of creating, training, and evaluating AI models to help prioritize documents for review.
Create an AI Tag
The first step in the AI Model Building Workflow is to create an AI Tag. Once the AI Tag is created, Reveal will automatically create a corresponding Classifier of the same name. Subject matter experts will code a sample set of documents using the new AI Tag. As documents are coded, the system will begin to train the Classifier using the coded examples.
To create an AI Tag, perform the following steps:
- Log in to Reveal.
- Click on the Admin tab.
- Click on the Tags menu option.
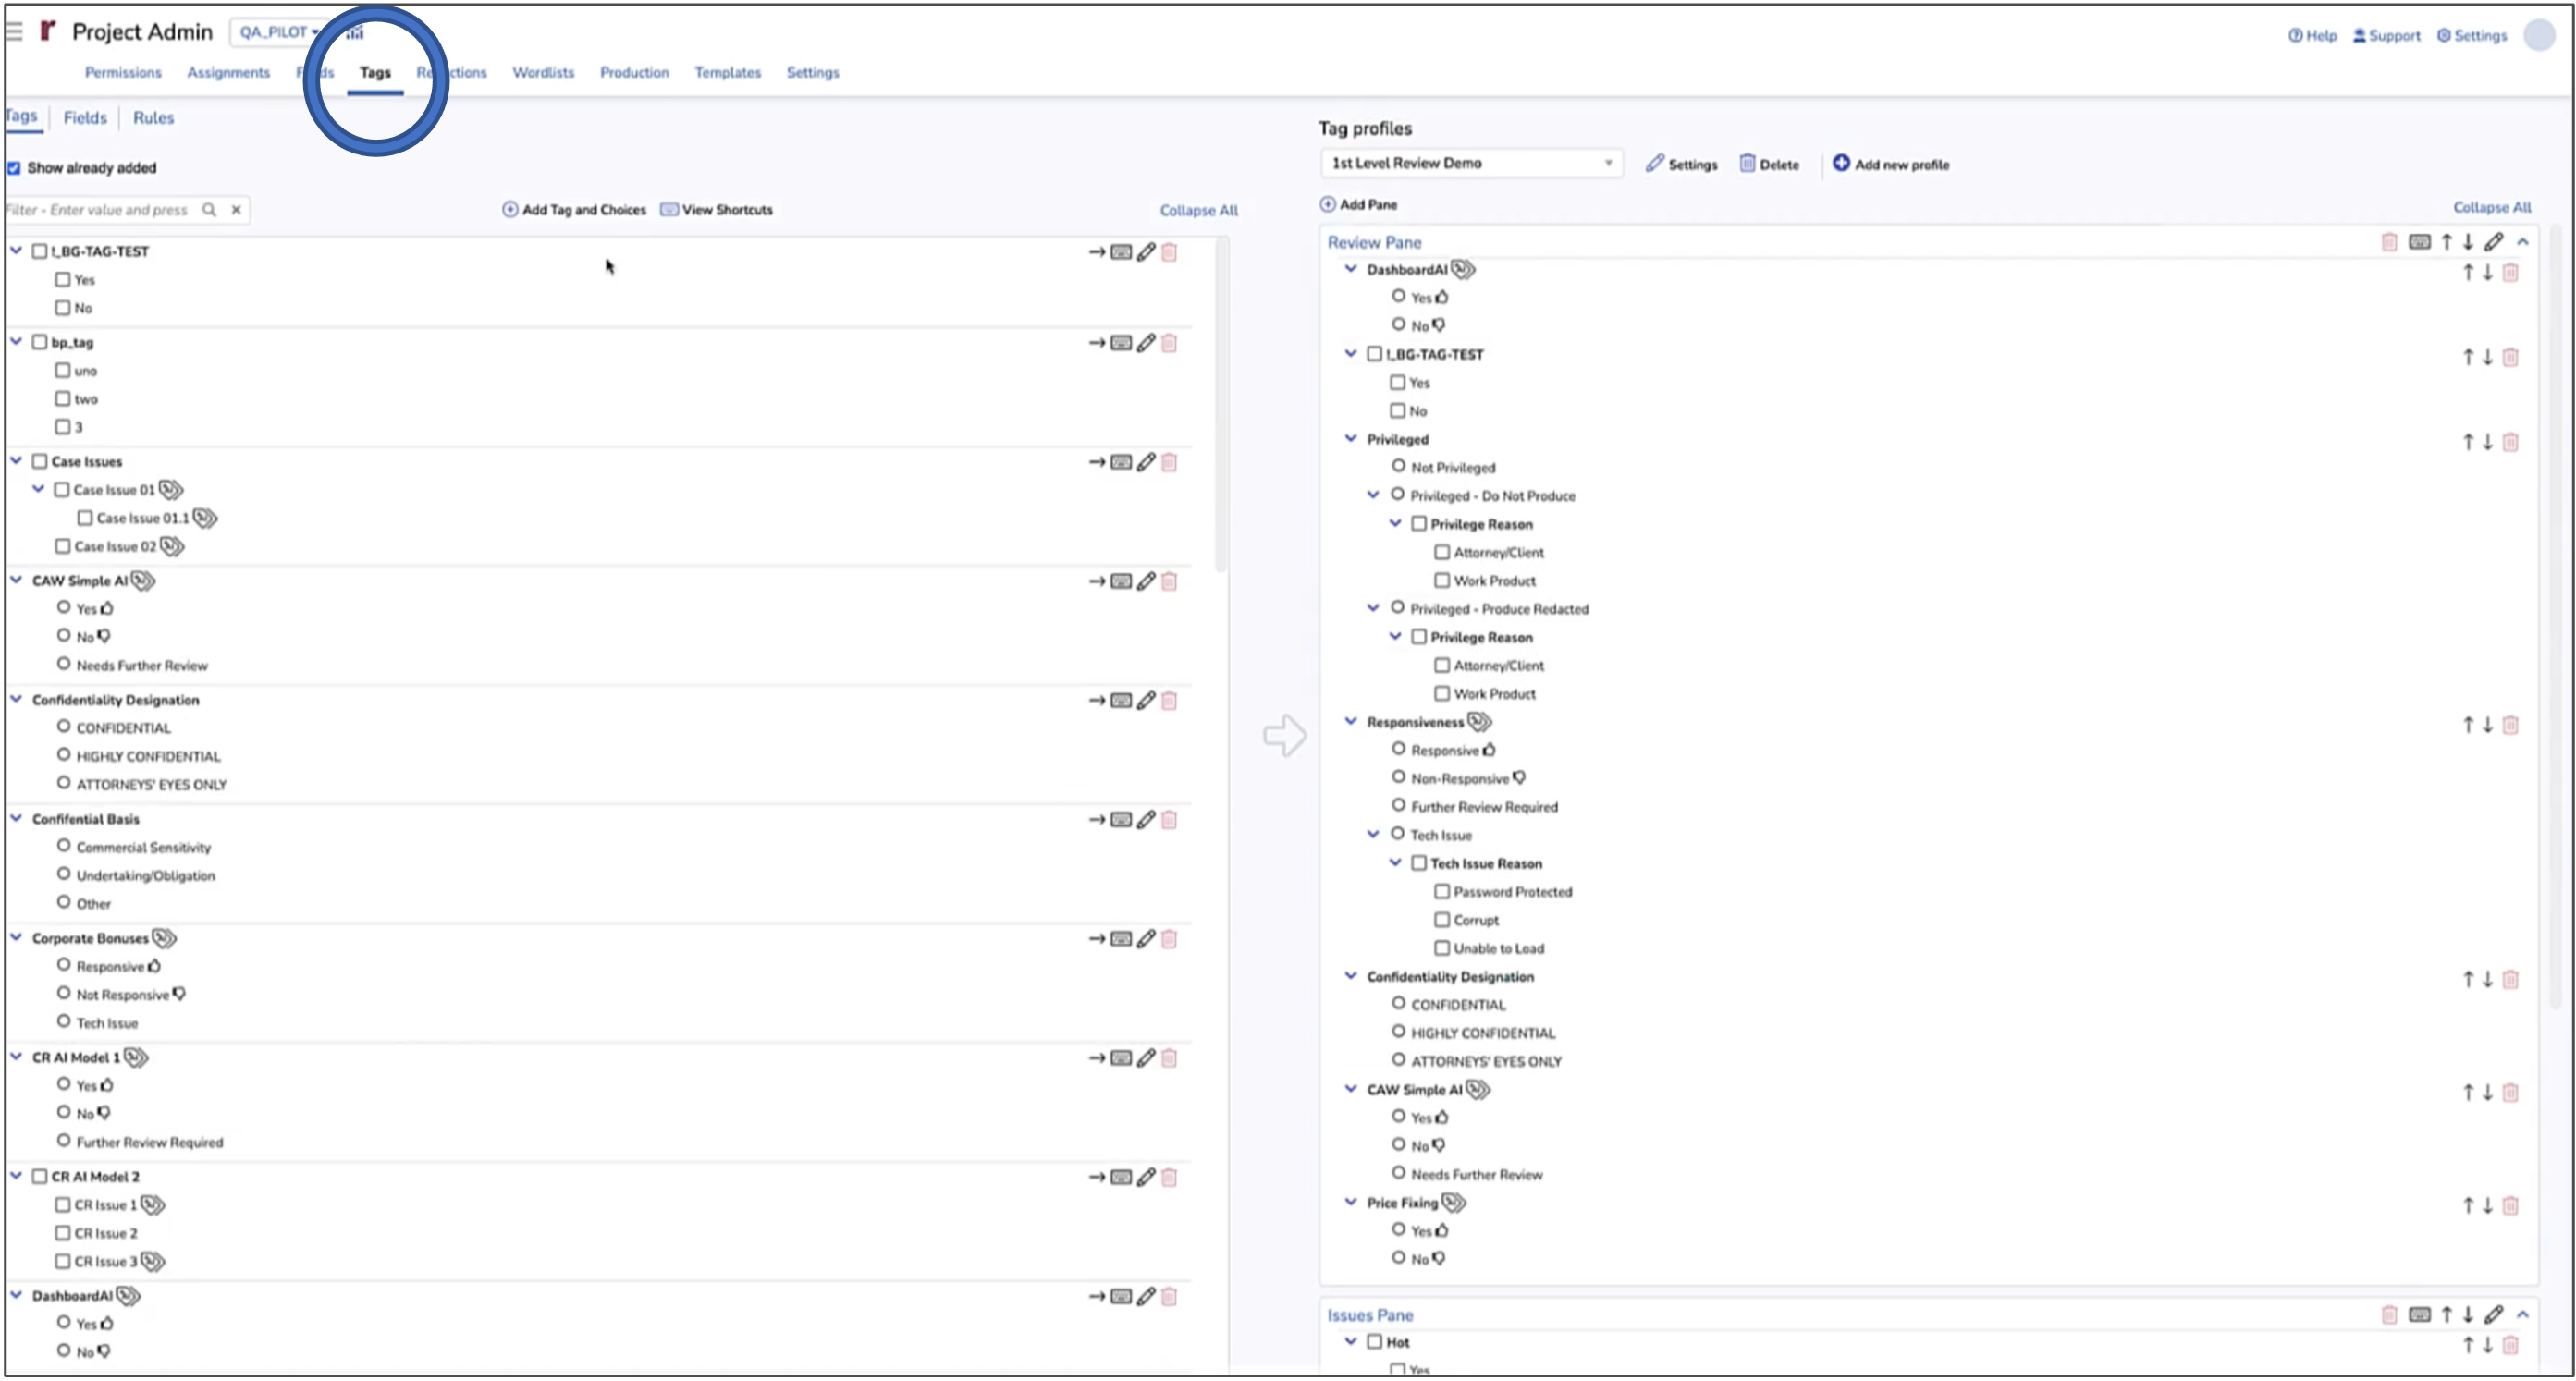
- Click the Add Tag and Choices menu option.
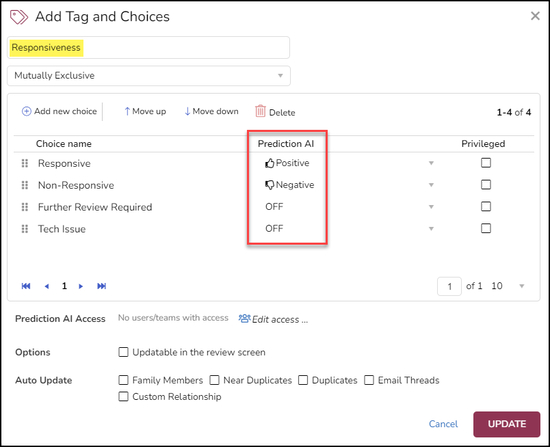
- To make a Tag an AI Tag, you need to ensure that the Prediction Enabled option is checkbox is selected for each choice. There are two options available when creating a Tag. Those options are:
- a mutually exclusive (binary) tag
- a multi-select tag
For mutually exclusive tags, the system will create a single Classifier and use the “positive” and “negative” choice to train the Classifier. The positive choice represents the type of content you’re looking for as it relates to a specific issue, whereas the negative choice represents the unwanted or not important content. For multi-select tags, the system will create a Classifier for each choice. For example, if you have a multi-select tag called “Fraud” and you can have tag choices such as “Compliance”, “Financial”, “Legal”, etc. There would be a Classifier created for each of these choices. When coding documents using a multi-select tag, you must decide if a given document is relevant or not relevant to each of the choices, or in this case, to each of the types of fraud.
When users create the AI Tag, Reveal will automatically create a new Classifier to train the machine on how to score documents (score between 0 and 100).
Please see the How to Create and Manage Tags article for more information.
Once your new AI Tag is created, you're ready to select documents to begin training the corresponding Classifier(s).
Creating AI-Driven Batches
AI-Driven Batches use artificial intelligence to select documents for Classifier training. AI-Driven Batches eliminate the manual task of selecting documents for training. With AI-Driven Batches, the system will intelligently select documents that best represent the overall document population (diverse) or it will select documents based on high predictive score values. These two options are referred to as Batch Composition.
Please see the How to Create AI-Driven Batches article for more information.
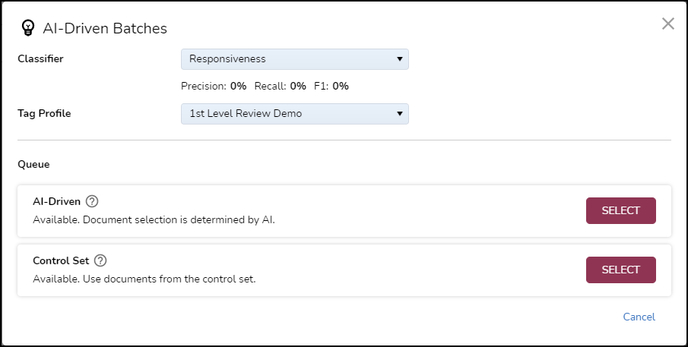
Creating Control Set (Optional)
If you want to measure the effectiveness of your new Classifier against a set of target metrics such as Recall, Precision, and F1 Score, it is recommended that you create a Control Set. A Control Set is just another AI-Driven Batch. Reveal automatically selects documents to be included in your Control Set. Subject matter experts will need to review the Control Set. Once all of the documents have been coded, you can then begin create AI-Driven Batches to train the Classifier.
Code Documents
As you begin coding documents within your AI-Driven Batches, Reveal will automatically run a training round for your Classifier(s) after a minimum number of documents have been coded. This minimum number of documents is referred to as the Retraining Interval.
The default setting for the Retraining Interval is 10.
The Retraining Interval setting can be adjusted by navigating to the Supervised Learning tab. Then click on the gear icon in the upper right corner of your Classifier. Scroll down to the Batch Configuration section. In addition to Retraining Interval, you can also set a minimum number of Positive examples to code before the training process kicks-off. This Minimum Positive Examples setting can also be found within the Batch Configuration section.
Here is an example of a standard Document Review screen tag pane in Reveal. In this screenshot you can see both the Responsive and Non-Responsive choices for the Responsiveness AI Tag, with the other two choices only there to inform the project manager of any issues encountered during document review.
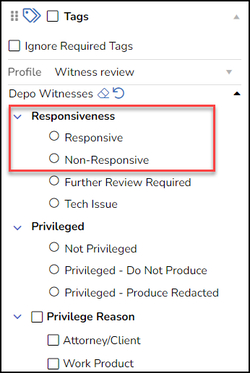
The reviewer's choice of Responsive or Non-Responsive will be analyzed with the document's content to refine the AI Model's predictive scoring of further documents.
Evaluating an AI Model
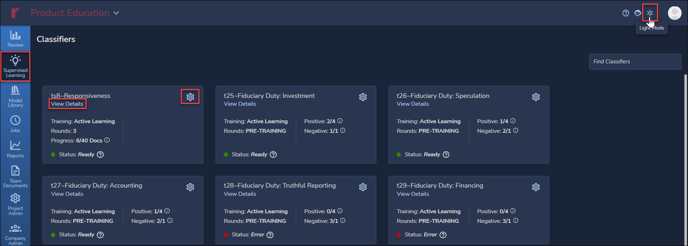
An important part of the training process is to assess how the actual coding compares with the model's predictions. This is done in the Supervised Learning > Classifiers screen (shown here in Dark Mode). To examine the status of a current model, click on View Details on the Classifier card below its title.
In the details window for the selected classifier you will find graphs and statistics.
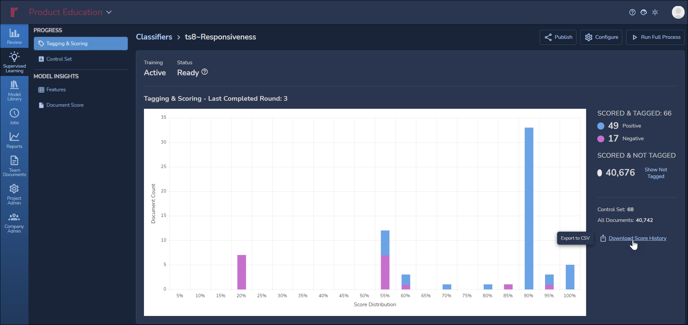
The above image shows a graph of Tagging & Scoring results. This graph shows actual tagging for this classifier, broken out as document counts of Positive and Negative reviewer assessments of Responsiveness as compared with the related AI Model's assessment of likely responsiveness. As of 3 rounds in which 66 documents have been tagged so far, there are 49 Positive and 17 Negative. In this way, a project manager can see at a glance how user coding compares with the model's prediction.
NOTE that negative tagging is extremely important in training AI models, in that these help define document language that fails to address the subject matter of this tag, which is Responsiveness.
The details to the right of the graph provide further information, including how many documents have not yet been tagged and the number of documents whose scoring according to current training is Uncertain.
Further training will help to stabilize the classifier and reduce the number of Uncertain documents. Reveal will include Uncertain documents in batching to gain a better understanding of the factors involved in scoring for this classifier.
At the bottom of the details is a link to Download Score History, which will export the numbers as a table to CSV, as in the example below. 
Below that is the Control Set chart with numbers to the right displaying Precision, Recall, F1 and Richness for the set Score Threshold. As the AI model is trained by the classifier, this will display the percentage of documents identified as relevant for accuracy (Precision), inclusiveness (Recall) and quantity of desirable attributes (Richness), which are calculated into a summary score (F1). The slider below the graph allows the user to see the number of documents required to achieve a desired level of Precision balanced against Recall. -1.png?quality=high&width=688&name=35%20-%2006%20-%20View%20Classifier%20Details%2002%20(Control%20Set%20-%20rmvStability)-1.png)
For further details on evaluating AI Tags see How to Evaluate an AI Model. For more on configuring settings for classifiers and further details, see Supervised Learning Concepts.
Prioritize Review
You can immediately begin prioritizing which documents to batch out to the review team once the first training round completes. At the completion of the first training round, Reveal will automatically populate a field (named after the Classifier) with the predictive scores calculated at the conclusion of the training process. You can add this new predictive score field to any Field Profile within the Grid or create batch Assignments by sorting documents within a batch in ascending order using the predictive score field.
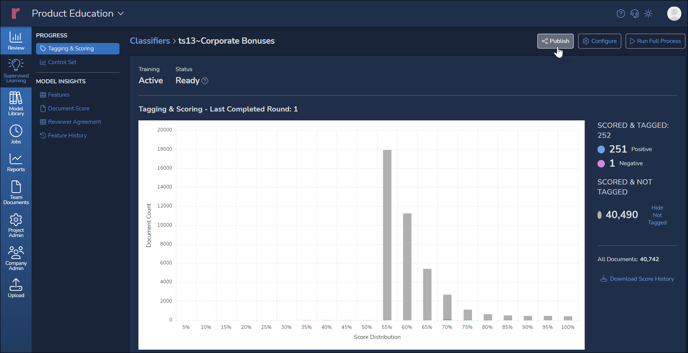
Publishing a Model
A project model can be published to the AI Model Library for use in other projects. The classifier, once trained, can offer a starting point for analysis of a new project having similar characteristics.
Publishing a model starts under the Supervised Learning section by opening View Details on the selected classifier card. Click Publish in the upper right of the screen.
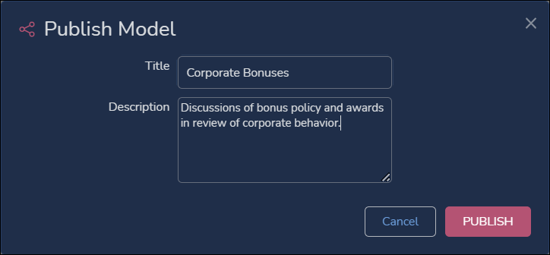
Enter the Title and Description for the model and click Publish to start the model generating process. NOTE: By default you need to have at least 4 positive samples and 1 negative sample in order to publish the model automatically; 1 positive sample and 1 negative sample are sufficient to publish, but the more coded samples provided, the better the model.
When Publish is clicked, there will be a green-framed notice at the top center of the screen notifying you that <Model Name> was successfully published.
The model will appear as a card in the Model Library, from which it can be downloaded in NPS format, after a period of back-end packaging.
AI Model Library
Models from the Reveal AI Model Library can be added to provide a training baseline for specific topics and scenarios. These models have been developed by Reveal for their applicability in many common litigation scenarios.
Library models are found under the Supervised Learning section by opening Edit Classifier, the gear icon in each Classifier card. When you Edit a Classifier, the AI Library Models section will be displayed near the top. Each AI Library Model card will feature a brief description and a button to +Add the model to the current project. 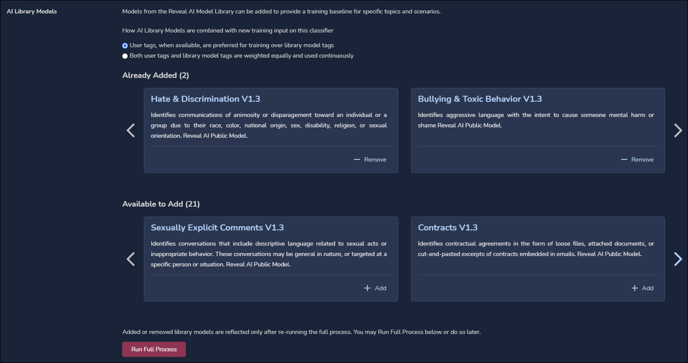
Added or removed library models are reflected only after re-running the full process. You may Run Full Process below or do so later.
Click the Run Full Process button to have the model address the project data. The project's documents will now be scored with this model as part of the current classifier in the manner that you have elected for your AI Library Models, with User tags preferred or with the model and User training weighted equally, along with any other models that may be added to this classifier.
For further details, see AI Model Library.
Last Updated 10/26/2023