
Document Purpose
There are four types of Pilots that the SSE team supports. Two of the Pilot Types is Production and Live. These Pilot Types require a production environment so that the prospect can test the full Reveal Platform.
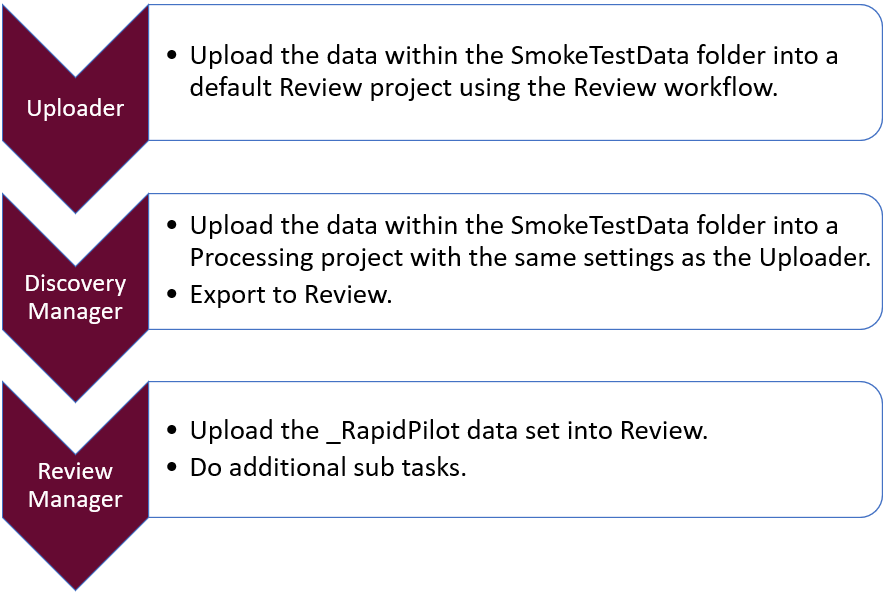
This document will provide the steps to properly smoke test a new production environment prior to providing it to the client. This will consist of three tests for the Discovery Manager, Uploader, and the Review Manager.
Technical Documentation
To access all technical documentation within the Reveal Discovery Platform, please go to our Online Help Portal.
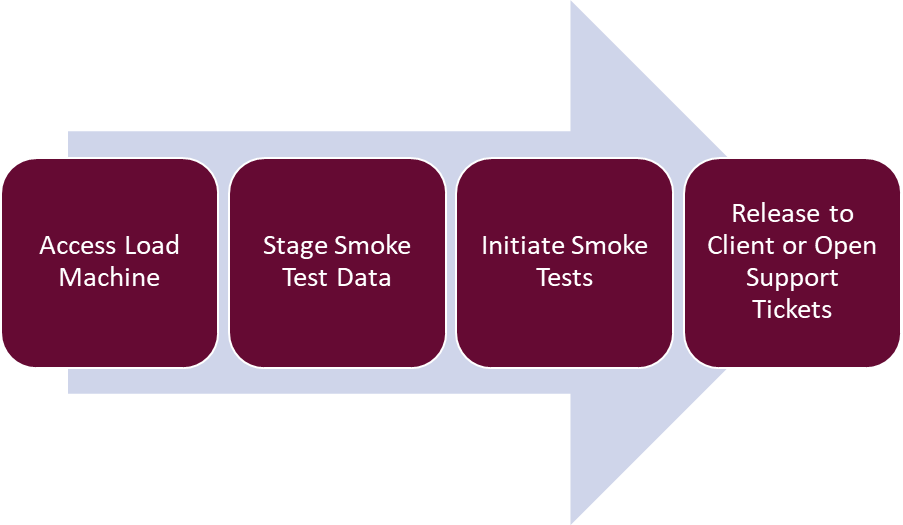
High Level Process Overview
Below provides the high-level illustration of this entire process.
Access to Load Machine
All Load Machine access is administered through Perimeter 81. To access a Load Machine, you can follow the high-level steps below.
- https://landing.revealdata.com
- Use your Reveal Universal ID to login
- Find/click on the icon for your Load Machine by searching for the MSA.
- If you cannot find or access your Load Machine, please email support@revealdata.com and ask for access.
Please take note of the MSA or 8-digit number in the name of the machine. This is the MSA number for the pilot.
Stage Smoke Test Data
There are three steps to stage the Smoke Test Data.
- Download the test data to the Load Machine.
- Copy/Unzip the data to the root of the Z:\ drive on the Load Machine.
- Copy the Smoke Test Data to the Pilot’s S3 Bucket.
Download Test Data
Follow the steps below to download the Test Data.
- On the Pilot’s Load Machine, use the following link in Chrome to download the Test Data,
- https://revealdata-public-test-data.s3.us-east-1.amazonaws.com/%21Smoke%20Tests.zip
Copy/Unzip the Data
- After downloading the zip file, copy it to the Z:\ drive of the Load Machine.
- Unzip this file to the root of the Z:\ drive so it looks like the below.
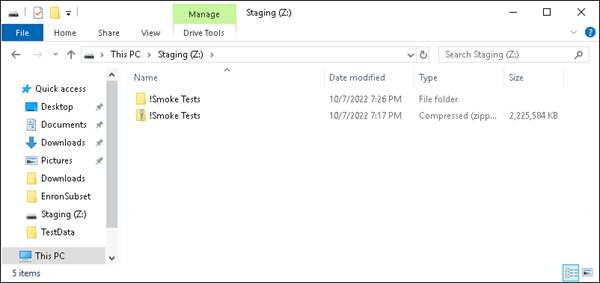
It is possible to receive a permissions error when trying to copy the zip file to the root of the Z:\ drive. If this happens, create a folder named '!Smoke Tests' at the root of the Z:\ drive, copy the zip file into this folder, and extract the contents of the zip file into this folder. Do not repeat the '!Smoke Test' underneath the '!Smoke Test' folder.
This data must be on the root of the Z:\ drive as illustrated above. If the data is not staged in this manner, the importing of the natives/text will fail in the Review Manager portion of the test below. If other files and folders exist on the Z:\ drive that is fine as well.
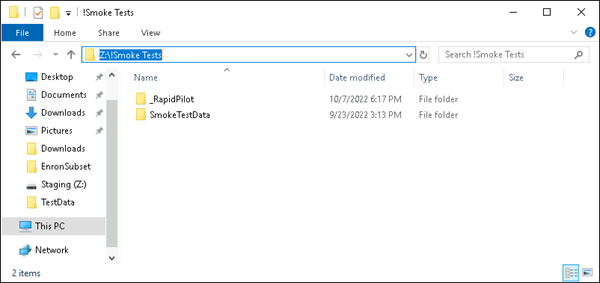
Copy Smoke Test Data to S3
The Smoke Test for Discovery Manager requires processing from the MSA's S3 Bucket. Follow the steps below to copy the Smoke Test Data from the Z:\ drive to the proper S3 Bucket.
- On the Pilot’s Load Machine, open the S3 Browser, and access the Temporary folder for the S3 Staging Bucket for the MSA you are smoke testing. If you have not accessed the S3 Browser before, please see this video.
- Please note that this video is specifically for the SSE team.
- If you are not on this team and you are unsure of how to access the proper S3 Bucket, please contact support@revealdata.com. Make sure to provide support the MSA for the environment.
- Connect to the S3 Staging Bucket for the MSA.
- Open the unzipped !Smoke Tests folder, and drag and drop the SmokeTestData subfolder into the Temporary folder in the MSA's Bucket. Please do not copy the _RapidPilot folder to S3.
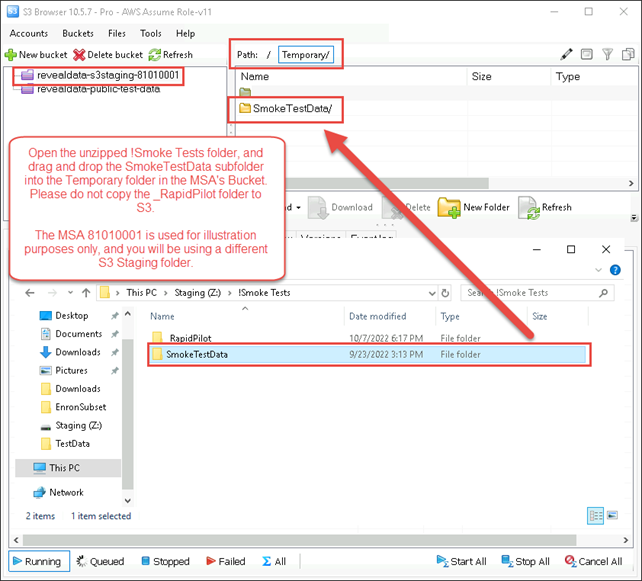
The MSA 81010001 is used for illustration purposes only. You will be using a different S3 Staging folder in your setup.
Smoke Test Setup
Reveal Review Manager is used to administer your instance of Reveal Review. In Review Manager, you can do any number of functions associated with the administration of Review such as create databases, manage users, load large amounts of data, set analytics and more. To see more information about this, please see Reveal Review Manager Overview.
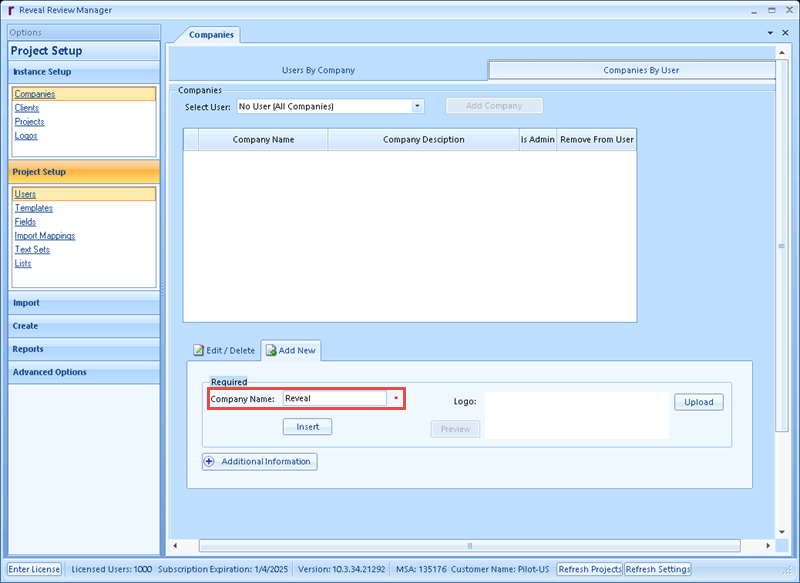
Create Company
The Reveal Company may already exist. If it does exist, please skip this step, otherwise create the Company Reveal using the steps below.
A Company is the highest level of organization in our permission structure. Please create a Company named Reveal.
- Open Review Manager on the Load Machine
- Expand Instance Setup
- Click Companies
- Click the Add New tab
- Enter Reveal as the Company name, and click Insert
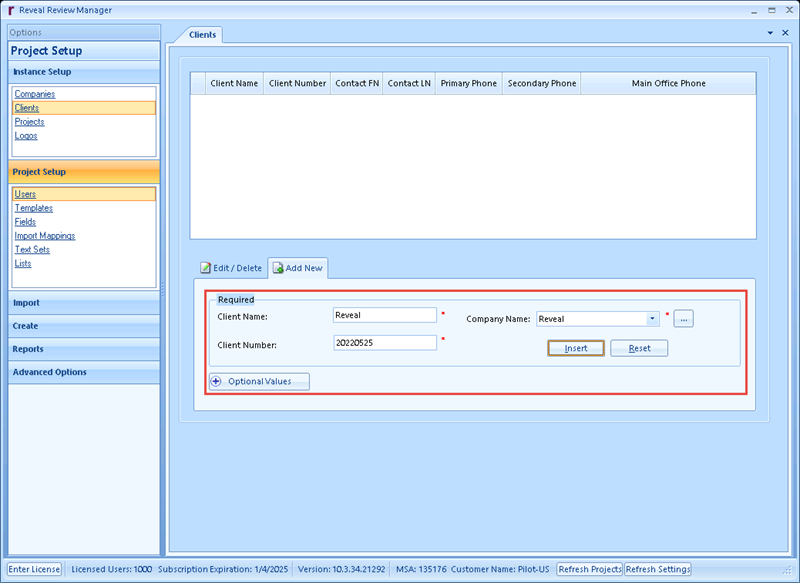
Create Client
This Client may already exist. If it does exist, please skip this step, otherwise create the Client Reveal using the steps below.
A Client is only associated with one Company. A Client can have multiple projects associated with it and is a way to keep a logical structure to the projects.
- Open Review Manager on the Load Machine
- Expand Instance Setup
- Click Clients
- Click the Add New tab, enter Reveal as the Client name, enter a Client Number (typically a number, recommended to use date created in YYYYMMDD format), associate the Client with a Company, and Click Insert
Create Rapid Pilot (RP) Enron Project
After creating or using a previously created Company and Client, follow the steps below to create a new Rapid Pilot.
- Open Review Manager on the Load Machine
- Expand Instance Setup, select Projects
- Click the New tab
- Enter the Project Name (use ‘RP_’ as the prefix, the client's MSA_Enron as the project name, i.e. RP_81010001_Enron), enter a Project ID (typically a number, recommended to use date created in YYYYMMDD format), associate the Company/Client, choose the Reveal InControl Standard Template, and UTC for Time Zone.
- Click Create Case
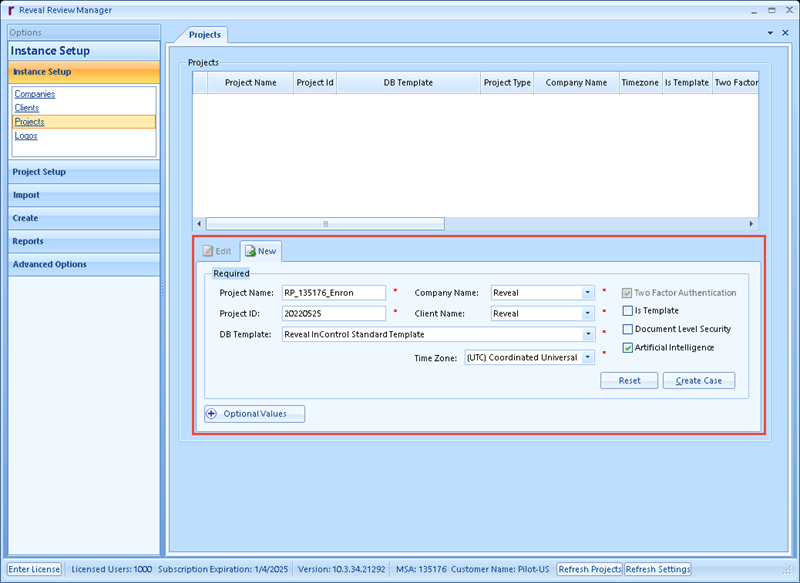
You will always choose Reveal as the client and company, but the MSA in the case you create will be different. The MSA provided in this document of 135176 is there for instructional purposes.
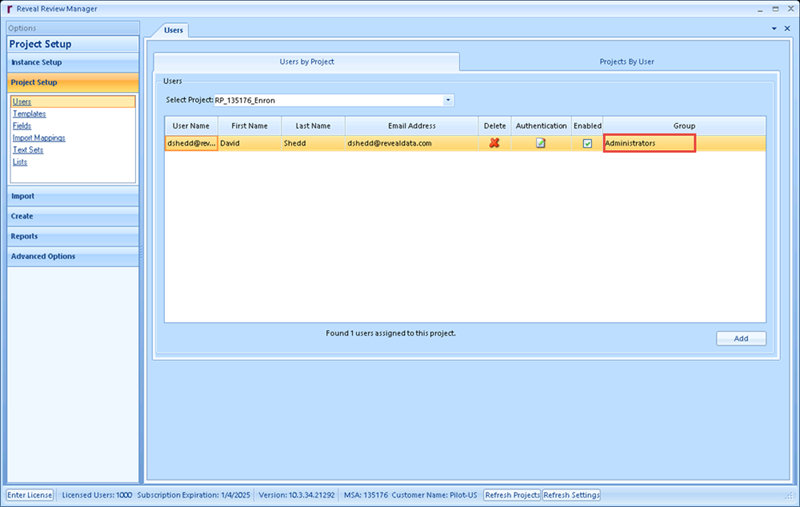
Rapid Pilot (RP) Enron User Setup
After creating the project, there are a few things that must be done prior to importing the data.
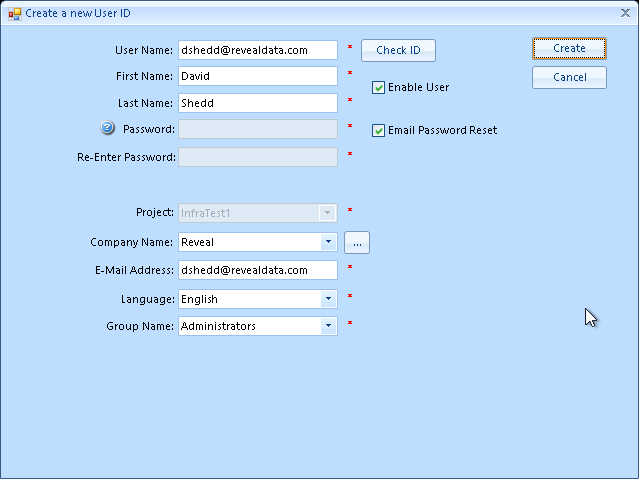
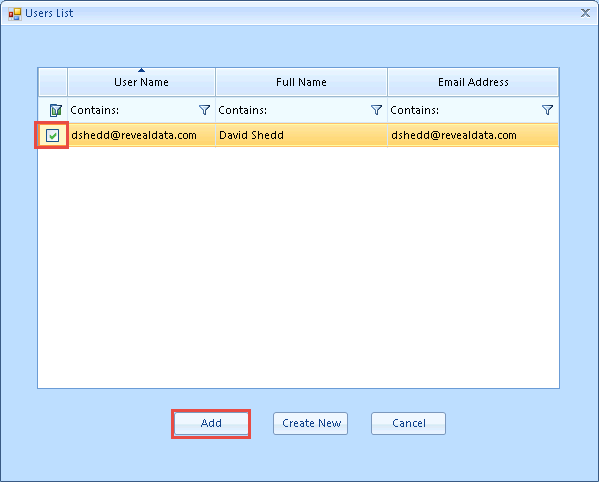
Create Review Account and Add to Rapid Pilot Project
Create a Review account for yourself and make your user a Company Admin as detailed below.
Open Review Manager on the Load Machine- Expand Project Setup
- Click Users
- Click Add
- Click Create New, fill in the Create a new User ID form, and click Create
- Choose the Review Account, and click Add
- Change Group to Administrators
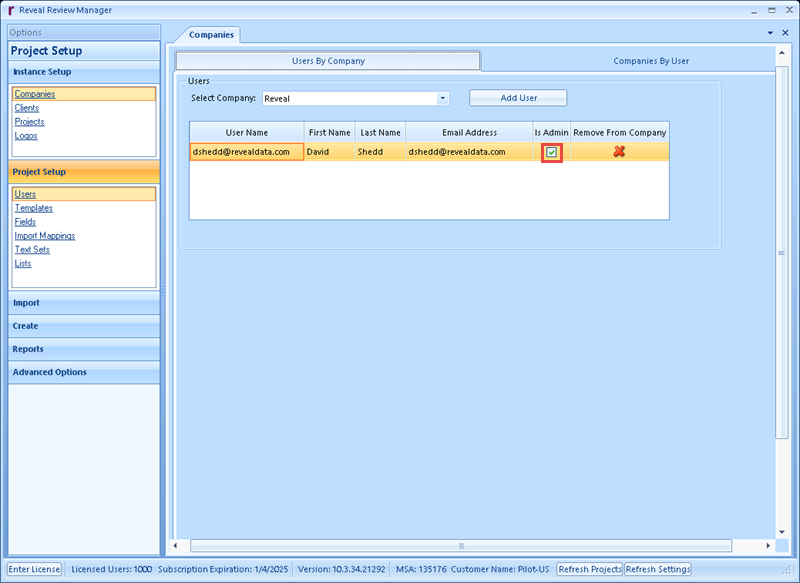
Company Admin Rights
A user must have Company Admin rights to create users or a project within Review. To make a user a Company Admin follow the steps below.
- Open Review Manager on the Load Machine
- Expand Instance Setup, and select Companies
-
Ensure the Company created associated with Rapid Pilot is the one selected
- Click the Users By Company tab
- Click Add User, and choose your user
- After adding the user select the checkbox Is Admin.
Checking for Company Admin Rights in Review
If a user does not have access to the Load Machine, but wants to check for Company Admin rights, the user can check within Review.
- Log into Review
- You can get the URL to Review to any environment in Review Manager by expanding Advanced Options, click System Settings, and in the Value column type 'indexserverserviceclient'. When copying this URL result, exclude '/review_indexserver' from the result.
- Click Admin
- Click the Menu button in the upper left-hand corner and look for Company Admin.
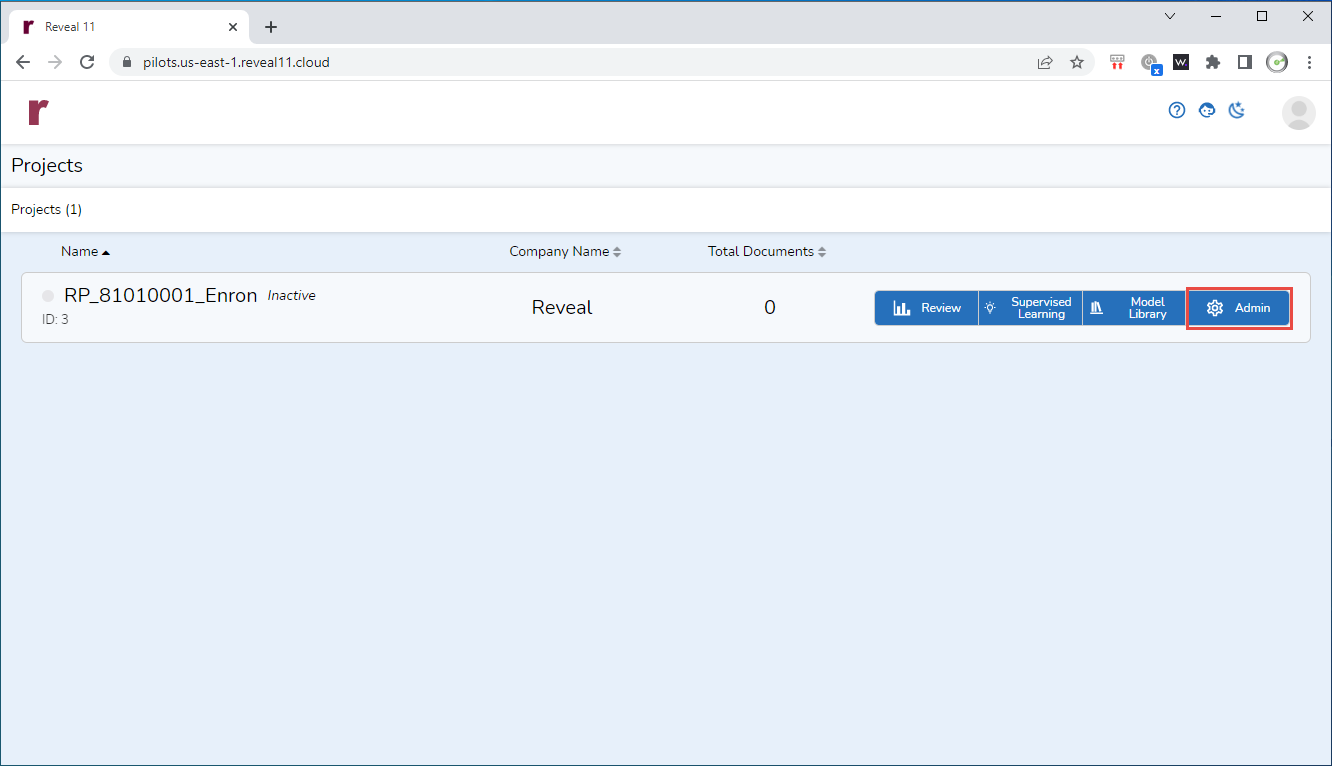
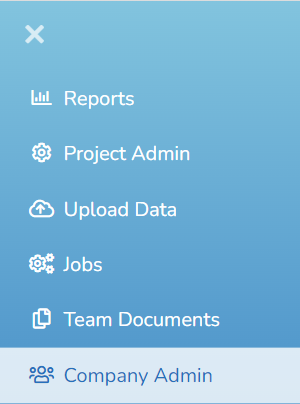
Please note if Company Admin is not visible, a user with access to the Load Machine will need to grant Company Admin rights via the steps above.
Initiate Smoke Tests
There will be a total of 3 smoke tests. The first two smoke tests use the data within the folder SmokeTestData, and we will compare the results to make sure they match. The final smoke test of the Review Manager uses the Rapid Pilot data set. This test is more involved, as this will be a project we use for the clients when it comes to administering demos, training, etc. during the Pilot.
Smoke Tests High Level Overview
Uploader Smoke Test
We will upload the data within the folder SmokeTestData into a new project created in Review. To accomplish, follow the steps below.
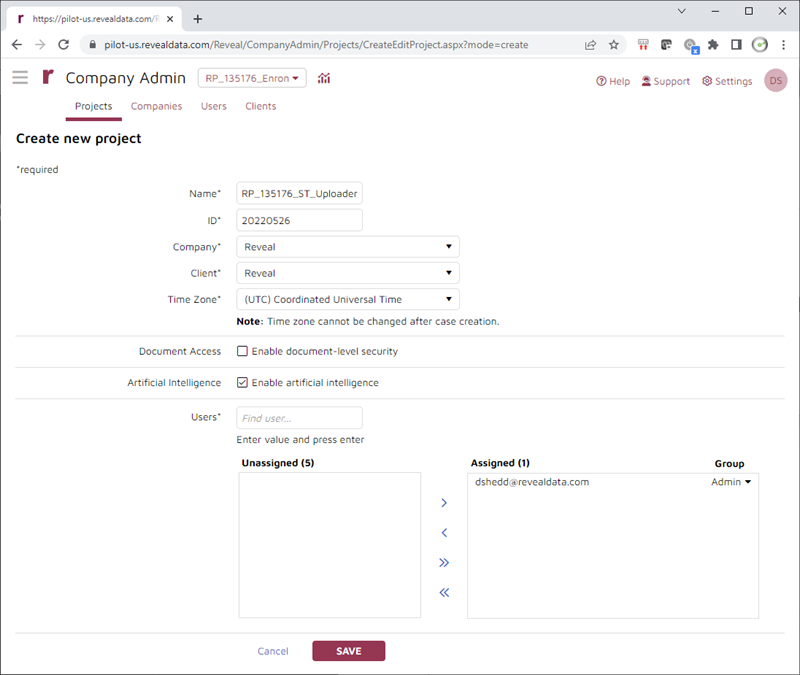
Create Project in Review
- On the Load Machine, login to Review
- Choose Menu -> Company Admin
- Click

- Enter the Project Name (use ‘RP_’ as the prefix, the client's MSA_ST_Uploader as the project name, i.e. RP_135176_ST_Uploader), enter a Project ID (typically a number, recommended to use date created in YYYYMMDD format)
- You will always choose Reveal as the client and company, but the MSA in the case you create will be different. The MSA provided in this document of 135176 is there for instructional purposes.
- Choose the Review Account and assign to the Admin Group
- Click Save
If you get an error stating the Project ID already exists for the specified project/client, please make the Project ID a unique number (suggested to back date Project ID by one day).
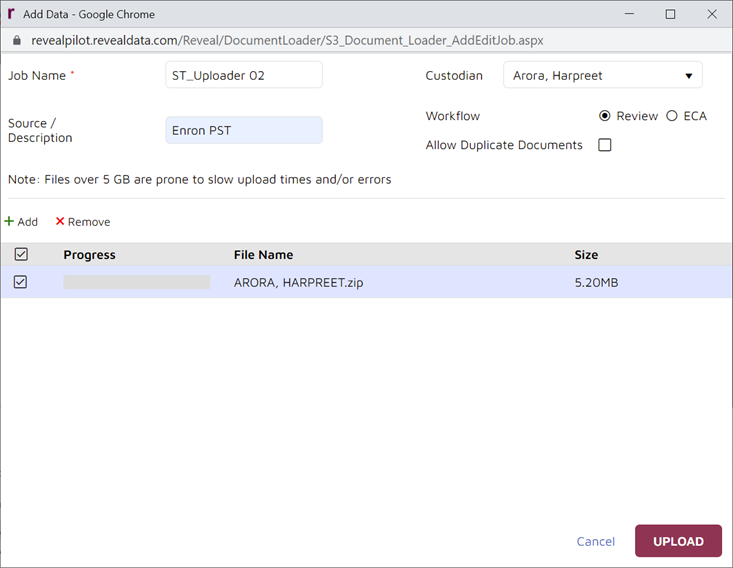
Upload Data
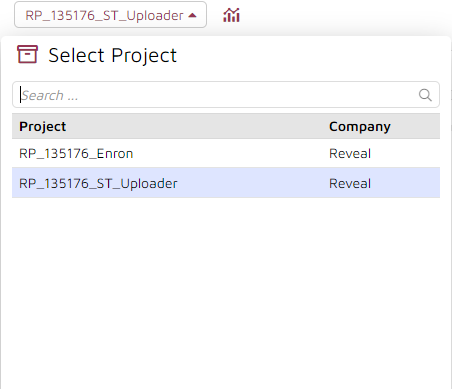
- After creating the project, switch to the project in the drop down.
- Click Menu -> Upload Data and upload the two zip files in the folder Z:\SmokeTestData separately, and use the zip file name as the custodian name.

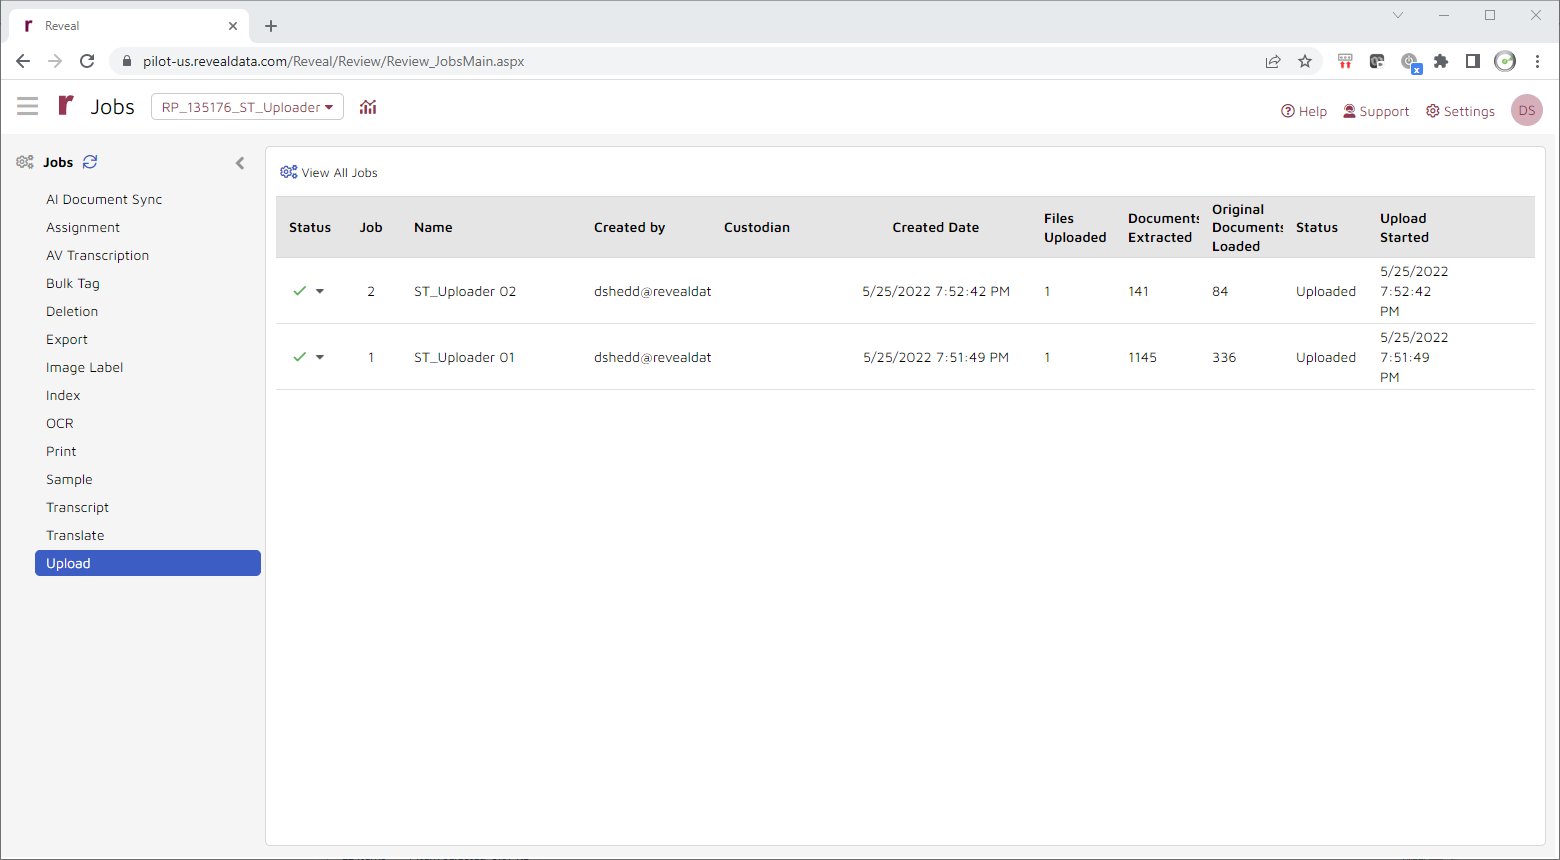
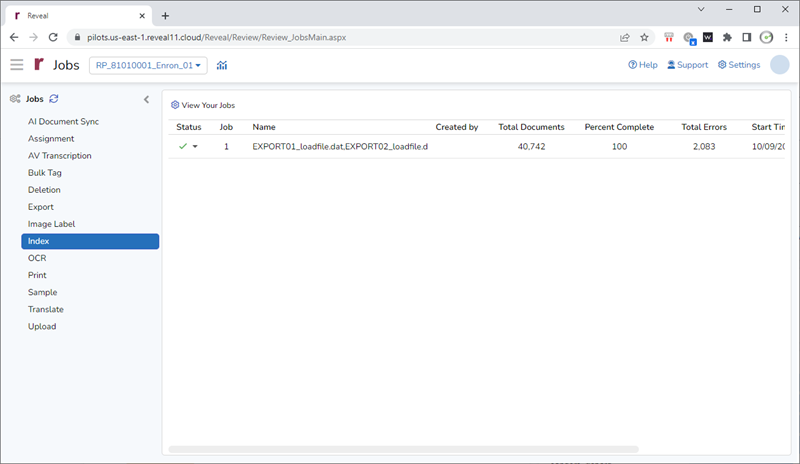
Monitor Progress
- To monitor the process, go to Menu -> Jobs -> Upload. The job will be complete when the jobs have green check marks. Make sure the counts in your project match the counts in the screen shot below.
- After the upload completes go to Menu -> Jobs -> Index, select View All Jobs, and you will see the indexing process of the upload. Make sure the counts in your project match the counts in the screen shot below.
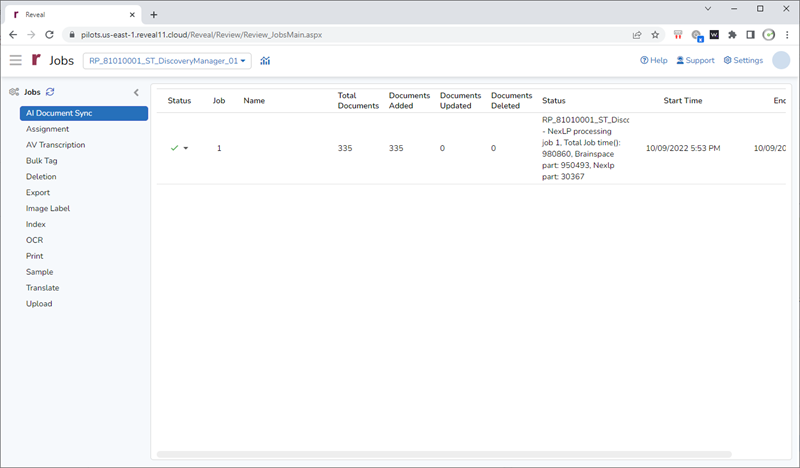
- After the index completes go to Menu -> Jobs -> AI Document Sync, select View All Jobs, and you will see the indexing process of the upload. Make sure the counts in your project match the counts in the screen shot below.
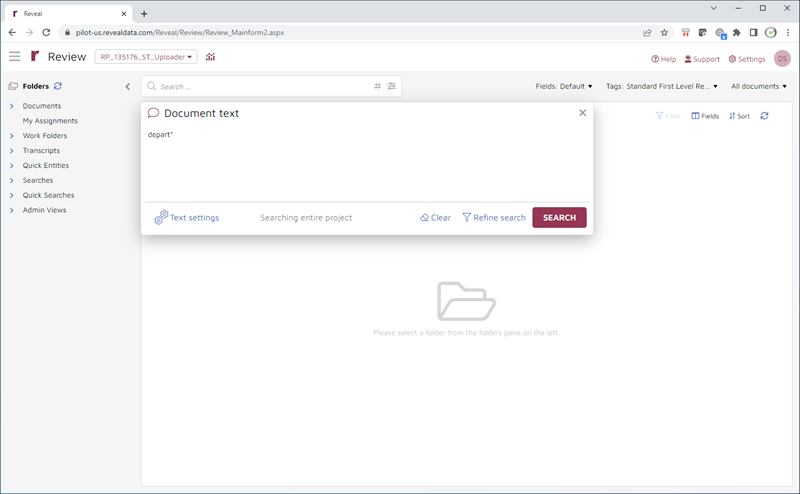
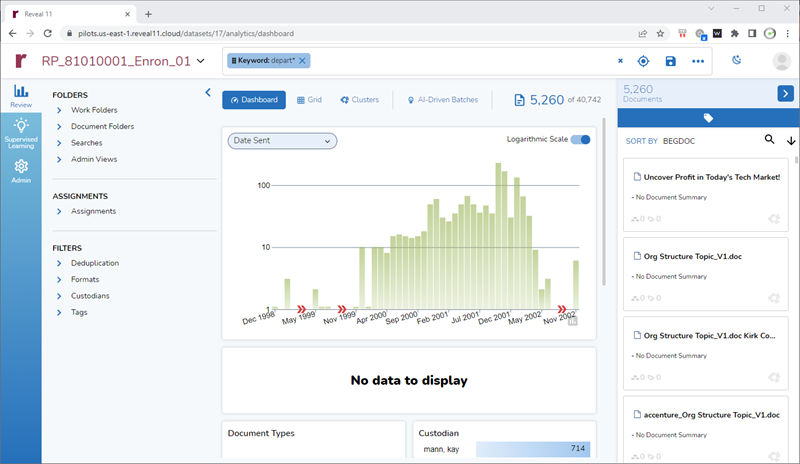
- Run the term depart* to make sure 34 documents are returned.

Discovery Manager Smoke Test
We will upload the data within the folder SmokeTestData into a new project created in Discovery Manager. To accomplish this, follow the steps below.
Add Review Credentials in Discovery Manager
- On the Load Machine, open the Discovery Manager
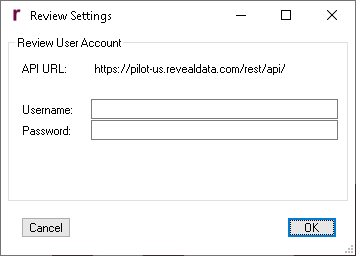
- If the following pop up is shown, please enter in the Review Account username and password. If the pop up does not appear, open Review Account in Discovery Manager and enter in your credentials.
Associate Reveal Client in Discovery Manager
- On the Load Machine, open the Discovery Manager
- Click the button Edit/Delete Clients in the Home Ribbon
- Select the client Reveal if not selected and click the Edit Selected Client button.
- Click Change Review Client Association and choose Reveal from the Select Review Client drop down.
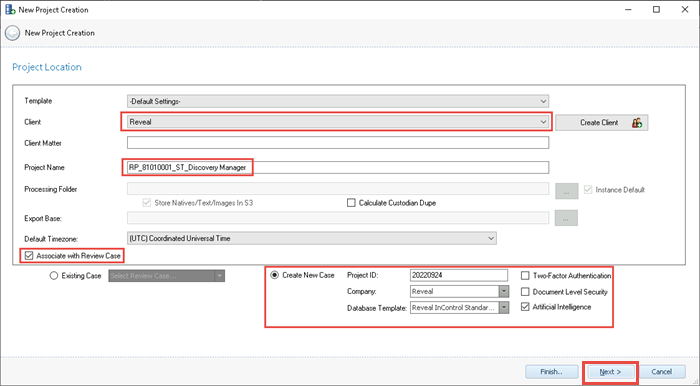
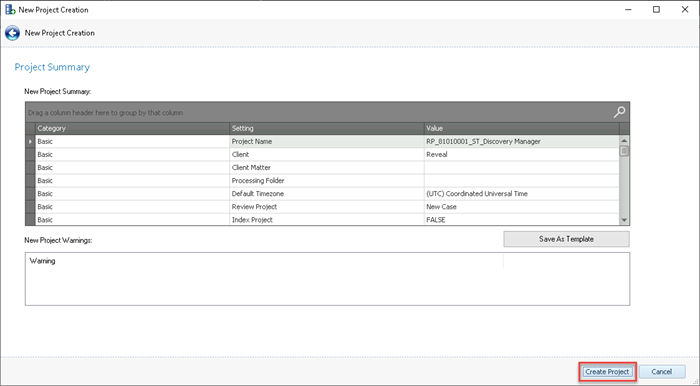
Create Project in Discovery Manager
- Click the New Project button
- Leave the default template of -Default Settings-
- Choose the Client Reveal from the drop down. If the client does not exist, create the client by clicking the Create Client button.
- Enter the Project Name (use ‘RP_’ as the prefix, the client's MSA_ST_Discovery Manager as the project name, i.e. RP_135176_ST_Discovery Manager)
- Click Associate with Review Case
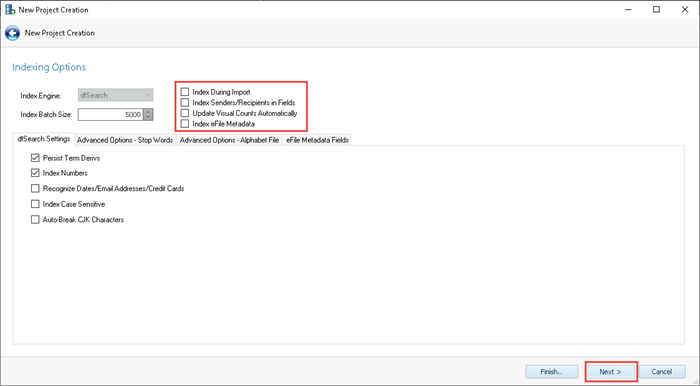
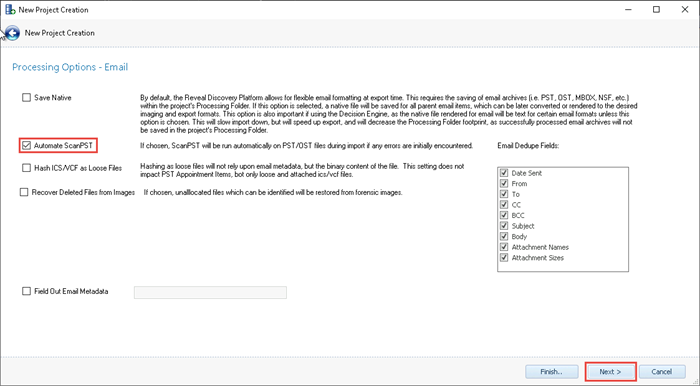
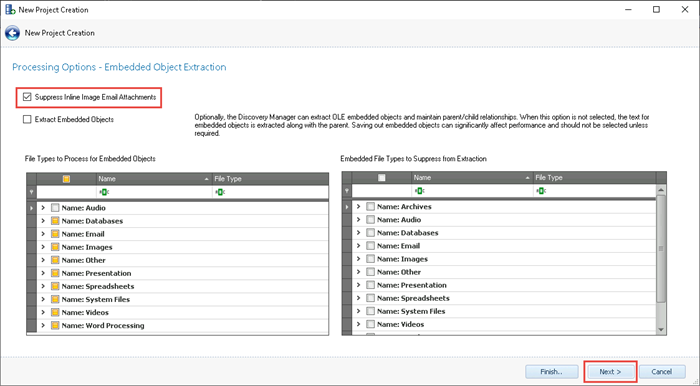
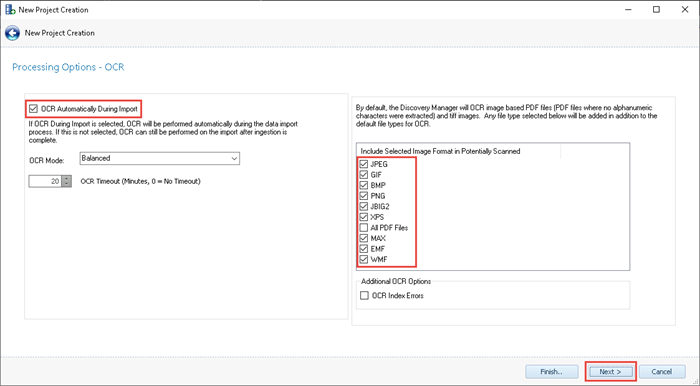
- Select Create New Case, enter a Project ID (typically a number, recommended to use date created in YYYYMMDD format), choose the Company Reveal, choose the Database Template Reveal InControl Standard, the checkbox for Artificial Intelligence, and click Next > and choose all the settings below.
- Do not click Finish, click Next. Only change the settings with a red box around them. All other settings, or missing wizard pages can be ignored and left to their default settings.
If you get an error when doing the above, but the project creates in Discovery Manager, you can create the Review project in Review Manager, and associate the case in Project Settings prior to doing the export below.
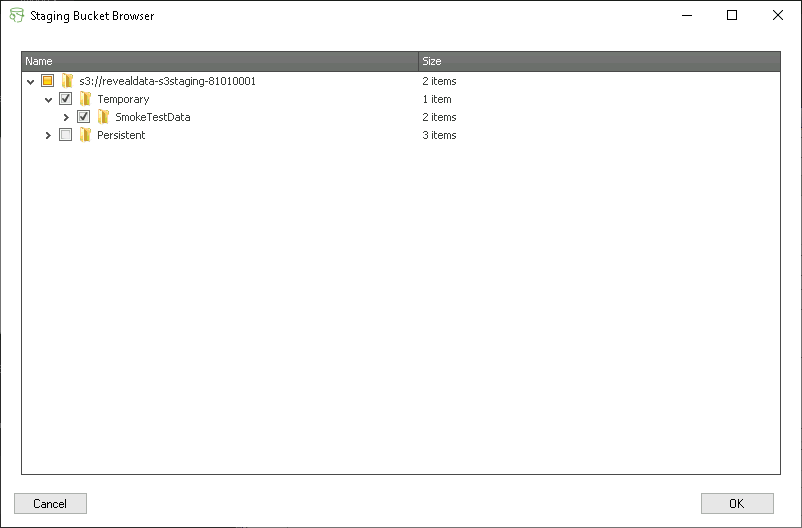
- After creating the project, go into the Imports Module
- Click the S3 Bucket Browser button

- Choose the SmokeTestData folder, and click OK
- Click the Import Selection button in the Imports Ribbon
Monitor Progress
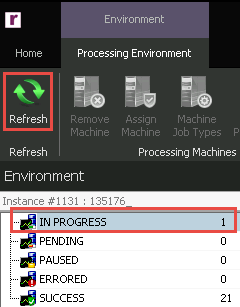
- To monitor the process, go into the Environments Module and click the Refresh button in the Environments Ribbon. When the job completes it will from In Progress to Success
Export Data
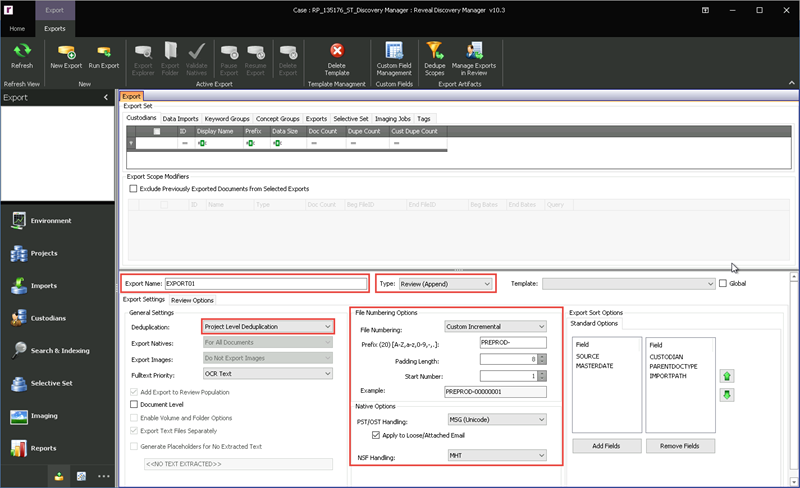
- Go into the Export Module, and set the following Export Settings
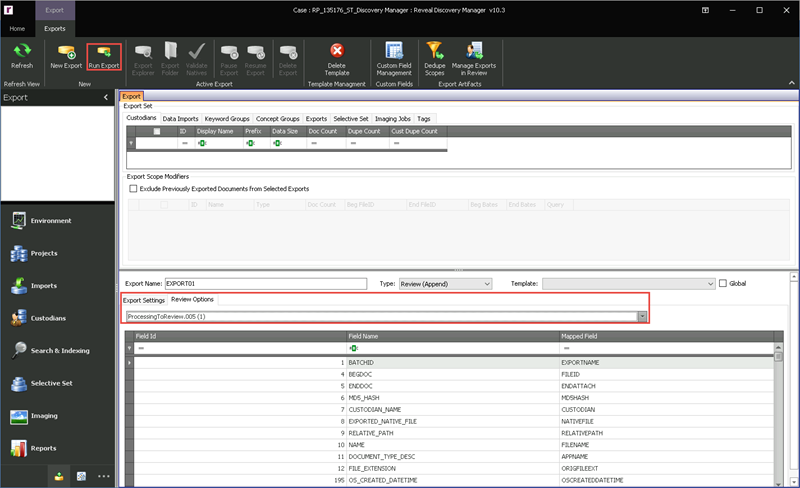
- Set the following Review Options, and click Run Export
Monitor Progress
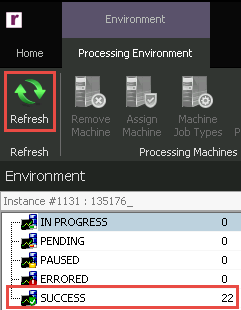
- To monitor the process, go into the Environments Module and click the Refresh button in the Environments Ribbon. When the job completes it will from In Progress to Success
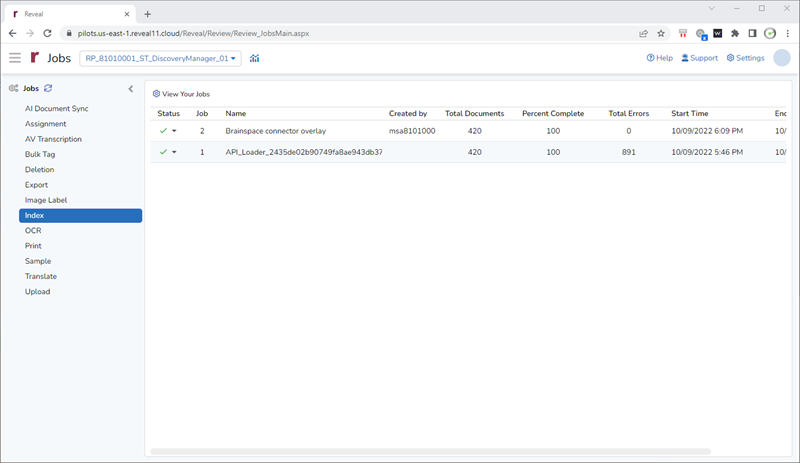
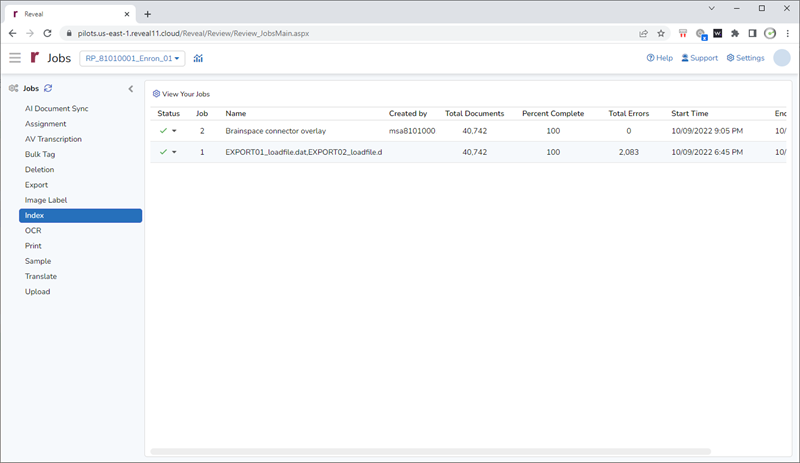
- After the upload completes go to Menu -> Jobs -> Index, select View All Jobs, and you will see the indexing process of the upload. Make sure the counts in your project match the counts in the screen shot below except for Total Errors. Please note that the Brainspace connector overlay is one of the last steps and will not show until everything is complete.
- Run the term depart* to make sure 34 documents are returned.
- Make sure the data loaded properly into AI by going to Menu -> Jobs -> AI Document Sync. If this shows complete
- Everything will be complete when the Candy Bar displays counts on the Dashboard, and that the index Brainspace connector overlay completed as well.


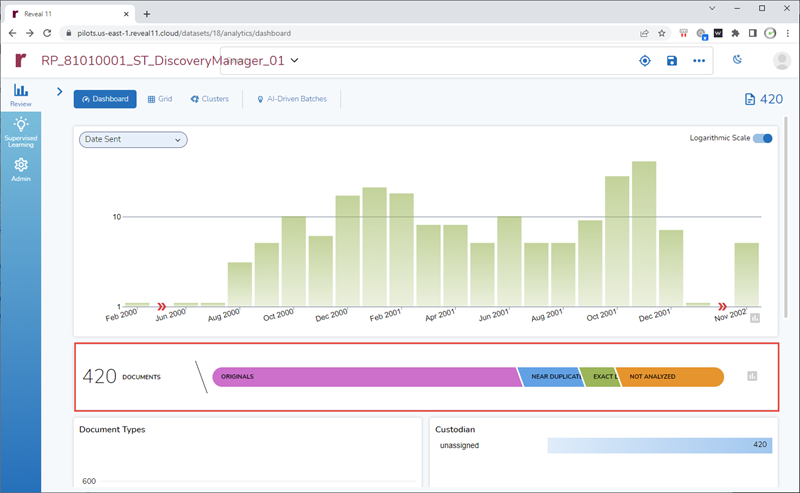
It can take upwards of 20 minutes for the Candy Bar and/or the Brainspace connector overlay to display after the AI Document Sync has completed.
Rapid Pilot Creation
The Rapid Pilot project was created in the Review Manager during the Project Setup. We will import data into the project. This requires importing the DAT file into the system and creating indexes. To do this, follow the steps below.
Please note the project in the screen shot is for illustration purposes only, and you should be choosing your project you created.
Import Data
We will import data into the project. This requires importing the DAT file into the system and creating indexes. To do this, follow the steps below. Please note the project in the screen shot is for illustration purposes only, and you should be choosing your project you created.
Import Mappings
A new field mapping will also need to be created to load the data.
-
Open Review Manager on the Load Machine, Expand Project Setup and Click Import Mappings
-
Browse to the following DAT file
-
Z:\20240303_RapidPilot\20240303_RapidPilot_loadfile.dat
-
-
Click Match All Fields.
-
Sort by the field Table Name, click in one of the fields that say -- Select -- and find/remap only the fields that show here as they did not map properly (there will not be that many). The fields that appear under the drop-down are the fields to find under table name. Remap each of these fields. When this is complete, there will be no more fields remaining in the drop down.
-
APPTBEGDATE
-
APPTENDDATE
-
DATE_OTHER
-
FILESIZE
-
LAST_ACCESS_DATE
-
MASTERDATE
-
SENT_DATE
-
TIME_OTHER
-
-
After mapping the unmapped fields, save this mapping as the Rapid Pilot Mapping
-
Continue without mapping Conversation_ID if warning comes up. Please note that all fields will not map. You will only map the fields that show via step 6 above.
-
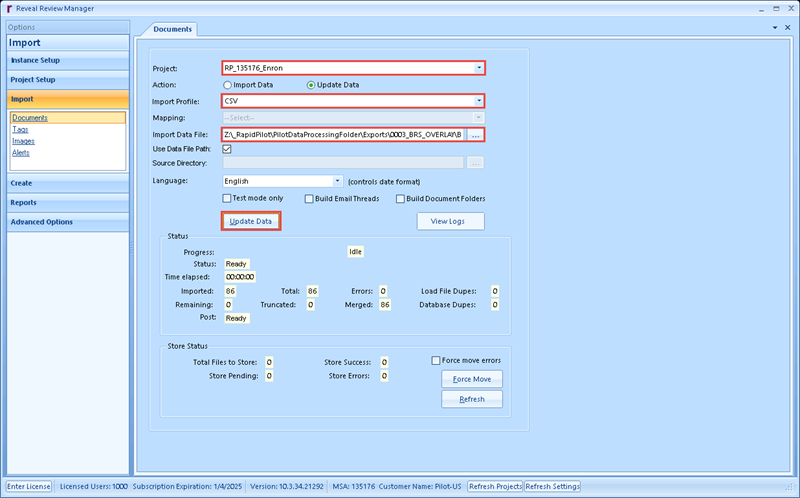
Documents Import
To import the DAT file, follow the steps below.
- Open Review Manager on the Load Machine
- Expand Import
- Click Documents
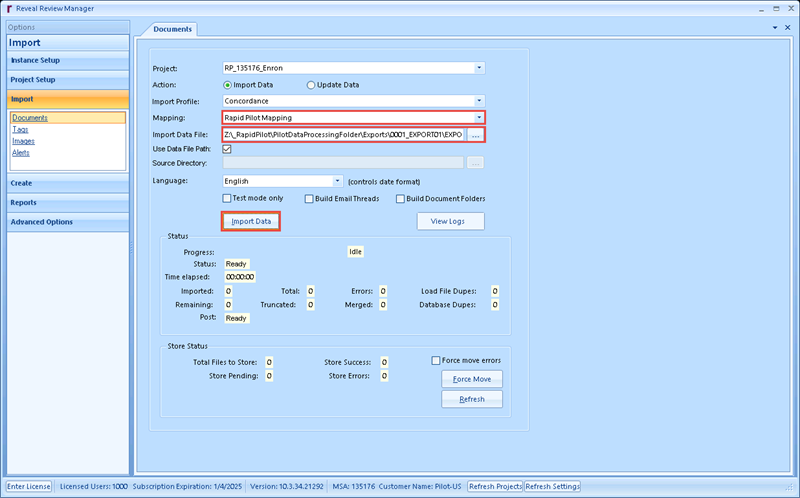
- Choose the Rapid Pilot project
- Choose the Rapid Pilot Mapping
- Import 1
- Import Data File: Z:\!Smoke Tests\_RapidPilot\PilotDataProcessingFolder\Exports\0001_EXPORT01\_textfiles.dat
- Click Import Data
- This will load 40,656 files.

- You can ignore this error and click OK.
- Import 2
- Repeat the same steps from Import 1
- Use Import Data File: Z:\!Smoke Tests\_RapidPilot\PilotDataProcessingFolder\Exports\0002_EXPORT02\EXPORT02_loadfile.dat
- This will load 86 files.
As shown above, it is possible to receive an Invalid column data error when importing. It is ok to click OK and disregard this error.
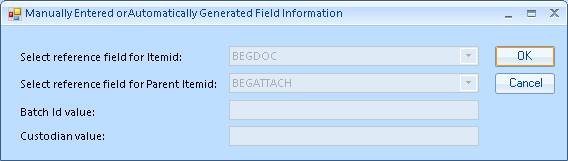
Documents Overlay
There are a few fields that were not properly in this data that are essential for Brainspace. To get these fields populated, we will need to do an overlay or Update Data for the project in Review Manager. To overlay these fields, follow the steps below.
- Open Review Manager on the Load Machine
- Expand Import
- Click Documents
- Choose the Rapid Pilot project
- Choose Update Data
- Choose CSV
- Overlay
- Import Data File: Z:\!Smoke Tests\_RapidPilot\PilotDataProcessingFolder\Exports\0003_BRS_OVERLAY\BRS_OVERLAY.CSV
- Please note that this is a CSV file and not a DAT file.
- Click Update Data
- Click Match All
- We are only overlaying 3 fields. You will need to find the following two fields and deselect them from the overlay, as Match All will return 5 fields. .
- Find the field SENT_DATE and deselect it (remove the checkbox from Import for the row) as we should be overlaying the field SENT_DATETIME and not SENT_DATE
- Find the field SUBJECT and deselect it (remove the checkbox from Import for the row) as we should be overlaying the field SUBJECT_OTHER and not SUBJECT
- Click OK
- This will update all files (40,742)
- Import Data File: Z:\!Smoke Tests\_RapidPilot\PilotDataProcessingFolder\Exports\0003_BRS_OVERLAY\BRS_OVERLAY.CSV
As shown above, it is possible to receive an Invalid column data error when importing. It is ok to click OK and disregard this error.
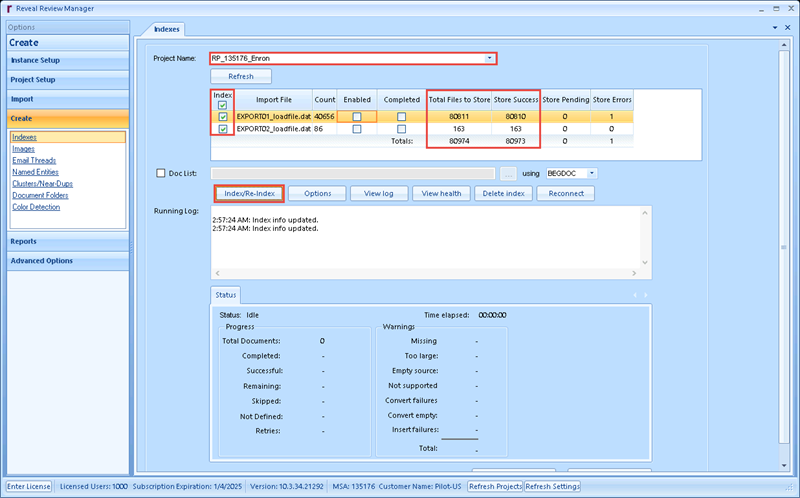
Create Indexes
After importing the data, you need to index the data. Please only do this after Store Pending = 0 as seen below. As part of this process, we grab the native and text files from the load file, and move them to S3 in AWS, or the “store”.
Please note the project in the screen shot is for illustration purposes only, and you should be choosing your project you created.
-
Open Review Manager on the Load Machine, Expand Create, Click Indexes
If Total Files to Store and Store Success do not match, wait a few minutes and hit refresh until Store Pending = 0
-
Choose the Rapid Pilot project
-
Select the index
-
Click Index/Re-Index
-
Click Native/Html, Extracted, OCR / Loaded, Document_Metadata, and click OK (Approximately ~1 hour for all indexes to complete)
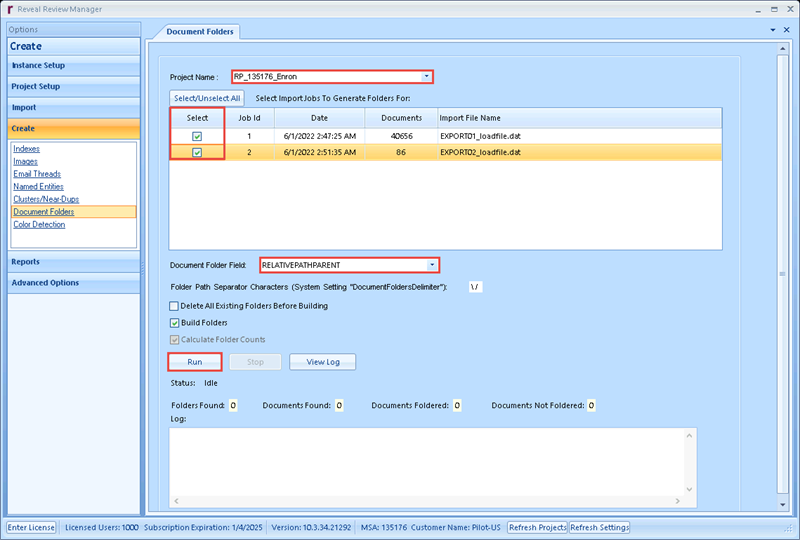
Create Document Folders
After kicking off indexing, run the following process in the Create section of Review Manager.
- Document Folders
- Choose the Rapid Pilot project
- Select both data sets
- Change Document Folder Field to RELATIVEPATHPARENT
- Click Run
Monitor Progress
- You can monitor the indexing progress in the Review Manager, or you can go to Menu -> Jobs -> Index, select View All Jobs, and you will see the indexing process of the import. Make sure the counts in your project match the counts in the screen shot below except for Total Errors.
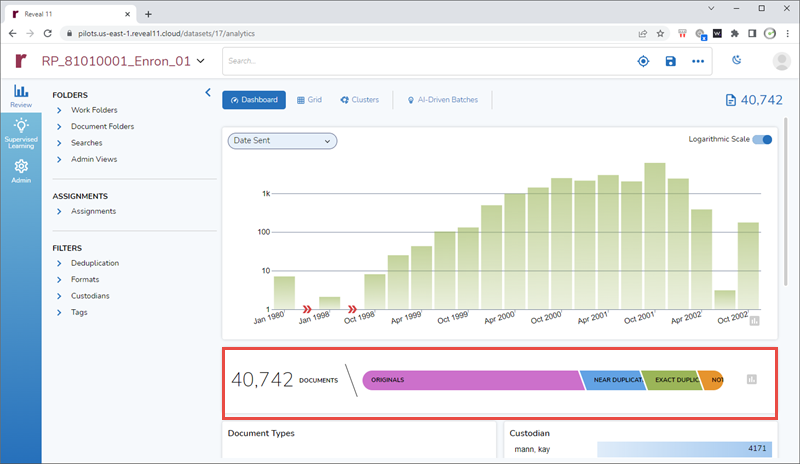
- Run the term depart* to make sure 5,260 documents are returned.
- Make sure the data loaded properly into AI by going to Menu -> Jobs -> AI Document Sync. If this shows complete
- Everything will be complete when the Candy Bar displays counts on the Dashboard, and that the index Brainspace connector overlay completed as well.

It can take upwards of 20 minutes for the Candy Bar and/or the Brainspace connector overlay to display after the AI Document Sync has completed.
Run Final Processes – Review Accelerators
There are 3 processes we must execute to complete the Review Accelerators (i.e., Image Label, Translation, and Transcription). Please note the project in the screen shots is for illustration purposes only, and you should be running these processes in the project you created. When the Label, Translation, and Transcription jobs complete, you will receive an email for each job.
Key Documents
For demo purposes, the following documents highlight key differentiators in Reveal. To get to these quickly, it is recommended to add these to a Work Folder.
-
Login to your project via your browser in Review
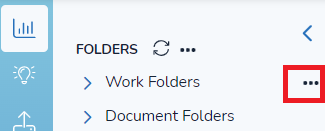
Next to Work Folders on top left, Click the ellipsis
-
Click Add Folder -> Name Folder "Key Docs" -> Click to Grid View
-
Click into Search Toolbar at top right, Click the ellipsis
-
Click +Add -> Type Begin Number -> Click Begin Number metadata field
-
Copy and paste the following Begin Numbers into the pop out window:
-
RP-00003880
RP-00007310
RP-00007374
RP-00007396
RP-00007410
RP-00007448
-
-
Click Add to Search -> Click Search -> Results should look like documents below:
-
Click Update -> Action to Take -> Check Folders -> Click dropdown to Work Folders -> Check off Key Docs -> Click Submit -> Confirm
The work folder and documents selected can be selected based on preference for demo purposes - just a suggested set of documents to highlight Review Enhancers within the Reveal Platform.
Label
Run Image Label on the following images for demo purposes.
- Login to your project via your browser in Review
- Select the Documents Folder Documents -> Dropbox -> Group Share -> Images, and this should return 49 files
- Click the Label button
- Click LABEL
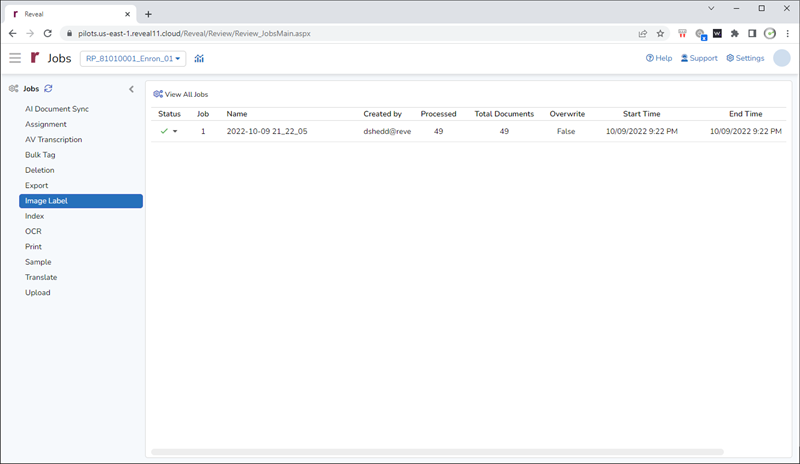
- You can monitor the progress of this job in the Jobs section (click Menu and choose Jobs). When the job is complete there will be a green check mark.
Translate
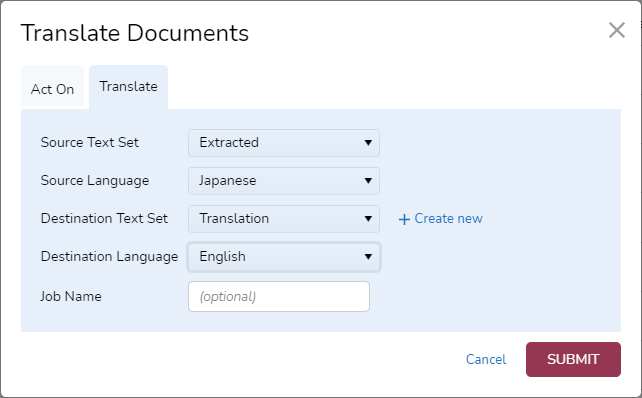
There are two sets of documents for translation purposes of Japanese and Korean. Below illustrates how to translate the Japanese files. The process should be repeated for the Korean files as well.
- Login to your project via your browser in Review.
- Select the Documents Folder Documents -> Dropbox -> Group Share -> Foreign Languages -> Japanese, and this should return 30 files
- Click the Translate button
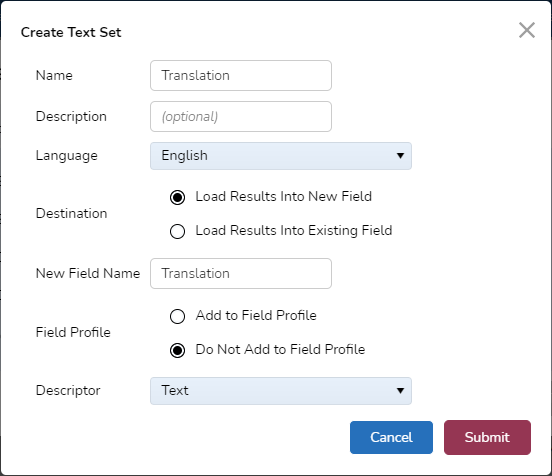
- Next to Destination Text Set click the + Create new button, enter the following items, and click Submit.
- Back on the Translate Documents settings, choose the following options.
- If the Destination Text Set that was just created does not show up in the list of text sets to choose from, logout/login, and the text set will be available.
- Repeat this process for the Korean files (Documents Folder Documents -> Dropbox -> Group Share -> Foreign Languages -> Korean), but translate from Korean to English. Please add the Korean files to the same Text Set of Translation, and do not create a new Text Set.
- You can monitor the progress of this job in the Jobs section (click Menu and choose Jobs). When the job is complete there will be a green check mark.
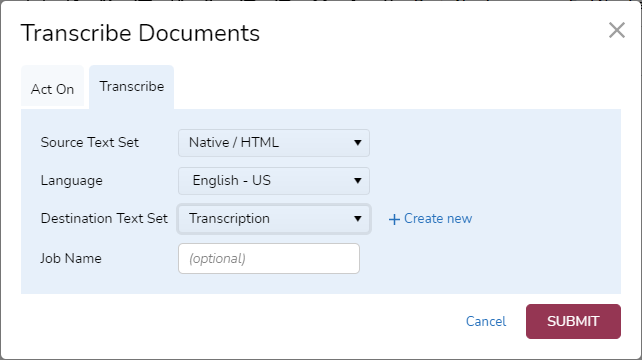
Transcribe
There is 1 deposition video to transcribe.
- Login to your project via your browser in Review.
- Select the Documents Folder Documents -> Dropbox -> Group Share -> Videos, and this should return 1 file
- Click the Transcribe, and click TRANSCRIBE (leaving all default settings)
- You can monitor the progress of this job in the Jobs section (click Menu and choose Jobs). When the job is complete there will be a green check mark.
Show Transcription
After the deposition video completes, turn on the transcription to show it during a demo.
- Login to your project via your browser in Review.
- Select the Documents Folder Documents -> Dropbox -> Group Share -> Videos, and this should return 1 file
- You can monitor the progress of this job in the Jobs section (click Menu and choose Jobs). When the job is complete there will be a green check mark.
- Launch this file in Review by clicking on the row.
- Click the CC Show Transcript button
 , and this will show the text next to the video when it is played. This setting will stick for all future demos of this file.
Enable AI - Add AI Model
Apply an AI Model from the Model Library for demo purposes.
-
Login to your project via your browser in Review
-
Click into Project Admin -> Tags
-
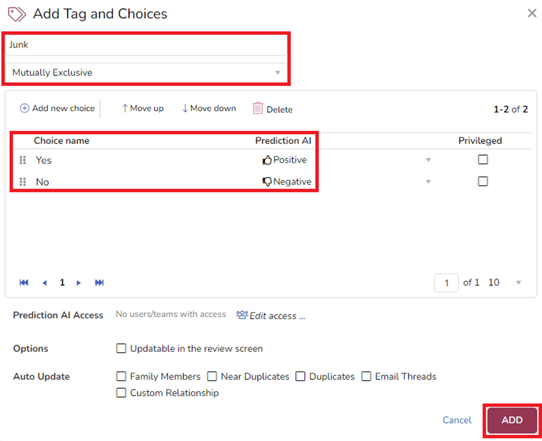
Click Add Tags and Choices
-
Enter and select the following information for the tag:
-
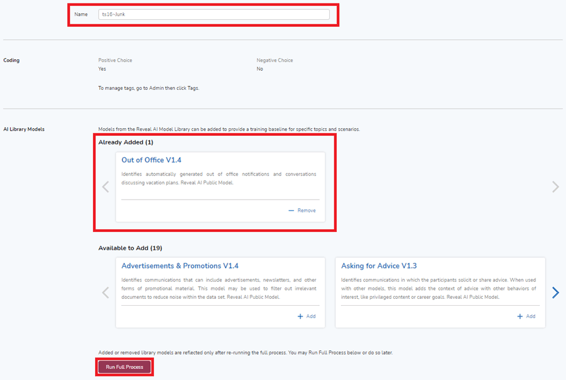
Return to your main Project screen -> Click Supervised Learning
-
Click the gear icon by the AI Tag created (Junk)
-
Scroll through the AI Library Models and add the "Out of Office" AI Model
-
Click Run Full Process -> Click Save (at bottom)
-
Click the Review Icon on left panel, return to dashboard.
The project's documents will now be scored with this AI model as part of the current Classifier which will take some time to run the process before it displays on the dashboard.
You can replicate these steps to create another AI Model for demo purposes or even combine two similar models from the library to "pack and stack" into one uber AI Model to further leverage the AI Model Library.
For more information on applying or leveraging AI Models, please see or help documentation or blog posts.
Enable AI - AI Responsiveness Mutually Exclusive Tag
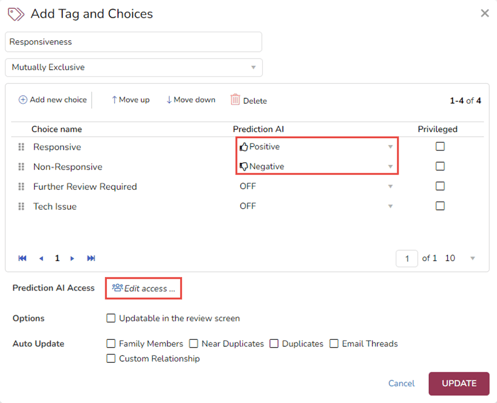
Update the existing Responsiveness tag to enable an AI model for the tag.
-
Login to your project via your browser in Review
-
Click into Project Admin -> Tags
-
Click edit (pencil icon) next to Responsiveness, and enable AI
-
Select "Edit Access" next to Prediction AI Access and select Original Administrators to have access to view AI Prediction Scores
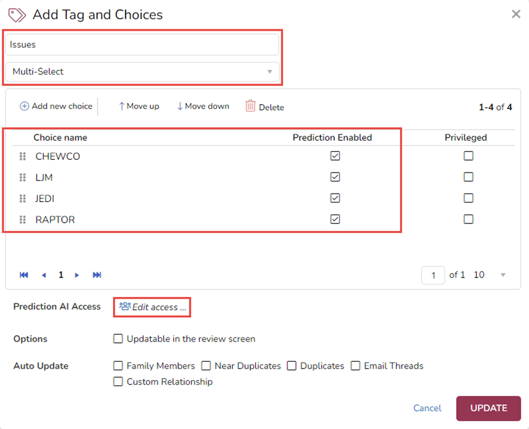
Enable AI - AI Issues Multi-Select Tag
Create a new multi-select tag named Issues, and enable an AI model for each choice within the tag.
-
Click Add Tags and Choices
-
Label Tag Choice "Issues"
-
Chose Multi-Select Tag
-
Add the following issues separately: Chewco; Jedi; Raptor
-
Select Prediction Enabled for each tag
-
Select "Edit Access" next to Prediction AI Access and select Original Administrators to have access to view AI Prediction Scores
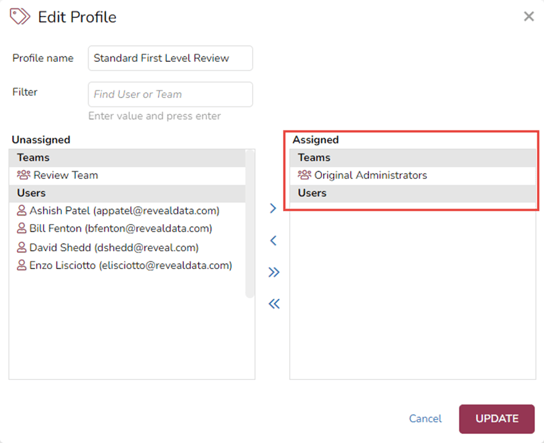
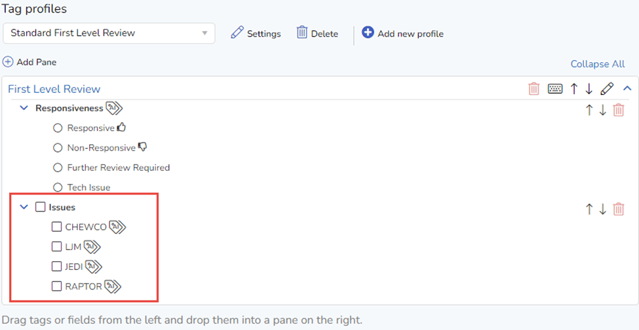
Enable AI - Finalize Tag Profile
-
Move the issues over to the Standard First Level Review Tag Profile that contains solely those tags or other tags relevant to typical workflow
-
Click the Settings button, and make sure the Original Administrators have access to the Field Profile.
Enable AI - Populate Scores for AI Tags
To get scores generated in the AI Tags, conduct the searches below, and bulk tag the results.
-
Login to your project via your browser in Review
-
Click into Grid View
-
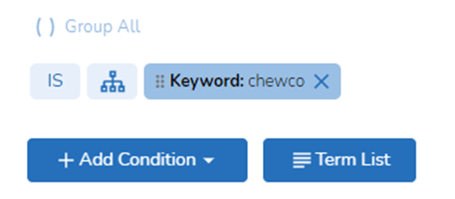
In the top search toolbar enter in search for keyword Chewco
-
Click Update from Mass Action Toolbar
-
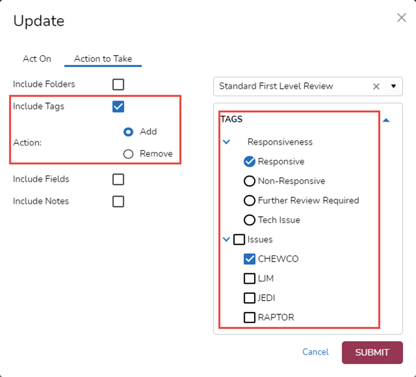
Click Action to Take -> Select "Include Tags" -> Select Responsive -> Select Chewco -> Click Submit -> Click Confirm in pop up window
-
The AI Tagging needs both positive and negative examples to populate AI Scores accurately. To tag the negative documents follow the steps below.
-
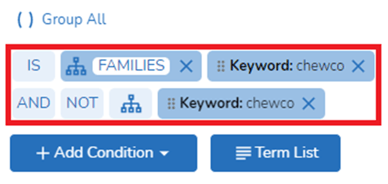
In the top search bar, search for the word Chewco -> Add families from the tree expander -> search for Chewco again -> Change the boolean operator from OR to AND -> change boolean operator IS to IS NOT -> Click Search
-
With the populated results, use the Mass Actions Toolbar again.
-
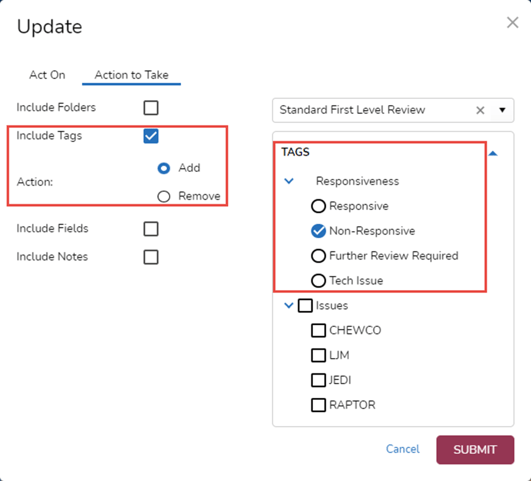
Click Action to Take -> Select "Include Tags" -> Select Non-Responsive -> Click Submit -> Click Confirm in pop up window
-
Repeat these same actions for the issues tags LJM, JEDI, and RAPTOR (e.g. search for LJM instead, mass tag all docs from search result with respective tag)
If a window appears suggesting the action may take a while, monitor in Jobs; however bulk tagging will process fairly quickly.
AI Scores from these mass tagging actions will update after several minutes after all Issues are mass tagged and synced with AI tagging engine.
When this completes (takes roughly 5 - 15 minutes), 5 new models will populate on the Dashboard in the widget Documents by Predictive Scores with the results.
Field Profile
By default, field profiles are not assigned to roles out of the box. This makes the Default Field Profile inaccessible for all users. To fix this, follow the below steps, and you can use the Default field profile.
-
Login to your project via your browser in Review
-
Select Admin
-
Click Fields -> select Default -> click Edit
-
Select Original Administrators -> choose Fields -> click UPDATE