
This article provides both visual and written instructions for loading a third party production including load file, natives, text, and images into a Reveal project.
Non-Audio Video Tutorial
Third-party productions are generally delivered with the following elements:
- A delimited load file containing document control numbers and metadata.
- Extracted text or optical character recognition (OCR) searchable versions of the produced documents.
- Native files may be delivered as specified.
- Image files of document pages with a load file to link with the control numbers in the document metadata load file.
This material is loaded using the Reveal Review Manager.
Loading Third-Party Production Data
- Log in to Review Manager with an Administrator account.
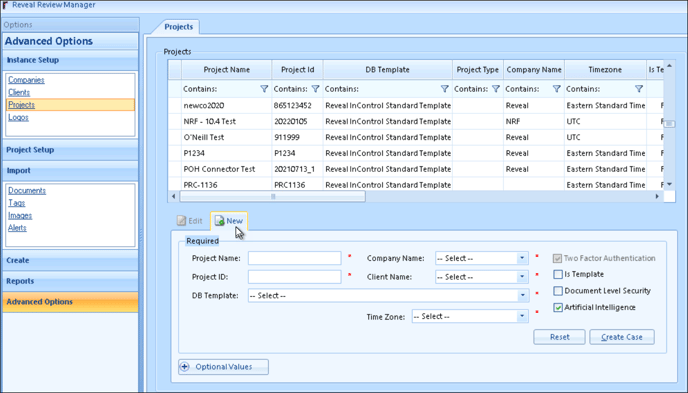
- If the project into which the production is to be loaded is not yet created, create the project.
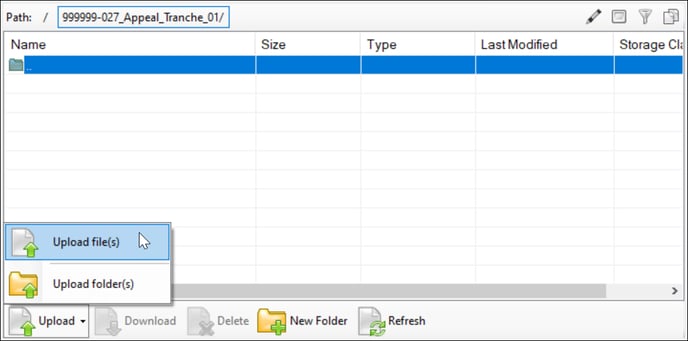
- Open S3 Browser and create or open the project folder within your bucket.
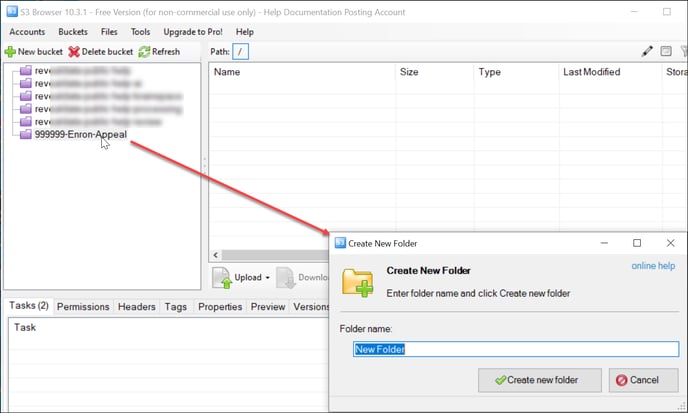
- Upload the production data to a sub-folder of the S3 project folder clearly labeled with the production name.
- Open the delimited load file (usually a Concordance DAT format, but may vary) to determine the fields included in the load file.
Mapping Fields
- Expand the Project Setup pane in Review Manager.
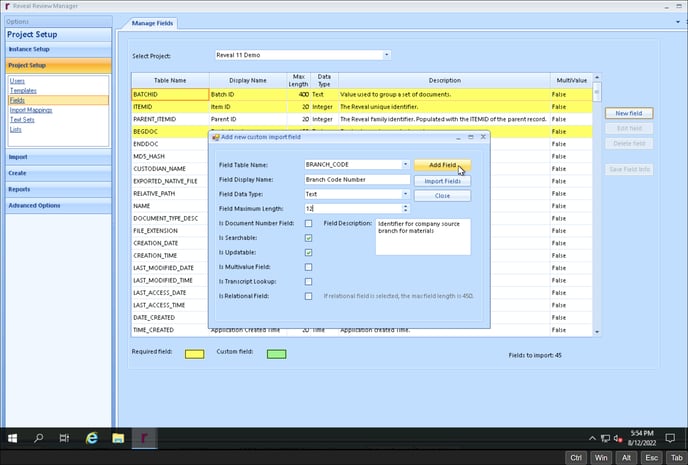
- Open Fields.
- Use New Field to create any load field (with the indicated data type) that does not have a match in the project database. NOTE that new fields may also be imported from a load file.
-
Field Table Name - The SQL column name. Cannot include spaces or dashes; underscores are permitted.
-
Field Display Name- The name displayed to the user in Reveal. May include spaces.
- Field Data Type – The field types are:
-
Boolean - True/False or Yes/No values
-
Date - Multiple date formats supported (Example: DD/MM/YYYY)
-
Date\Time - Date and Time combined (Example: DD/MM/YYYY HH:MM:SS)
-
Float - Number with decimal point and unlimited precision after decimal
-
Integer - Whole numbers, no decimal
-
Numeric - Number with decimal point to 17 digits
-
Text - Alpha numeric values
-
Time - Time (Example: HH:MM:SS)
-
-
Field Maximum length - The size of the field. Any data beyond a field’s max length will get truncated during data loading.
-
Is Document Number Field – Indicates if field shall be used as a key field when loading images or updating data during Production Update.
- Is Searchable – Indicates whether the field should be indexed for searching.
-
Is Updatable - Indicates whether the field should permit values to be modified. This attribute should be reserved largely to Custom fields, never for metadata.
-
Is MultiValue Field – Indicates that the field may contain multiple values per document record. This setting allows the field to be parsed.
- Is Transcript Lookup - Designates the field to be a transcript reference field and be one of the selections in the Document Link Lookup By dropdown menu in a Transcript Pane. The user will be able to query this field and retrieve documents using a unique document ID.
- Click Add Field when done.
- Fields that do not currently exist in a project may also be imported from a load file using the Import Fields button in the Add new custom import field dialog box.
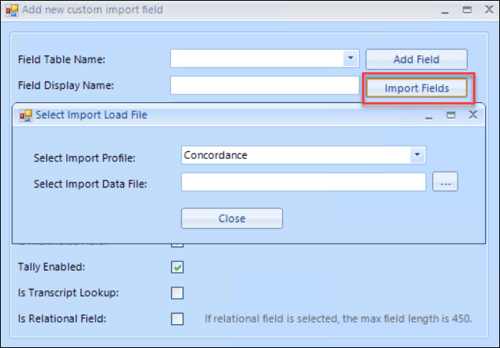
-
Select Import Profile specifies the delimiter type used in the load file.
-
Select Import Data File retrieves the load file whose field specification will be parsed. Any new field names discovered will be added to the Reveal project.
-
-
- In the Project Setup pane of Review Manager, open Import Mappings.
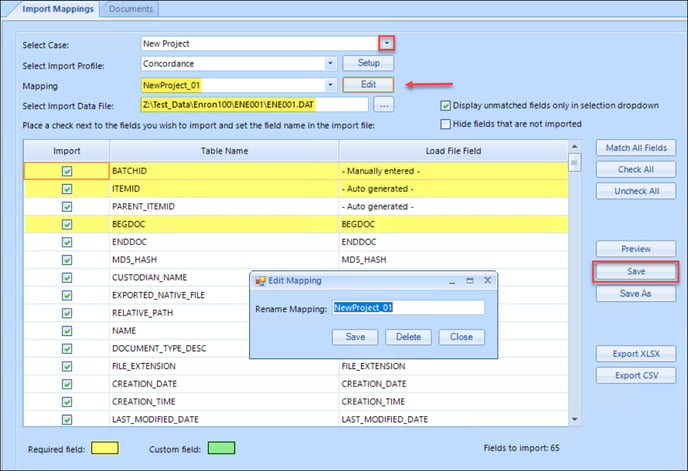
- Specify the project (if not already open) in the Select Case field. The list of available fields will display in the table below.
-
Select Import Profile to specify the delimiter set used in the load file; Concordance is the default.
-
Mapping selects a named mapping profile if already defined; if not yet defined, go on with the specification and Save the Mapping name when complete.
-
Select Import Data File is where you browse out to select the load file to be imported.
- There are two checkbox options as you prepare to map the table:
-
Display unmatched fields only in selection dropdown is checked by default, to limit the choices when manually mapping or editing to fields not yet selected in the table.
-
Hiding fields that are not imported optionally unclutter the table.
-
-
Required fields are in yellow. Required fields are: BatchID, ItemID and BEGDOC.
-
Unmapped fields are indicated with the word --Select-- in the Load File Field name.
- To have Reveal Review Manager try to match load file fields automatically, select the Match All Fields button just to the top right of the table. A prompt appears confirming that you wish to map the fields automatically.
-
Load File Field values will appear next to Table Name fields
-
The matches may or may not be correct - verify everything.
-
Any unmatched fields from the load file will be available in a dropdown list when you click --Select-- in the Load File Field name for any unmatched Table Name field.

-
-
These load file fields can be manually mapped by selecting from the dropdown list for any Table Name field, or may require custom fields to be created for them.
-
To create a new custom field, you must go back to the Fields Tab.
-
Uncheck the green checkmarks to deselect any fields that you do not want to import.
-
Click the Save button to save the field mapping profile and name the profile in a similar manner to match your database. Click the Save As button if you wish to save a different mapping with a new profile name.
-
Additional options are to Save As Database Template, Export XLSX and Export CSV.
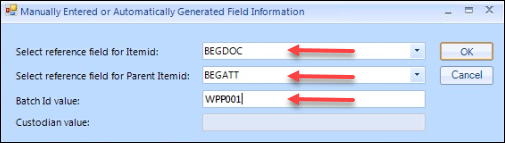
- Certain fields may be flagged as <Manually entered> or <Automatically generated> rather than matched or left as --Select--.
- Fields such as ItemID and Parent_ItemID will normally be assigned by Reveal using internally sequential record numbers for consistency, referencing BEGDOC and BEGATT (Begin Attach) to signify new item records and item records sharing a parent document. These will be set as <Automatically generated> under Load File Field.
NOTE: Parent_ItemID is generated by referencing BEGATT and is used to populate document families. BEGATT must be mapped and the load file must have BEGATT populated for every record in the load file. If BEGATT is not populated for every record in the load file, the import/overlay will fail. -
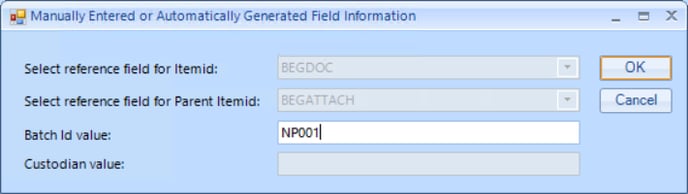
BatchID is the field that gets populated in Review that’s used as a label to reference the import. The value is typically the volume information received by a producing party (e.g., VOL001). This is <Manually entered> at import rather than mapped from a field in the load file. See also Importing Documents->COMMON ERRORS below.
- Upon clicking Import Data, a prompt box will pop up:
- Fields such as ItemID and Parent_ItemID will normally be assigned by Reveal using internally sequential record numbers for consistency, referencing BEGDOC and BEGATT (Begin Attach) to signify new item records and item records sharing a parent document. These will be set as <Automatically generated> under Load File Field.
- Once this step is complete, barring the need to configure any custom Text Sets, you are ready to import documents.
For performance reasons there is a hard limit of 16MB expanded text size for indexing documents in the Native / HTML text set. While settings in Review Manager may be set to indicate a larger limit, any document exceeding the 16MB limit will not index and an error will appear in the indexing log. We strongly recommend contacting Reveal Support if encountering this limitation.
Note: The native and text file sizes differ from the expanded file sizes. The expanded file size is the size of the text set created.
Import Documents
- Expand the Import pane in Review Manager.
- Open Documents to specify, test and import.

- Project select the project name from the drop-down list if not already set.
-
Specify the Action, initially Import Data for initial dataset load (see Updating - Overlays for adding information with Update Data).
-
Import Profile specifies the delimiter set used. The default is Concordance which uses ASCII 254 (the 'thorn' character) to define field contents, ASCII 020 as a field separator, ASCII 174 (the 'registered' symbol) for an in-field new line, and a hard return for a new record. A new Import Profile using different characters may be defined and specified.
-
Mapping as configured and saved in Import Mappings above.
- Import Data File as referenced in Import Mappings.
- Use Data File Path - Checkbox specifying:
- Absolute Path Imports - When importing documents using a load file with fully qualified paths, ensure that Use Data File Path is checked. The Source Directory field is greyed out because source directory will not need to be specified, since Review Manager will instead rely on absolute pathing to locate the corresponding file on the system or network.
Pathing Scenarios
Subfolder Prefix
NativePath
TextPath
Absolute path
Drive letter (local or mapped)
C:\Client\Matter\Vol01\Native\0001.pdf
C:\Client\Matter\Vol01\TEXT\0001.txt
UNC (\\)
\\Client\Matter\Vol01\Native\0001.pdf
\\Client\Matter\Vol01\TEXT\0001.
- Relative Path Imports - When importing documents using a load file with partial paths, ensure that Use Data File Path is unchecked. Review Manager will make the necessary adjustments so that all relative path scenarios are treated the same. The Source Directory will need to be specified. Review Manager supports the pathing structures shown in the table below.
Pathing Scenarios
Subfolder Prefix
NativePath
TextPath
Relative path
Nothing
Native\0001.pdf
TEXT\0001.txt
Backslash dot (.\)
.\Native\0001.pdf
.\TEXT\0001.txt
Backslash (\)
\Native\0001.pdf
\TEXT\0001.txt
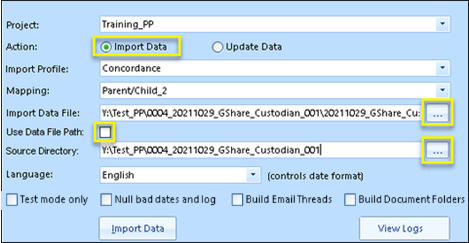
- Absolute Path Imports - When importing documents using a load file with fully qualified paths, ensure that Use Data File Path is checked. The Source Directory field is greyed out because source directory will not need to be specified, since Review Manager will instead rely on absolute pathing to locate the corresponding file on the system or network.
- Set Language appropriately, usually to English in the United States, for example; language selection, which is noted as controlling date format, opens initially as Afrikaans which is the first alphabetical choice. The following languages are supported:
Afrikaans
Albanian
Amharic
Arabic
Armenian
Azerbaijani
Basque
Belarusian
Bengali
Bosnian
Bulgarian
Cebuano
Chinese (Simplified)
Chinese (Traditional)
Corsican
Croatian
Czech
Danish
Dutch
English
English (United Kingdom)
Esperanto
Estonian
Finnish
French
Frisian
Galician
Georgian
German
Greek
Gujarati
Haitian Creole
Hawaiian
Hindi
Hmong
Hungarian
Icelandic
Igbo
Indonesian
Irish
Italian
Japanese
Kannada
Kazakh
Khmer
Korean
Kurdish
Kyrgyz
Lao
Latin
Latvian
Lithuanian
Luxembourgish
Macedonian
Malay
Malayalam
Maltese
Maori
Marathi
Mongolian
Myanmar (Burmese)
Nepali
Norwegian
Nyanja (Chichewa)
Pashto
Persian
Polish
Portuguese (Brazilian)
Punjabi
Romanian
Russian
Samoan
Scots Gaelic
Serbian
Shona
Sindhi
Sinhala (Sinhalese)
Slovak
Slovenian
Somali
Spanish
Sundanese
Swahili
Swedish
Tagalog (Filipino)
Tajik
Tamil
Telugu
Thai
Turkish
Ukrainian
Urdu
Vietnamese
Welsh
Xhosa
Yiddish
Zulu
-
Administrators are strongly advised to run Test mode only first to turn up any errors in the mapping or import setup before they are written to the project database.
-
When importing, checking Null bad dates and log will handle incorrectly-formatted dates by loading null values and logging the document ID and issue for analysis and remediation.
-
Click Import Data.
NOTE: File Encoding – Review Manager attempts to detect the encoding of a dat file when it is imported. UTF-8 is the default file format if the detection library cannot make any other determination. The detection library reads the first 1Kb of the file to determine the encoding, and if there are no detection characters or byte order marks (BOM) found, then it will fall back to UTF-8.
Testing Document Import
- With the Document Import settings configured and Test mode only checked, click Import Data.
- Review Manager will sample paths referenced in your load file to ensure that they exist on disk and warn immediately if referenced files cannot be found.

- Review Manager will sample paths referenced in your load file to ensure that they exist on disk and warn immediately if referenced files cannot be found.
- Once the data path is confirmed by Review Manager you will be shown all <Automatically generated> field references (such as for ItemID and Parent_ItemID) and prompted for <Manually entered> field information (such as BatchID).
-
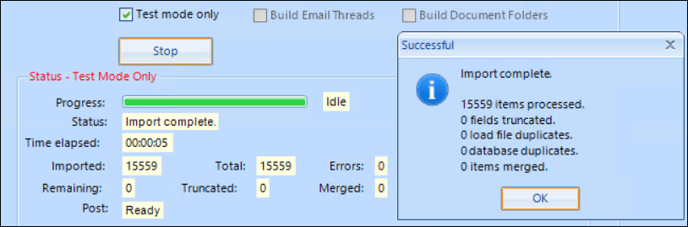
After checking a Preview load table, select OK to run the test import. If all is well, the result will look roughly like this:
-
You may now deselect Test mode only.
-
At your option, you may elect to Build Email Threads and/or Build Document Folders during import; these processes may also be run separately under functions in the Create pane.
Running Document Import
-
To run the live import, once more click Import Data with Test mode only unchecked.
-
Once again enter any <Automatically generated> field references (such as for ItemID and Parent_ItemID) and <Manually entered> field information (such as BatchID) when prompted.
-
Check a Preview load table.
-
Select OK to run the import.
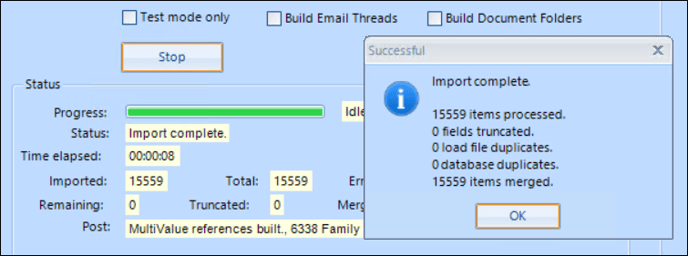
- The load process will be more verbose, and should look like this:
Running Image Import
When you import images to Reveal, you need to either connect to the image load file, which should be (a) an IPRO LFP or Opticon (Concordance Image) OPT format file with single page image, or (b) PDF files loaded as images. The load files will likely be found in the same folder as the load file(s) used to load documents from a third-party production, with the referenced images found in subfolders.
PDFs will automatically be converted to single-page jpegs and loaded into your destination image set. If these PDFs contained searchable text, Reveal can extract this text and store in a text set.
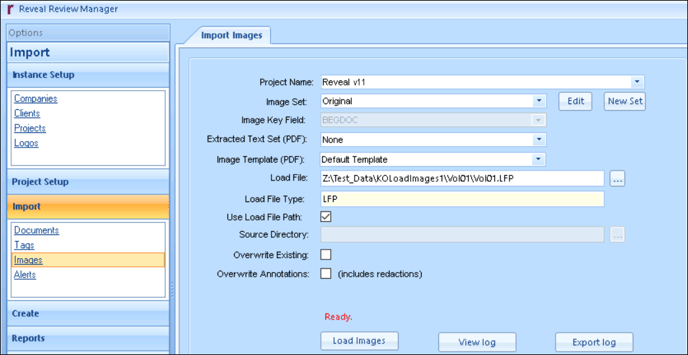
- After indexing your text data has been started, you should begin the loading of your images. This can be done directly from the Index window, by clicking on the GoTo Load Images button at the bottom of the Indexes window or expanding the Import Pane and choosing the Images link. The Load Images window appears.
-
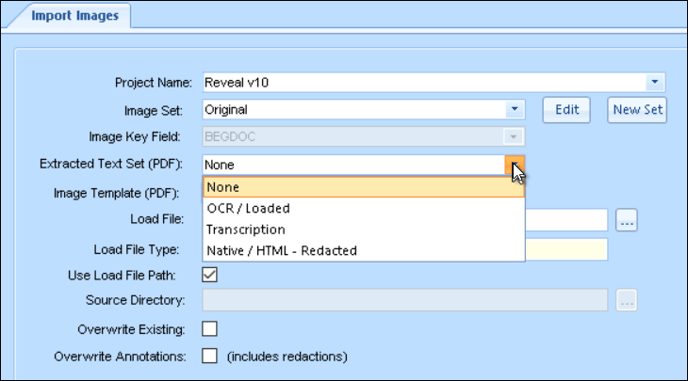
Select the Project Name from the dropdown menu.
-
Select the Original Image Set, or create a New Set if needed. Reveal supports multi-version image loading. When you load images you will be able to use an existing set or create a new image set into which new document images will be placed.
-
Select the Image Key Field or confirm Image Key (e.g., BEGDOC) for a new set.
-
Set the Extracted Text Set (for PDFs only) specifies where text extracted from a PDF will be grouped.
-
Select the Image Template (for PDFs only) to manage PDF conversion settings.
-
Use the ellipsis to search for and select the Load File. This will be a file in the document imports folder having an LFP or OPT extension.
-
Specify the Load File Type.
-
Indicate if Load File Path should be used, if the load file has a fully defined path to the image file. If your image load file has a complete path to the images they will load from that location. However if your path in the image load file doesn’t have the complete path and starts with the IMAGES folder, un-check the Use Load File Path box and browse to the IMAGES folder in the Source Directory field. Make sure there is a slash(\) at the end of the Source Directory path.
-
Specify the Source Directory to locate the IMAGES folder if Use Load File Path is unchecked.
-
Overwrite Existing option - Check only if you are replacing images that already exist in the database.
-
Overwrite Annotations option - Check only if you want to overwrite existing images that include Annotations and Redactions.
-
Select Load Images to complete the process.
-
If needed, you have the option to View or Export the log file.
Common Errors
Index Errors:
The error message occurs when the load file is is missing information: An exception occurred creating the DataTable to hold import data. The message is: Index was outside the bounds of the array.
Situations where this might occur are:
-
If a line in a load file is incomplete, missing fields, or missing/incorrect delimiters.
-
If a line in a load file has carriage returns.
-
If the BegAttach field is not mapped and ParentID is set to "- Auto generated -" (which is the default) then an error will occur. This happens because ParentID is built by referencing the BegAttach field, so the system requires a properly mapped BegAttach to populate ParentID. NOTE: BegAttach values cannot be blank if using it to Auto-generate ParentID.
In addition, for performance reasons there is a hard limit of 16MB expanded text size for indexing documents in the Native / HTML text set. While settings in Review Manager may be set to indicate a larger limit, any document exceeding the 16MB limit will not index and an error will appear in the indexing log. We strongly recommend contacting Reveal Support if encountering this limitation.
Note: The native and text file sizes differ from the expanded file sizes. The expanded file size is the size of the text set created.
Storage Errors:
If the load file that is being utilized contains broken paths to natives or text, store errors will occur. Store errors signify that either the referenced text or native file did not exist, or the native or text path field within the load file was not formatted properly. 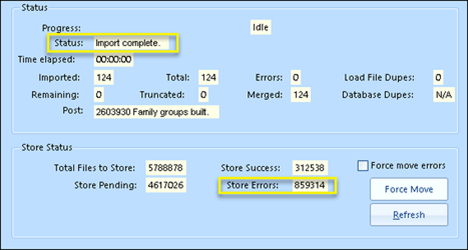
After Import
Once all Document imports are complete, go to Create Indexes to render them searchable.
If overlays are required to add further metadata or custom values, see Updating - Overlays.
Last Updated 1/23/2024