
This article provides both visual and written instructions for setting up a new user.
Users in Reveal are accounts accorded permissions to manage or access defined aspects of the review workflow, including access to selected projects. Once a new Reveal project is created within a Company, Users' accounts within that company may then be assigned to the projects and given appropriate role permissions.
This document will set out how to create a user and how to manage the account and its access to projects and role permissions.
Getting Started
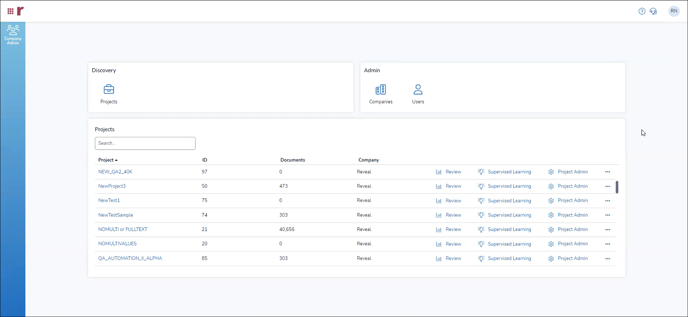
An Instance or Company Administrator will open Reveal to this landing page, containing sections to administer Projects (under Discovery), Companies, and Users (under Admin), as well as a table of projects for the current instance or company.
Setting Up Users
- Open Users in the Admin (If you are in the Company screen, click Users to the right of the Company in which you want to create the Users.)
- The Users screen will display:

- A list of available Users (filtered by Name in the above image), displaying:
- Name
- Date Created
- Status (Active or Inactive)
- Administrator (Yes or No)
- Duplicate control to create a new user with the same project permissions; this opens a Create User window similar to that in Item 3 below, but all projects and permissions for the new user are cloned from those of the current user.
- Edit control to edit the user permissions and information.
- Delete to remove the user account.
- A button to Create User.
- A search filter to focus the list of users.
- A group Edit control for selected user accounts.
- A Reset Password control for selected user accounts.
- A Reset Authentication control to address possible multifactor authentication problems in selected accounts.
- A Deactivate control for selected accounts.
- A list of available Users (filtered by Name in the above image), displaying:
- Click Create User to open the Create User dialog box. Enter the following (here showing the single Create User screen that appeared before Release 2024.2):
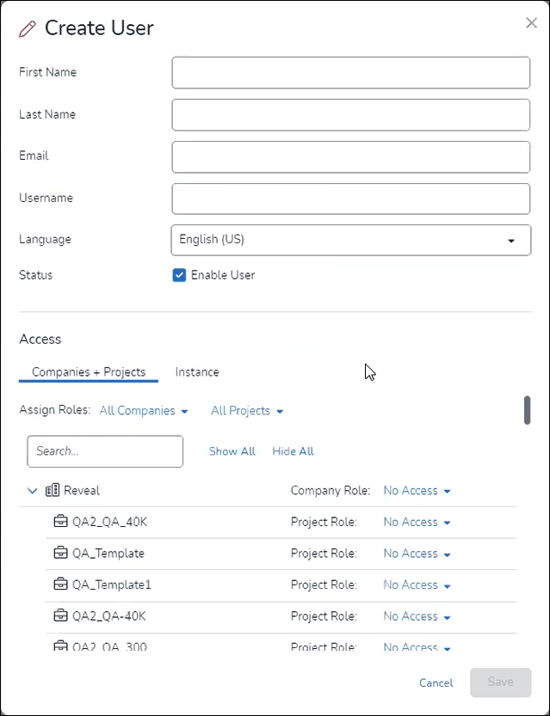
- First Name
- Last Name
- Email – obviously unique.
- Username – generated from the Email entry by default.
- Language – English (US) is default.
- Status – Enable User is checked by default.
- Access – this section determines the access and permission for the User across the company’s projects.
- Companies + Projects tab – select Company and Project roles for user.
- Assign Roles
- All Companies – Role for all companies in the instance. The user’s Company Role is displayed and selectable at the top (company) level of the Access listing for projects.
- Member – has access to projects subject to project role permissions.
- Company Admin – rights to administer all projects for company, automatic project administrator rights to be forthcoming with company admin project favorite setting.
- No Access
- All Projects – Role for all listed projects in instance or projects filtered by search. Project Role is displayed and selectable for each project.
- Administrator – Full management rights for project; automatically sets Member status for project’s Company.
- Client Administrator – Review management rights for client project.
- Power Reviewer – Reviewer with enhanced bulk action and public item management permissions.
- Reviewer – Basic Reveal Review, foldering, tagging and redaction capabilities.
- [Custom] – Any custom roles defined in a listed company project may be applied to other projects for the user.
- All Companies – Role for all companies in the instance. The user’s Company Role is displayed and selectable at the top (company) level of the Access listing for projects.
- Assign Roles
- Instance – the single setting here is to make the user an Instance Administrator able to create companies.
- Companies + Projects tab – select Company and Project roles for user.
- Save when settings are complete.
Editing Users
- Open Users in the Admin box. (If you are in the Company screen, click Users to the right of the Company in which you want to create the Users.)
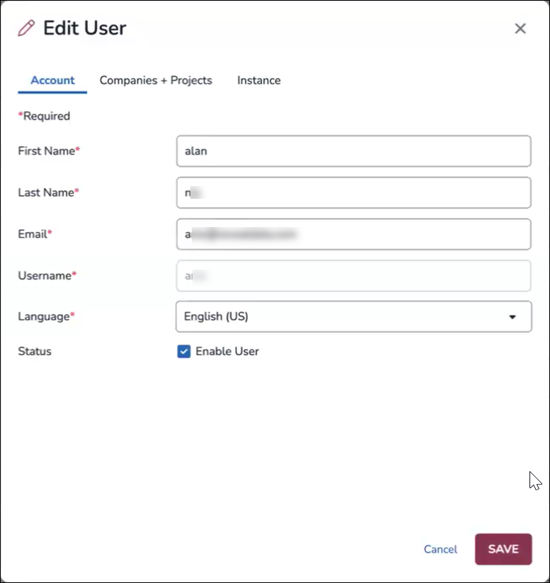
- Use Edit to modify User (or group of users) at a later point. Below we display the tab-segmented screens provided here and in Create User as of Reveal 2024.2 to facilitate small-screen access to User creation and management functions.
- The updated Account tab has the fields from the top part of the old User modal:
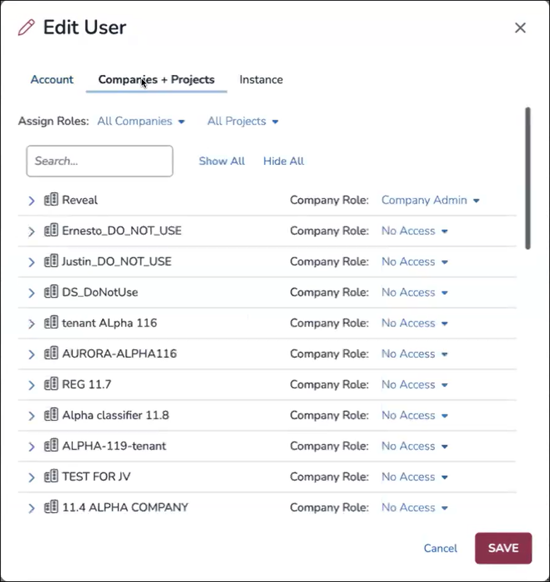
- The updated Companies + Projects tab contains the Company and Project Role selection previously shown under the Access half of the User modal:
- The Instance tab, as before, only displays the Instance Administrator checkbox.
- The updated Account tab has the fields from the top part of the old User modal:
Managing Users Under Company Admin
- Log in to Reveal as an Administrator.
- Click Company Admin in the upper left of the Administrator landing page.
- Open to the Users screen, listing current Users.
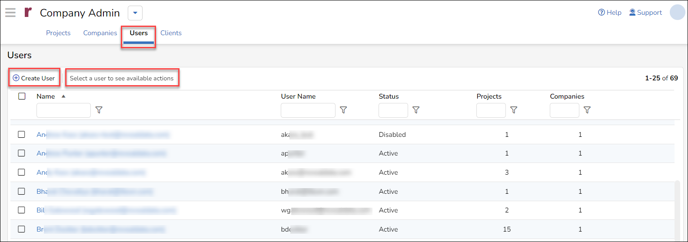
- You may use the Create User button here to create a new user.
- Clicking a checkbox next to a user name adds two buttons (these do not appear when multiple users are selected):
- Details – Show current user settings, with only option to Send Password Reset Email.
- Edit – Open Edit User screen to change and update the user account as set out below (the same as clicking on the User Name hyperlink).
- Click on a User Name in the Users table to open the Edit User screen for that user.
- In the Edit User screen:
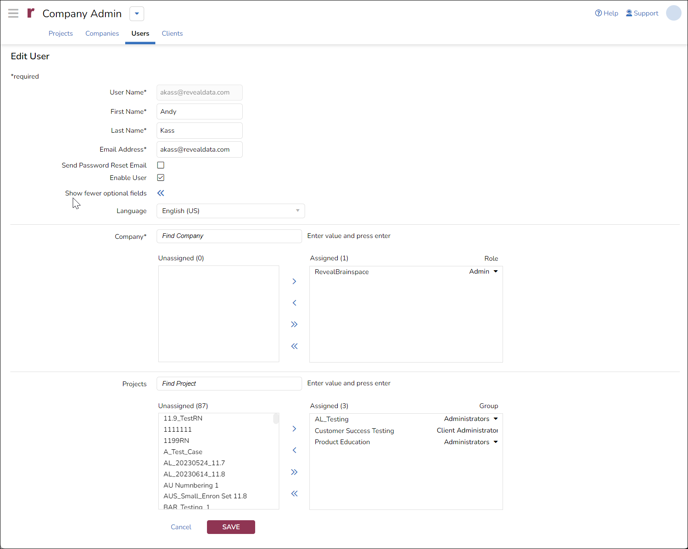
- You can edit a user's First Name, Last Name and Email Address, but not the User Name
- You can Send Password Reset Email to the user.
- You can Enable User (the default) or uncheck to disable the account.
- When you expand to show optional fields, you can select Language in the optional field.
- You may change or add a Company for the user and set the user’s role (Admin or Regular) for each selected company.
- You may add, remove, or change the user’s role in Projects with aid of a Find Project filter to quickly locate a specific project. Once a project is selected, set the user’s Group permissions role (Administrators, Client Administrator, Power Reviewer or Reviewer, or any custom roles defined for the project).
- Click Save to set any changes, or Cancel to return to the Users list.
- Changes will take effect the next time the User logs in to Reveal.
Last Updated 2/26/2024