
A brief summary of how to prepare and run a production in Reveal
A major function of the Reveal review process is the collation and processing of a production, whether to opposing or third-party counsel, government instrumentality or other entity. Reveal facilitates this process with powerful selection and formatting tools enabling the production of accurate and complete responsive data and the logging of all items produced. 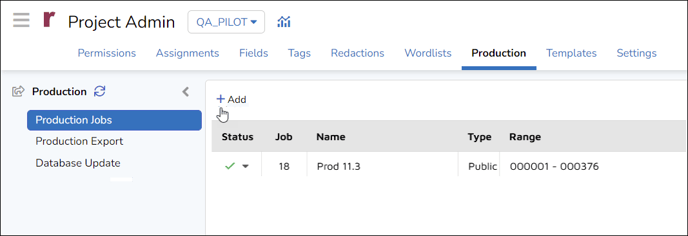
- To create a new production set, place the documents to be produced in Public or Private Work Folder(s) under FOLDERS in the left Sidebar panel. Batches of searched and filtered documents may be assigned to a work folder using the Update function on the Grid Toolbar. You will then reference the Work Folder(s) when you add a Production Job in the Production Management screen under Project Admin. See How to Create a Production Set for more detail on this process.
- To create a Production Job, open Admin, then choose Production. The Production Jobs window appears within the Production Management screen and select Add. The following will need to be configured for the production job:
- Under the Documents tab:
- Enter the production's Job Name.
- Set its Priority Level.
- Choose the Production Type (Public or Private).
- Select the Work Folder(s) containing documents for production.
- Under the Imaging tab:
- The value of Images will be either None, in which case nothing further is entered here, or Existing, which will require the following configuration settings.
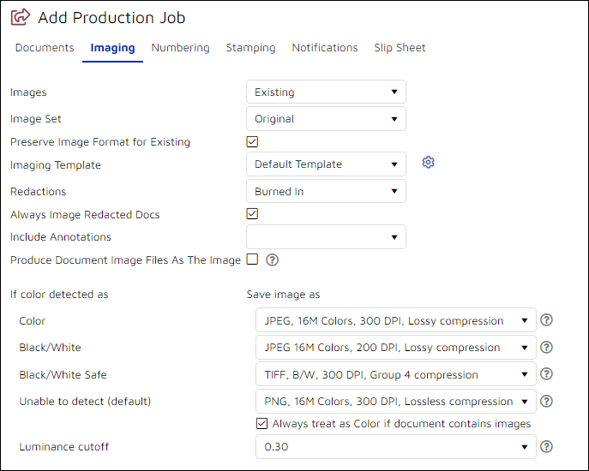
- Image Set - If there are multiple image sets, choose which you prefer to use as the basis for producing images; the default is Original.
-
Preserve Image Format for Existing - If a document in the image set already contains an image (i.e., bulk imaging or overlay), the production will not attempt to tiff/re-image it. The image that's already present will be used in the production.
-
Imaging Template - An Imaging Template may be selected to specify formatting for different document types.
-
Redactions
-
Burned In - to fully mask redacted text; the default setting.
-
See Through - to show transparent redactions.
-
None - to produce without redactions.
-
-
Always Image Redacted Docs – Creates new images with redactions burned in; the default is checked.
-
Include Annotations - Selects any Highlights, Freehand Annotations, Text Annotations or Sticky Notes to be included.
-
Produce Document Image Files As The Image - When the document type is an image type (i.e., jpg/png), then produce the native as the image, instead of reimaging the image. This is typically used to accelerate production speeds when it contains many high-resolution images. Images produced while using this setting will not receive stamped text (Bates Numbers, Confidentiality Labels, etc.).
NOTE: An exception to this will be when the “Always Image Redacted Docs” setting is selected and the document has redactions, then it will be imaged with the redactions.
-
Luminance cutoff - The luminance cutoff is used to determine if a document has color or not. The higher the value, the brighter the images in a file must appear to be before the file is treated as having color.
-
Color Settings - The remaining items determine format based upon color detection. The default settings are recommended.
For additional details on Luminance cutoff and Color Settings, please refer to Color Detection and Luminance.
- The value of Images will be either None, in which case nothing further is entered here, or Existing, which will require the following configuration settings.
- Under the Numbering tab:
- In preparing to designate Bates number formatting, first set the Sort Order of the documents in the production set. Default is BEGDOC Asc.
NOTE: If you change your sort order from Begin Number Ascending, there is the possibility of document families sorting out of order. -
Numbering: Select
-
New Sequence to begin a fresh production;
-
Next Number to continue an ongoing production; or
-
Use Existing Numbers to use the internal Begin Number values, regardless of whether or not sequential.
-
If it is a New Sequence, set up the Prefix and any Suffix (including any spacer character), Start Number and Number of Digits.
-
If it is not the first production, choose Next Number and from the Image Set dropdown, select the previous production.
- In the Number(s) dropdown, choose the previous production’s number range which will set the next production number in sequence as the start for the new production. The settings from the previous production, such as prefix and number length, appear in the proper fields.
-
-
- In preparing to designate Bates number formatting, first set the Sort Order of the documents in the production set. Default is BEGDOC Asc.
- Under the Stamping tab:
- Set formatting and stamping options for documents and the slip sheets for excluded documents.
- Choose the location for the Production Number stamping or Bates Numbers to appear. The most common location is lower right corner.
-
Select if you want any Field information from the document record or free Text to appear in any of the locations.
Example: a CONFIDENTIAL stamp on the lower left corner is common.
-
Excluded: Same as Included - Select this checkbox to replicate all stamping settings for the Included Documents to the Excluded Documents. You may optionally configure the Excluded Documents tab differently if this is not checked.
- Under the Notifications tab: Use the Notifications tab to select which Users and Teams should get notices regarding the completion of the production job.
- Under the Slip Sheet tab: The Slip Sheet tab controls what documents are considered Excluded Documents for the production. Excluded documents will receive a slip sheet as its produced image. The following settings are required here:
- Text Location
- Template for slip sheet information and formatting, as may be selected from the Project Admin Templates section.
- Conditions - Conditions set the rules for what documents are considered Excluded Documents for the production and will receive slip sheets as their image. See How to Create a Production Job for more details.
- Select ADD to create the production job and be returned to the Production Management screen.
- Under the Documents tab:
- Clicking the arrow next to the Production Job number, select Start Preprocessing - All documents. See How to Run Production Job Preprocessing for details on running this evaluation step and handling any errors that are turned up.
- After Preprocessing is complete and all errors resolved, click the arrow next to the Production Job number, select Start Full Processing - Imaging and Stamping. See How to Run Production Job Preprocessing for details on running this evaluation step and handling any errors that are turned up. When this process is complete, a green checkmark will appear next to the production job.
- Production Export is where the final output is specified and processed for download. See How to Run Production Job Export for further details.
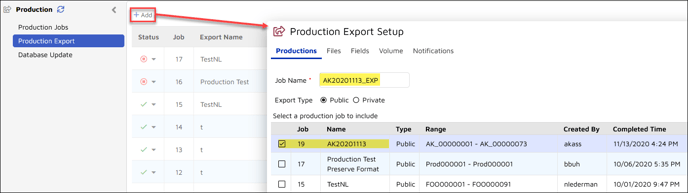
- Choose Production Export from the grey side menu.
- Click the +Add button.
- Under the Productions tab:
- Enter the production export's Job Name. It is helpful if the Production Job and Production Export are similarly named.
- Choose the Export Type (Public or Private).
- Select the Production Job to export.
- Under the Files tab:
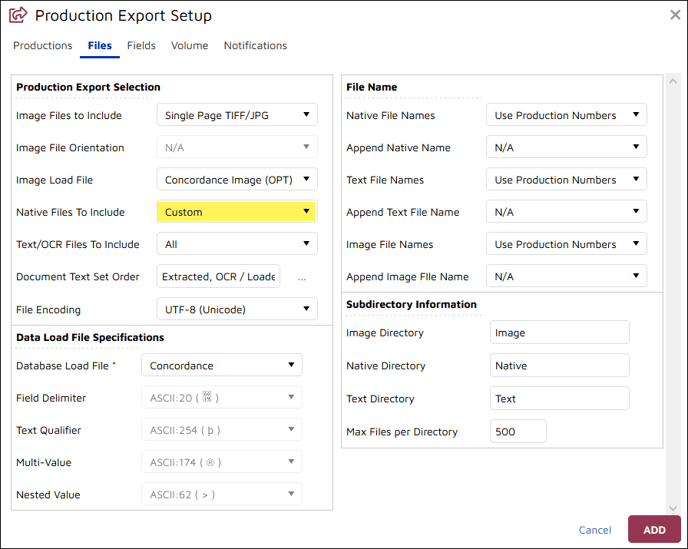
- Select the type of Image Files to Include, with their Image File Orientation (if PDF is selected) and Image Load File type.
- Set Native Files to Include, either None, All or Custom specification.
-
Set the Text/OCR Files to Include in the same manner as set out for Native Files above.
-
Set the Document Text Set Order to determine which Text Sets will be examined first for production if Text/OCR Files are to be included.
-
Select File Encoding from between the default UTF-8 (Unicode) and Western European (Windows). The default supports a broader range of character sets.
- Set the Data Load File Specifications to Concordance or adjust if using custom settings.
- Native, Text and Image Files Names will usually Use Production Numbers. The Append options are rarely used.
- Under Subdirectory Information you may set the name for each of the Native, Image and Text directories in the production export, along with the maximum number of files per folder.
- Under the Fields, Volume, and Notification Tabs:
- Use the Fields tab to select and order the metadata fields to be included in the export load file.
- The Volume tab allows you to set the name of the Volume and adjust the number padding if needed.
- The Notifications tab allows you to select Users or Teams that are notified when the production export is completed.
- Choose Add to complete the Production Export Job creation.
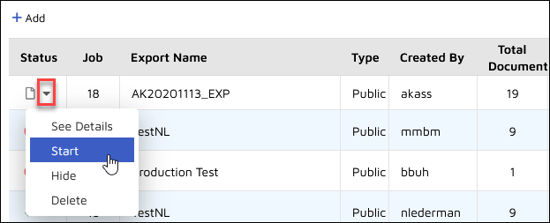
- Click Start in the Production Export Job menu to run the export.
- You will be asked for confirmation on start. Once the job is started a grey gear will appear in the Status column. The gear will turn green and spin while the job is processing.
- When the job is complete, an option to Download the production package appears in the Production Export Job menu. When this is selected, a window opens enabling you to select the download location for the production ZIP package.
- If the export is particularly large, it may not be downloadable from this location and might require assistance from an Administrator with access to the Reveal Review Manager.
- Production Database Update is the final step in the production process. To update Production Bates Numbers and Image Sets in the project database:
- Choose Database Update from the grey side menu.
- Click the +Add button.
-
Enter a Job Name.
-
Select the Production Job for database update.
- Under the Settings tab:
-
Select Add Production(s) to Image View as display options for Review.
-
Add or Select and Edit the Image Set to which the production images should be added.
-
Check Mark Documents as Produced.
-
Check Add Page Count to update that information for each produced document (if not already populated).
-
Lastly, set Production Number Fields to which production numbering will be recorded in each document record for:
-
Begin Production Number - usually Begin Bates
-
End Production Number - usually End Bates
-
Begin Production Attachment - usually Begin Bates Attach
-
End Production Attachment - usually End Bates Attach
-
-
Click Save to save the job. You also have the option to open and re-specify an existing job with a new Job Name and Production Job selection and Save As New.
-
-
Once the Database Update Job has been created, it needs to Start from the Status column dropdown menu for the job on the Database Update Jobs list. You will be asked for confirmation on start.
-
Once the job is started a grey gear will appear in the Status column. The gear will turn green and spin while the job is processing, which should not take very long. A green checkmark will appear in the Status column when done.
-
The production process is complete with this step.
Last Updated 10/26/2023