
This article provides both visual and written instructions for test running a production job to evaluate and correct errors.
Video Tutorial
When a Production Job is created, running the Preproduction function allows you to gain information about the job, such as total documents, pages and, most importantly, draw attention to any documents that may error out during production. Information regarding privileged documents and excluded documents discovered in preprocessing are also included in the table.
This is an ideal tool to give attorneys a preview of what should be expected and fix any errors that may be indicated during preprocessing. It also allows you to manage a very large or rolling production in more functional sections. To start the preproduction process:
- Log in to Reveal as an Administrator or Client Administrator.
- Open the project from the Project Hub.
- Click Admin and open Production.
- Create a Production Job as described in How to Create a Production Job.
- Select the dropdown arrow next to your new Production Job and choose Start Preprocessing - New Documents Only. You will be asked to confirm on start. You also see the ability to reprocess errors from earlier production jobs’ preprocessing.
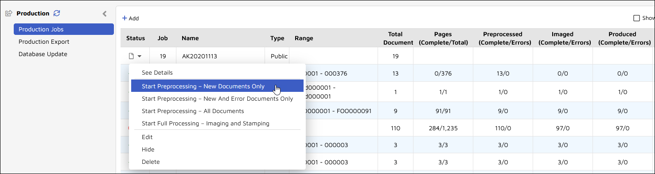
- You also see the ability to see and edit details and reprocess errors from earlier production jobs’ preprocessing in the following choices:
- See Details - Examine settings for the Production Job.
- Start Preprocessing - New and Error Documents Only - Will run against any new production job or any previous production job where documents have been added or errors encountered.
- Start Preprocessing - All Documents - Will preprocess the entire production job.
- Start Full Processing - Imaging and Stamping - Kicks off live processing of production.
- Edit - Opens production job settings for modification.
- Hide - Suppresses display in the Production Jobs table of a job that may have been superseded or will otherwise not be used.
- Delete - Removes the production job.
- When a preprocessing job is run, a large Production Job will take time to run. The Refresh Jobs button is used to refresh the screen and update totals as the processing runs. When the preprocessing is complete, the icon next to the production job is a green check mark.

- The numbers in the columns after the Job number, Name and Type (e.g. Public) indicate:
-
Bates Range
-
Total number of Documents
-
Pages that have been produced/completed
NOTE: Preproduction will still indicate zero documents completed as the production has not run yet. -
Preprocessing completion and errors
-
Imaging completion and errors
-
Items produced and errors
-
Number of Excluded items
-
Created by (User)
-
Start date and time
-
End date and time
-
- If any errors are reported examine the type and cause and then re-run preprocessing for the job under its dropdown Status menu using Start Preprocessing - New and Error Documents Only. Most common errors noted during preprocessing require:
-
Checking links to native files,
-
Replacing corrupt native files, or
-
Adjusting excluded documents settings referencing either file extension or work folder.
-
- After fixing any errors or choosing to exclude error causing documents, opening the dropdown arrow again you can choose Start Preprocessing - New and Error Documents Only.
- Once all errors have been addressed and verified as resolved, you may run the production job.
Last Updated 9/29/2023