
This article provides both visual and written instructions for exporting a production job.
Non-Audio Video Tutorial
Produced documents are exported with associated load files using the Production Export function.
With the deployment of Reveal 11.9, updates will be implemented without interrupting running production export jobs. This will facilitate continuous improvement of Reveal without impact on workflow.
- Log in to Reveal as an Administrator or Client Administrator.
- Open the project from the Project Hub.
- Click Project Admin and open Production.
- Create, preprocess and run a Production Job as described in How to Create a Production Job, How to Run Production Job Preprocessing and How to Run a Production Job.
- Choose Production Export from the grey side menu.
- Click the +Add button.
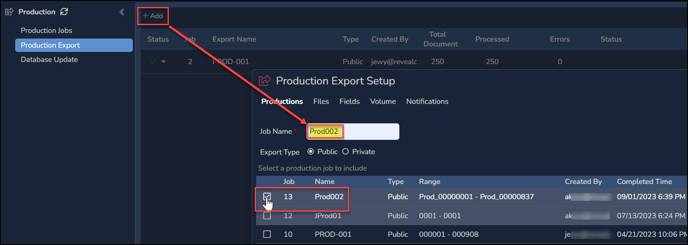
- The Production Export Setup screen opens to the Productions tab.
- Create a Job Name for the Production Export Job.
- You may optionally change the Export Type from Public to Private.
- Select which Production Job should be exported. The Production Job must be completed (with a green checkmark) in Production Jobs to be listed for export.
The Files Tab
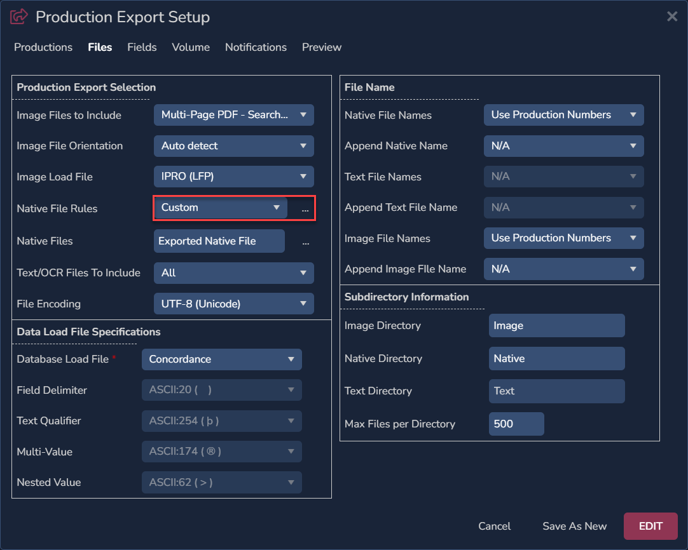
Set the following:
- The type of Image Files to Include:
- None
- Single Page
- Multi-Page PDF - Non-Searchable
- Multi-Page PDF - Searchable
- Image File Orientation is only settable for PDF generation, as
- Auto detect,
- Portrait or
- Landscape.
- Image Load File may be
- None,
- Concordance Image (OPT) [default for single-page TIFF] or
- IPRO (LFP) [default for multi-page PDF].
- Native Files Rules opens to None, All or Custom. If native files are to be included in the export, select a value from the drop-down list, which is expanded if Custom is selected.
-2.png?quality=high&width=550&height=550&name=57%20-%2003%20-%20Production%20export%20-%20Native%20Files%20(Custom)-2.png)
- If no native files are to be included, select None.
- If all the native files are to be included, select All.
- Selecting Custom will open the Native File Rules modal shown above, where the listed items are presented in order of priority (e.g., Privileged setting will outweigh any setting below it in case of contention for a given document). The Rule sets are:
- Privileged - Defaults to Do Not Export.
- Redacted - Defaults to Do Not Export.
- Slip-Sheeted - Select Export if you wish to selectively export native files falling under one or more of the defined slip sheet rules templates.
NOTE: The slipsheet rules will not automatically be selected when using a previously run Production Export job. Reveal does not assume that the exclusion rules present in one production job will be present in another production job. The Exclusion Rules categories are loaded dynamically each time the Production Export window is displayed and it makes a call to retrieve the production job that is selected to populate the exclusion rules categories at that time. - Errors – Select to if you wish to export files where images could not be created.
- All Other Files – Select to optionally specify inclusion of documents found in a selected saved search.
NOTE: Files that exist in multiple categories such as Excluded and Privilege or Excluded and Redacted will use the setting in the Redacted/Privilege section to ensure important/privilege data isn’t accidentally included in a production.
In addition, if Custom is selected, a Native Files field is opened.
- Native Files allows users to select the Imaging Template specifying the metadata field specifying from which to generate native file output. This is particularly useful in Australian review, where redaction of generated PDF copy may be required.
-1.png?quality=high&width=350&height=396&name=57%20-%2003a%20-%20Production%20export%20-%20Native%20Files%20(Text%20Set)-1.png)
- First Native Found allows the user to re-order from the Image Template default (here, Exported Native File) by selecting and clicking SAVE, or re-ordering using the grab handle to the left of the item.
- All Natives Selected will remove the grab handles and generate native file output for all native files in a document.
- +Add allows further available document natives to be added to the list of Native Files, while Delete removes items from the list.
- Set the Text/OCR Files to Include in the same manner as set out for Native Files above, allowing selection of Errors, Excluded, Redacted, Privileged and Remaining.
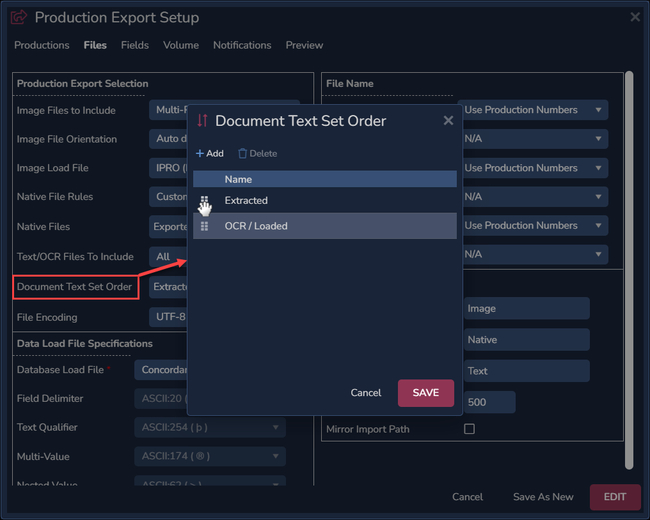
- If multiple Text Sets have been selected under Native Files, Document Text Set Order will be added to allow you to select the order in which the text sets should be considered for export.
- Select File Encoding from between the default UTF-8 (Unicode) and Western European (Windows). The default supports a broader range of character sets.
- Data Load File Specifications defaults to Concordance or may be changed to Comma separated (.csv), Tab Delimited (.txt), Concordance (AUS) or Custom settings with delimiter and qualifier characters to be specified below.
- Set the Native File Names option, commonly Use Production Numbers. You also have the options to Use Original Beg Doc Numbers, Use Begin Bates Numbers or Use File Name. That last option will use a native file’s original name for production native files.
- Append Native Name offers the rarely used option to append a selected field value to the native file name.
- Set the Text File and Image File Names options, commonly Use Production Numbers, or may be specified as with Native File Names above.
- Append Text File Name and Append Image File Name offer the rarely used option to append a selected field value to each of the text and image file names.
- Under Subdirectory Information you may set the name for each of the Native, Image and Text directories in the production export, along with the maximum number of files per folder.
The Fields, Volume, and Notification Tabs
- Use the Fields tab to select and order the metadata fields to be included in the export load file.
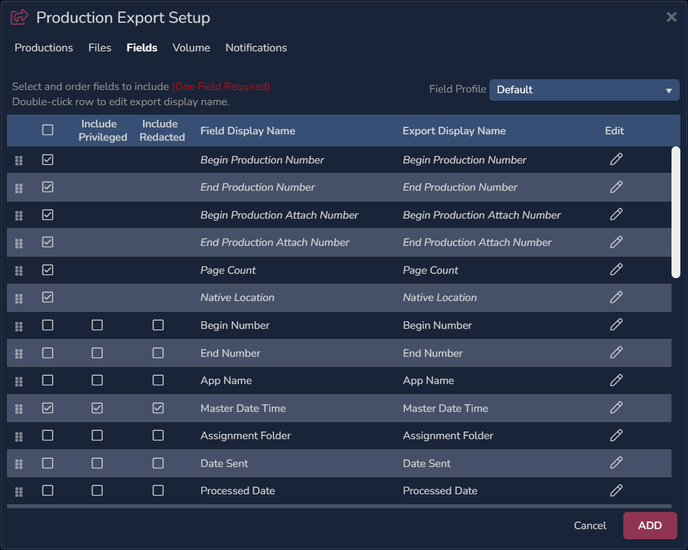
- Check in the first column to select or deselect a metadata field.
- There is an option to Include Privileged document metadata when exporting the production.
- There is an option to Include Redacted document metadata when exporting the production.
- Field names can be changed in the export if desired using Edit.
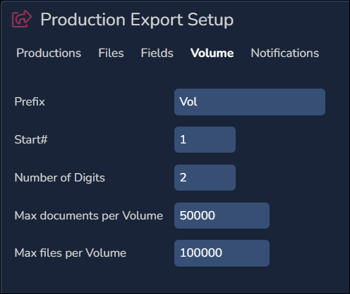
- The Volume tab allows you to set the name of the Volume and adjust the number padding if needed.
- The Notifications tab allows you to select Users or Teams that are notified when the production export is completed.
- Choose Add to complete the Production Export Job creation.
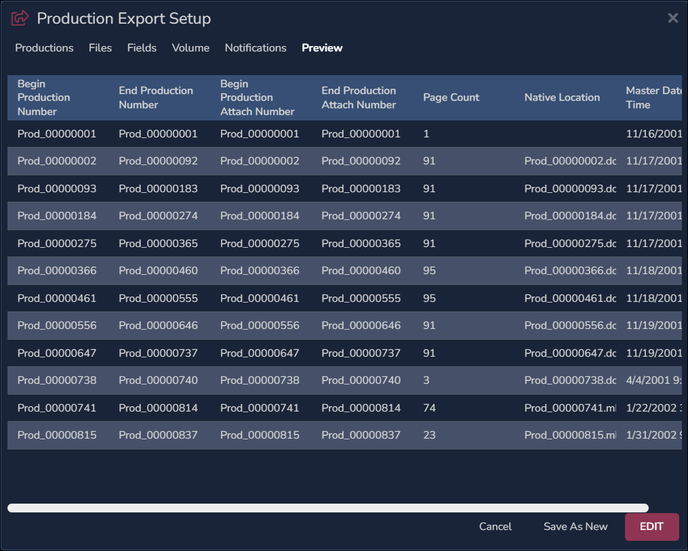
- Once the job has been created, a Preview tab will appear that will show the document metadata to be exported with production numbering and page counts. This screen offers the choices to Cancel, Save as New or Edit. Choosing Edit will return you to the Production Export table and allow you to edit the Export job before submitting it to be processed.
Running the Production Export Job
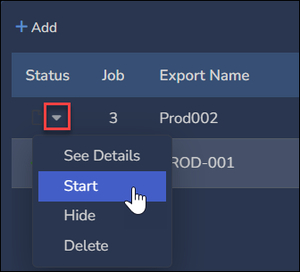
- Once the Production Export Job has been created, it needs to Start from the Status column dropdown menu for the job on the Production Export Jobs list.
- Under this menu you may also examine the details of the job and adjust if needed.
- You will be asked for confirmation on start. Once the job is started a grey gear will appear in the Status column. The gear will turn green and spin while the job is processing.

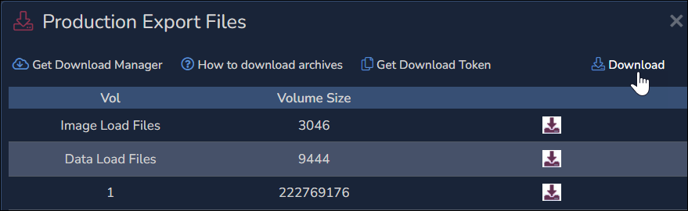
- When the job is complete, there is an option to Download the production package from the Production Export status menu for the job.
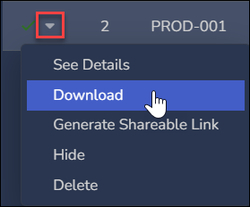
- When this is selected, a window opens enabling you to select the download location for the package.
- If the export is particularly large, it may not be downloadable from this location and might require assistance from an Administrator with access to the Reveal Review Manager.
- In general, the files may be downloaded directly using the icon at the right of the Production Export Files table.
- Users can allow others to download production exports from Reveal even if they are not users of Reveal using the 'Generate Shareable Link to Production Exports' function in the job’s Production Export Status menu. This feature is perfect for sharing production exports with opposing counsel. These shareable links are limited in use to seven days.
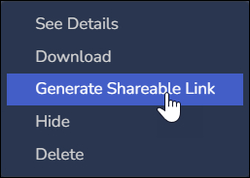
- Please be careful when sharing these links as they will allow anyone with the link to download the production export and they cannot be revoked until they expire in seven days.
- Users can allow others to download production exports from Reveal even if they are not users of Reveal using the 'Generate Shareable Link to Production Exports' function in the job’s Production Export Status menu. This feature is perfect for sharing production exports with opposing counsel. These shareable links are limited in use to seven days.
- See Production Database Update for the final step in the production process.
Last Updated 10/11/2023