
This article provides both visual and written instructions for loading document data for a project.
The most efficient method for loading large tranches of raw discovery data is via Reveal Processing. Fully integrated with Reveal Processing offers optimized performance and filtering controls to load good data quickly and accurately into Reveal.
- Create a project either in Reveal or in Reveal Processing.
- See How to Create a Project to see how to create a project in Reveal.
- See How to Create a Processing Project to see how to create a project in Reveal Processing.
- Define a Processing job in the Imports Module of Reveal Processing.
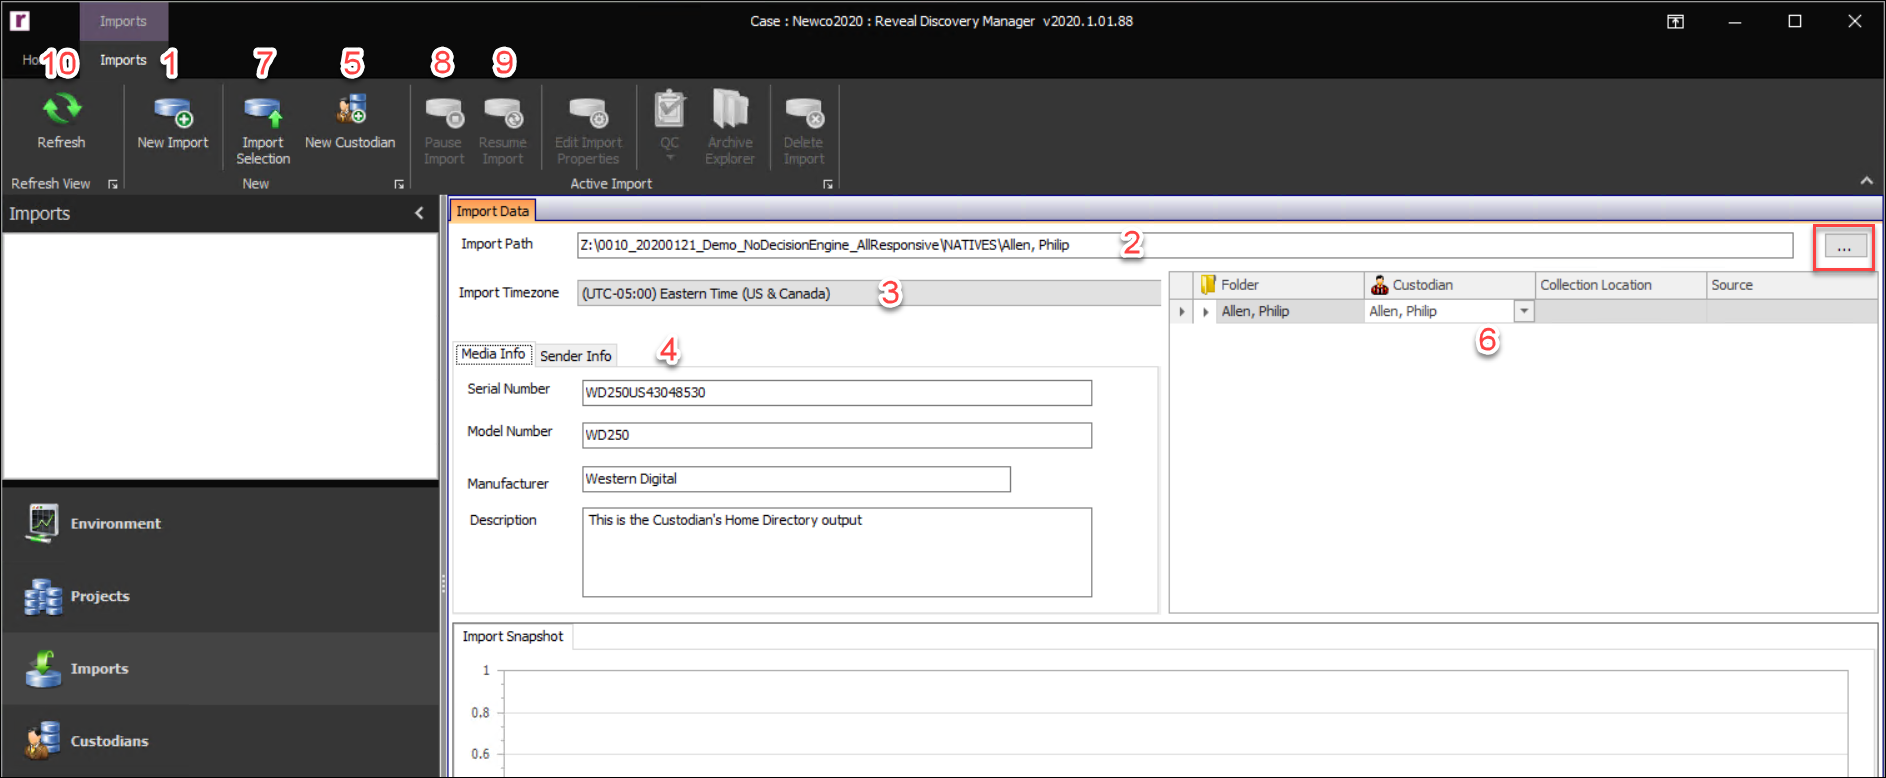
Reveal Processing Imports Module
-
New Import – Click the New Import button in the Import Ribbon to launch the Import Data form.
-
Import Path – The Import Path is set to default to the S3 data store bucket for your account. This location and the access keys required are configured during installation.

-
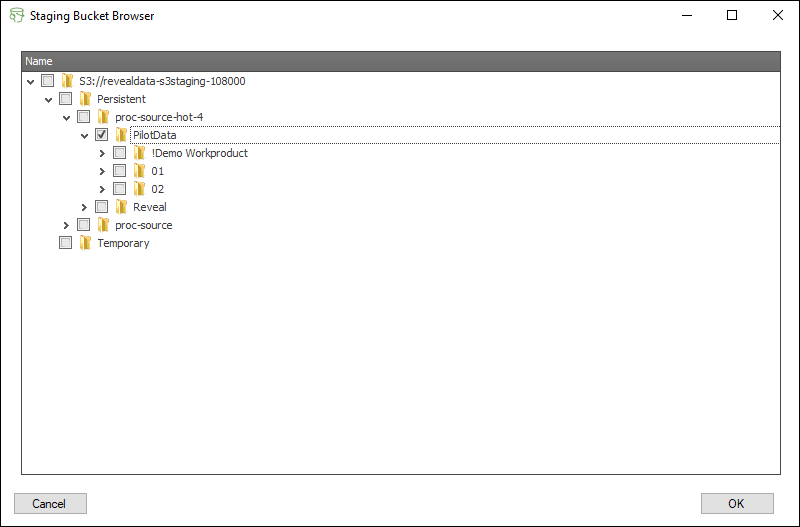
Clicking the green button to the right of this field opens the Staging Bucket Browser.

-
There are two main stores within the S3 bucket:
-
Persistent - Data in this store is retained even after ingestion and processing. Unless removed within 30 days these data are charged as inactive storage.
-
Temporary - Data in this store is automatically deleted after 30 days so no reminder to remove is required after import and QC are complete.
NOTE: Only one folder and all its sub-folders under either store may be selected for import at one time. In the below example, everything under the PilotData selection will be imported.
-
On-premise users may browse to the top level folder of the source data by clicking the [...] button and choose the source folder.
-
-
- Import Timezone – By default, the timezone is set to the local timezone of the machine. If the data was collected in a different timezone, click the drop-down menu and choose the timezone according to the location of the collection.
At this point the data can be imported without any other settings by clicking the Import Selection button in the Imports Ribbon. - Import Details – There are two types of additional details that can be added to an import:
-
-
Media Info – If the import is located on a hard drive, enter the hard drive’s serial number, model number, and the manufacturer of the hard drive to track the hard drive. A description of the data can also be added to help better track the data.
This information can be edited or added after an import completes by clicking the Edit Import Properties button in the Imports Ribbon.
-
Sender Information – To track the sender of the data, enter the contact’s information. Click the […] button to upload the Chain of Custody.
-
-
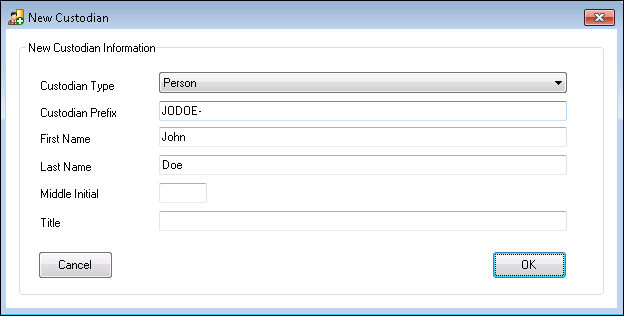
- New Custodian – To create a new Custodian click the New Custodian button in the Imports Ribbon and the form below will appear. There are two types of Custodians that can be created. Each Custodian requires the input of a Custodian Prefix. One of the settings in Export is Custodian Prefix Incremental when it comes to numbering the files. This will add the Export Prefix onto the number for files pertaining to the Custodian within any scope.
-
-
Person – This is the default Custodian Type. The minimum information for a Person Custodian is the First Name and Last Name. After filling out the New Custodian form, click OK.
-
Entity – The other Custodian Type is Entity. This Custodian Type allows for only one name if necessary. To create an Entity Custodian, click the Custodian Type drop-down, change it to Entity, and enter the Entity Name. After filling out the New Custodian form, click OK.
-
-
-
Import Custodian Assignment – If the import belongs to one or more Custodian(s), the data can be assigned to the Custodian(s) automatically by clicking the drop-down menu and choosing the applicable Custodian(s). If it is preferred to assign the data to the Custodian(s) after the data is imported, the default Unassigned Custodian may be assigned within the Custodian Management Module after the import completes.
-
Import Selection – Click the Import Selection button in the Import Ribbon to import all of the data under the source folder.
-
Pause Import – This will pause the import, so that the import can be resumed later. There are several reasons to pause an import, but the two most common reasons are to start importing data that has priority over the suspended data.
-
Resume Import – This will resume any import that was suspended or interrupted abruptly.
-
Refresh – Click the Refresh button in the Import Ribbon to refresh the Imports Module to show new imports as well as to update the import group’s statistics.
See Reveal Processing Import Module for further details.
Exporting Processed Data to Reveal
Once the imported data has been processed and collected using searches in a Selective Set, the Export Module creates, manages and deletes exports for the project. There are six main types of exports: Parent/Child, Natives Only, Overlay, Review (Append), Review (Overlay) and Australian Protocols. This section will discuss exporting to Reveal using Review (Append) and Review (Overlay).
-
Review (Append) - sends the export as fresh documents to the Reveal project.
-
Review (Overlay) - updates a Review (Append) Export with additional or updated information.
The processes described below take place under the Export Module in Reveal Processing. 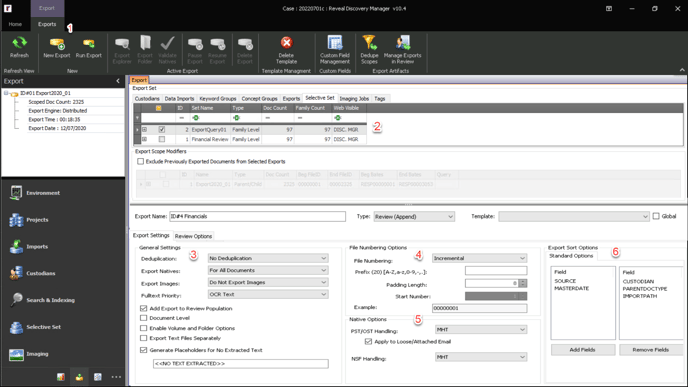
- New Export – To create an export click the New Export button.
- Export Set – Each tab contains a table of data subsets created within the different modules which may be selected for the export. There is an option to Exclude Previously Exported Documents from Selected Exports if the possibility of duplication exists between the prior and new Exports.
-
Export Settings –
-
Export Name – Supply each export a name by typing in the Export Name text box.
-
Type – Choose one of the six export types, here Review (Append) to add documents to a Reveal Review. If updating a prior Review export, use Review (Overlay). For more information about these export types, please Reveal Processing - Export Module.
-
Template – Saved Export settings may be selected here. Otherwise, after choosing all Export Settings and clicking the Run Export button the last step when performing an Export is the Save As Template form. After entering a Template Name, all Export Settings chosen for this job will be saved for future exports. To recall this template for a future export, click the drop-down and choose the applicable template.
-
Deduplication – This setting dictates the duplicate handling that will be applied within the export. Choose between No Deduplication (default), Custodian Level, Project Level or a Custom Dedupe Scope as defined under Dedupe Scopes in the Export toolbar. To change the Deduplication handling choose one of the settings from the drop-down menu.
-
Export Natives – By default, all native files are exported within an export. To suppress native files from an export, click the drop-down and choose For No Documents, and native files will not be exported.
-
Export Images – By default, no images are exported within an Export.
-
Fulltext Priority – A file can contain electronic extracted text and OCR text. By default, the OCR text will be exported out for a file first. If using the electronic extracted text instead of the OCR text is desired, choose Extracted Text.
-
Add Export to Review Population – Checked by default to push the export directly into the Reveal project.
-
Document Level – By default, families are never broken in a Parent/Child Export. To Export files without their family members, click the checkbox Document Level.
-
Enable Volume and Folder Options – To control the Export volume foldering, numbering convention, sizes, and maximum number of items per folder, click the checkbox Enable Volume and Folder Options, and the Volume and Folder Options tab will appear. Not used in Review exports.
-
Export Text Files Separately – This setting will export a separate text file named after the FILEID per native file containing the extracted text for the file from the FULLTEXT field. The text files and a load file will be placed at the root of the Export folder in a folder named TEXT. The load file will contain the FILEID and the path to the exported text file.
-
Generate Placeholders for No Extracted Text – This setting will add the value <<NO EXTRACTED TEXT>> in the DAT file or the separate text file for the files where there was no extracted text. Not used in Review exports.
-
-
File Numbering Options – This setting only applies to Parent/Child or Production exports and dictates the file numbering within the export. The number used will be applied to the resulting native file, text file (if the setting Export Text Files Separately is chosen), and all FILEID related fields within the load file.
-
Native Export Options – These settings affect PST/OST handling (including loose or attached mails) and NSF handling.
- Export Sort Options – By default, exports are sorted by CUSTODIAN, PARENTDOCTYPE, IMPORTPATH. To change the sort order of the export, add the fields in the order in which the export should be sorted.
- Review Options tab - Optional field mapping may be defined and saved here.
- When all options are set, click Run Export in the Export toolbar.
- An Export Summary will appear, allowing you to confirm settings, with the options Go Back and Continue.
- On clicking Continue, there will be a prompt to save the Export template.
- To Save And Continue, enter a name and a scope (Project or Global). The Export will commence when the button is clicked.
- Continue Without Saving to simply run the Export.
- Cancel to exit the Export process.
- Monitor progress using the bar graph on the Export screen, which shows the progress of each aspect of the export and watch for any errors.
- When the export is complete, open Reveal to the project receiving the Review (Append) and check the Imports folder under Folders > Admin Views in the Dashboard's Sidebar.
Last Updated 3/26/2024