
This article provides both visual and written instructions for setting up and assigning users to projects across a Company instance.
Non-Audio Video Tutorial
Users in Reveal are created under the Company and are assigned to Projects. The creation and management of Users is done by project managers and administrators either in Reveal's Review Manager application or in Company Admin section within Reveal 11. Here are the steps to setting up a new User, first under the Users tab in Company Admin, then in Reveal Review Manager. User accounts may also be managed under the Company screen in the Users sub-tab.
Creating a User under Company Admin
- Log in to Reveal as an Administrator.
- Select Company Admin from the Navigation Panel.
- Company Admin will open to the Users screen, listing current Users.
- To create a User, click Create User at the upper left corner of the Users table.

-
User Name must be unique (required).
-
First Name (required).
-
Last Name (required).
-
Email address (required).
-
Send Password Reset Email is checked by default and is the only option for setting passwords.
-
Enable User is checked by default when a user is created.
- You may Show more optional fields for capturing language information for the User.
-
Next assign the User to a Company by selecting a Company and moving it to the Assigned window at right.
-
Can designate User as Regular or a company Admin in the Assigned window.
-
-
The User may be assigned to one or more Projects from this screen as well by selecting one or more Projects to move to the Assigned window at right.
-
In selecting a project, be sure to select the Group in which the User should be placed for that project.
-
-
Click Save when done.
Creating a User in Review Manager
- Log into Review Manager as an Administrator.
- Open the Project Setup Pane.
- Click Users.
- The Users work area opens to the Users by Project tab. All existing Users for the project are listed. (There is also a tab for Projects by User which displays each user's projects.)
- Select Project from the dropdown list of all projects with which to initially associate the new user.
-
Choose Add to add users to the case. The User List appears.
-
Select any existing users from the list for a project by placing a check mark next to each name.
-
Use the Create New button to create any new users if needed.
-
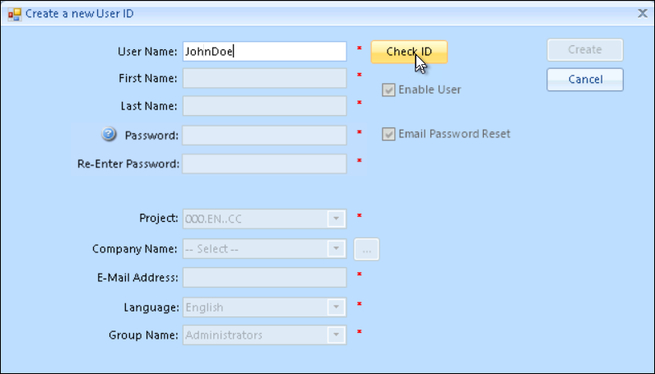
In the Create a new User ID window, enter the proposed User Name and select Check ID to make sure that ID is not already taken. If the User ID is available, then the rest of the fields (except Project, which may not be selected here) become active, allowing you to complete the creation process; all below are required fields that are marked with a red asterisk.
- Company Name: Select the company from the list under which this User account will be created. If the company instance does not yet exist, it may be created using the option [...] button at right.
- E-Mail Address: For notifications and messaging.
- Language: Sets the default language for the User's interface.
- Group Name: Assigns the users to a role group, setting permissions for the initially assigned project.
-
Choose Create to complete the process.
- Back in the Users List, click Add to populate the project with users.
- Assign the added users to an initial Role Group; at least one Administrator will be needed to open and manage the project.
Last Updated 1/30/2024